HTML Canvas Games from Scratch #4

Reading Time: 6 minutes

HTML Canvas Games from Scratch #4

Hello devs!🎮
Let us continue with the game👾
Now we need to implement these functionalities to complete the game:

  • Collide bullets with aliens
  • Healthbar for the player
  • Respawning of aliens
  • Background
  • Score calculation and game over

Let’s do it! 🚀

Phase 4

So we will begin with the code we left last time.
If you don’t already have it, you can download it from : HERE
So we will follow the order of functionalities given above.

Bullet alien collision💥:

So the alien should die if the bullet touches the alien’s body. To do this we will implement a distance() function which will take the coordinates of the alien and the bullet in consideration and check if any collisions occur. We will be iterating through the array Aliens and the array Bullets to check for each pair of {alien , bullet} to check for a collision. Let’s code!

//Checking for bullet kill  
for(i=0;i<Bullets.length;i++)
{
for(j=0;j<maxAliens;j++)
{
if(Math.abs(Bullets[i].x - Aliens[j].x) <= 18 && Bullets[i].y <= Aliens[j].y && Bullets[i].y>=Aliens[j].y-20 && (player.y - Aliens[j].y) >= 38 )
{
kills++;
Bullets[i].y = -10;
var addAlien = new alien(Math.random()*(window.innerWidth-100)+60, Math.random()*(window.innerHeight/2-300),Math.floor(Math.random()*2));
Aliens[j] = addAlien;
}
}
}

Now let us analyse this code.

We are traversing through both the arrays and checking for 4 conditions :

  • Absolute distance between bullet and alien in x axis is less than or equal to 18 (as the aliens are almost 36px in width).
  • The y coordinate of the bullet is less than the y coordinate of the alien.
  • The y coordinate of the bullet is greater than ( alien.y - 20 ).(as the aliens are almost 40px in height)
  • The y coordinate of the space shuttle (center) is at least 38px below the aliens center.(this ensures that the alien and space shuttle are not )

If these conditions are satisfied, we :

  • Update number of kills (variable kills++)
  • Send the bullet out of the screen (y = -10)
  • Add a new alien in place of the dead alien.

Source Code : Code Link
Location in repository : \Phase 4\BulletCollisions


Try and run this code yourself to see the output.
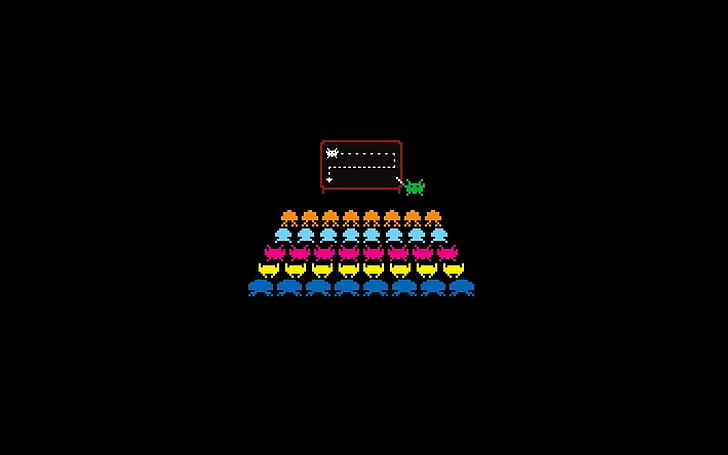
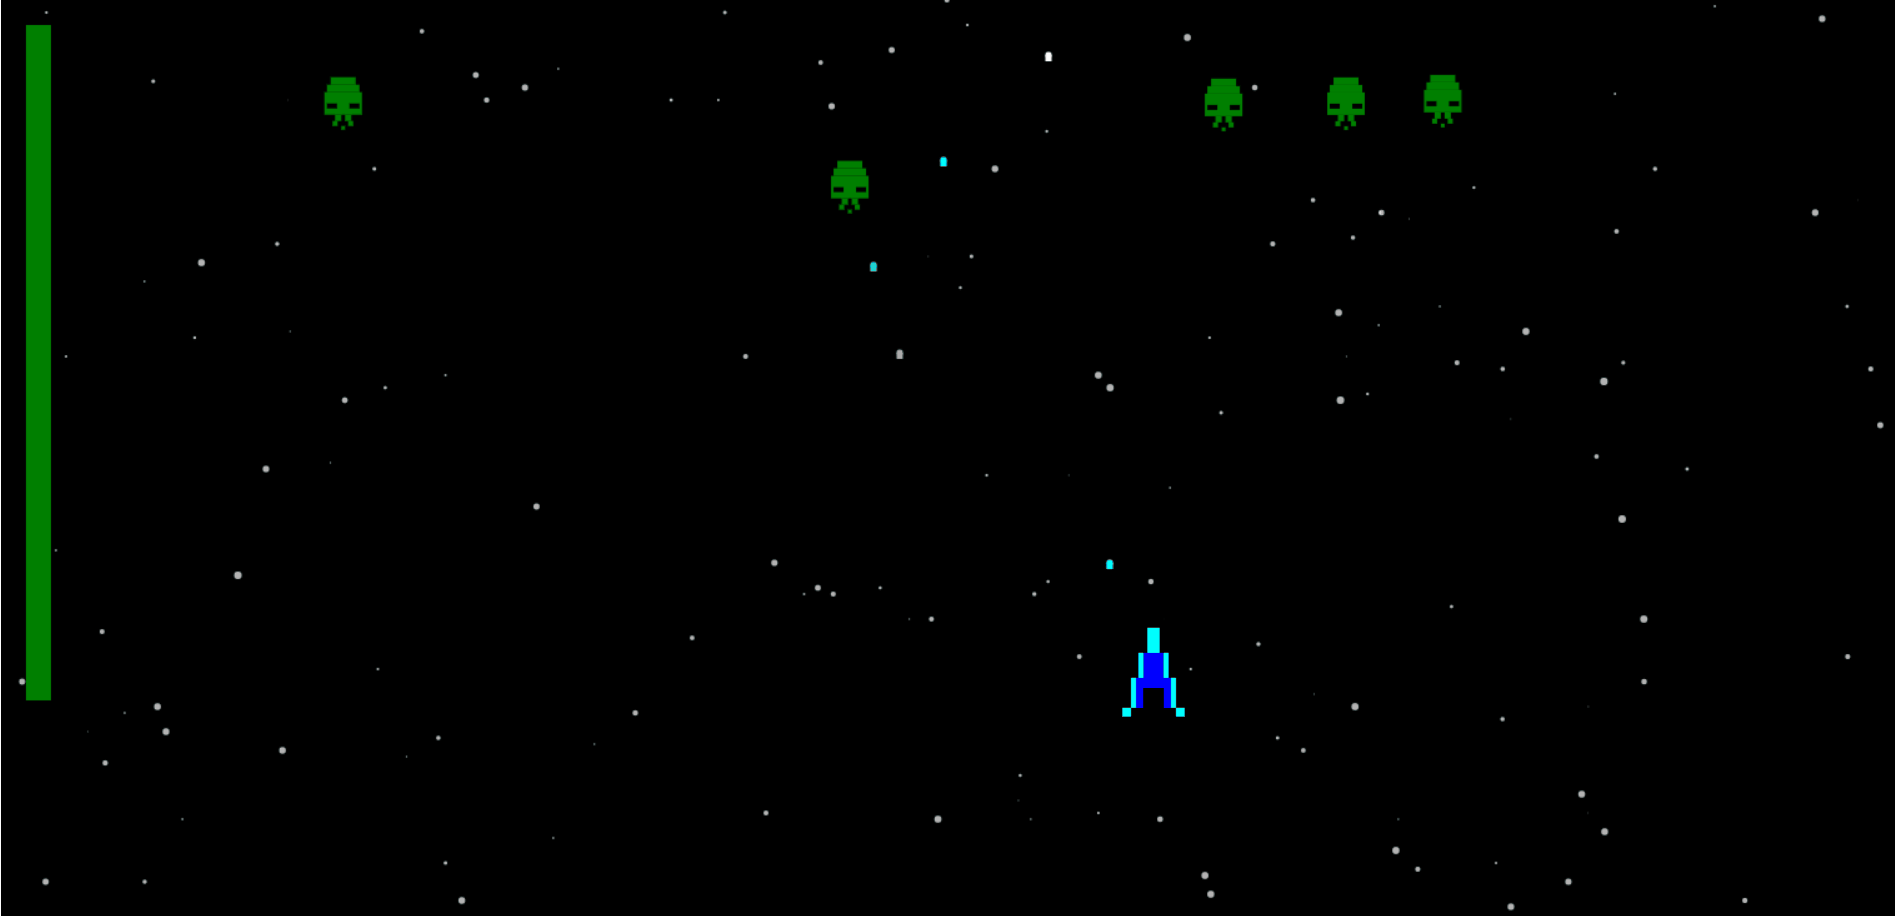
Healthbar❤️:

For this we define a new variable called healthBarHeight.
So out health bar height will depend on the health variable, which is initially valued 90. As the aliens touch the shuttle, or the aliens *pass beyond the screen *, the shuttle’s health is reduced.
Turning it into code :

//Drawing the health bar  
c.beginPath();
if(health == 90){
c.fillStyle = "green";
healthbarHeight = 90*6;
}
else if(health == 60){
c.fillStyle = "orange";
healthbarHeight = 60*6;
}
else if(health == 30){
c.fillStyle = "red";
healthbarHeight = 30*6;
}
else{
healthbarHeight = 0;
}
c.fillRect(20, 20, 20 , healthbarHeight );
c.closePath();
c.fill();

Note : All this is written inside the draw() function.

Well we also need to handle the cases where the player loses health. Write this inside the draw() function :

for( j=0 ; j<Aliens.length ; j++)
{
if(Math.abs(Aliens[j].y - testShuttle.y) <= 60 && Math.abs(Aliens[j].x - testShuttle.x)<=18 || Aliens[j].y >= window.innerHeight -30){
health-=30;
var addAlien = new alien(Math.random()*(window.innerWidth-100)+60, Math.random()*(window.innerHeight/2-300),Math.floor(Math.random()*2));
Aliens[j] = addAlien;
}
}

Try to check what conditions are handled.


Note : As soon as any of the conditions are satisfied, we have also killed the alien. Try removing the last 2 lines inside the if statement and then run the code and see the outcome.

The healthbar would looks something like this :
https://github.com/jrathod9/Making-of-Space-X-/blob/master/Phase%204/Health/Healthbar.png

Source Code : Code Link
Location in repository : \Phase 4\Health


Note : We still need to add the “Game Over” condition. We will do that at the end.

Before moving forward, let us code to increase the difficulty with score.
I.e. as kills increase, so will the speed of the aliens and the number of aliens:

var level = 0; //Declare this at the top  
//Increase difficulty with kills  
//Add this inside "Checking for bullet kill" after Aliens[j] = addAlien;  
if(kills % 10 == 0){
alienSpeed += 0.1;
}
if(kills % 20 == 0){
level++;
var levelupAlien = new alien(Math.random()*(window.innerWidth-100)+60, Math.random()*(window.innerHeight/2-300),Math.floor(Math.random()*2));
Aliens.push(levelupAlien);
maxAliens++;
}

At every 15 kills we add a new alien, and at every 10 kills we increase the speed.
Source Code : Code Link
Location in repository : \Phase 4\LevelUp
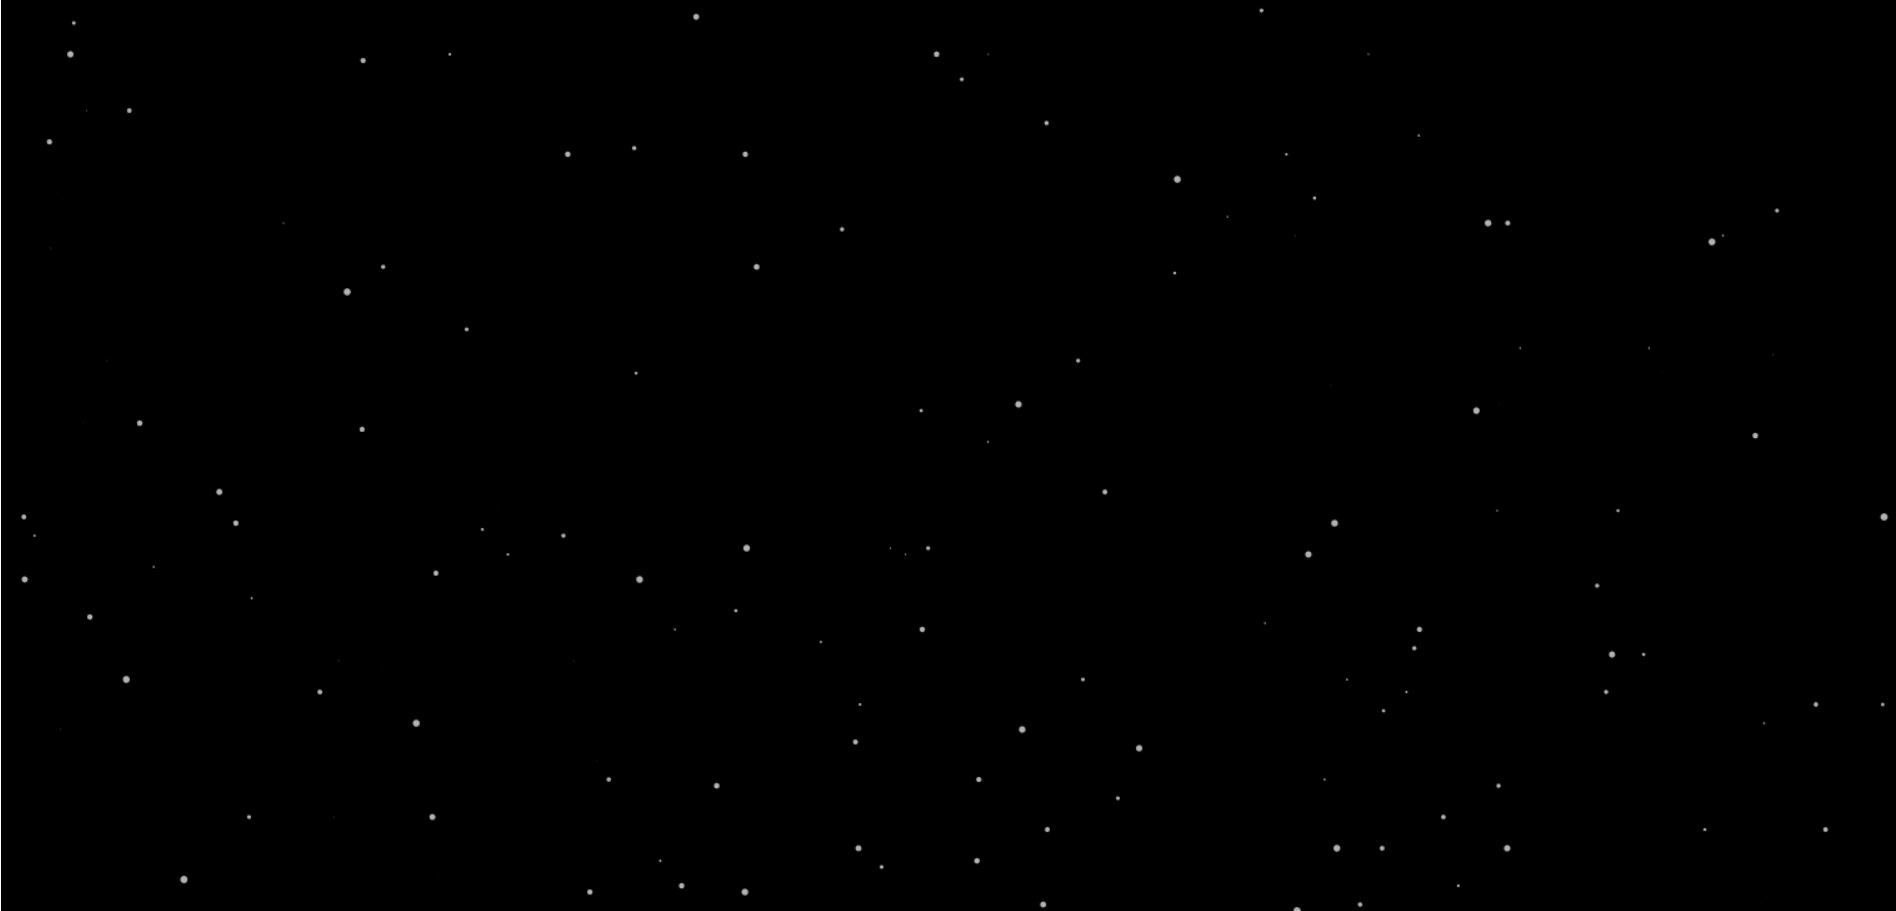
Background✴️:

The game is set in outer space, so whats missing?
Right! Stars✨!
Lets code this separately first:

var maxStars = 150; //Stars on the screen  
var starSpeed = 5;
//Star object  
var star = function(x,y ,rad){
this.x = x;
this.y = y;
this.rad = rad;
}
Stars = new Array(); //Array of stars  
//Filling the array  
for(a = 0; a<maxStars ; a++){
var temp = new star(Math.random()*(window.innerWidth-20), Math.random()*(window.innerHeight-20),Math.random()*3 );
Stars.push(temp);
}

Now we will be drawing these stars, but every time a star leaves the screen we will place it back on the top. Hence it will be like a single screen just repeating itself.
This is how most of the infinite runner games like temple run and subway surfers take up just a few MB of space.
So here goes the draw function :

function draw(){
//Clear window  
c.clearRect(0,0,window.innerWidth, window.innerHeight);
//Draw stars  
for(j = 0;j<maxStars ; j++){
c.beginPath();
c.fillStyle = 'rgba(255,255,255,0.7)';
c.arc(Stars[j].x,Stars[j].y,Stars[j].rad , 0 , Math.PI * 2 , false);
Stars[j].y += starSpeed;
//This part send the star back to the top  
if(Stars[j].y >= window.innerHeight-20){
Stars[j].y = 0;
}
c.closePath();
c.fill();
}
requestAnimationFrame(draw);
}
draw();

Result:
https://github.com/jrathod9/Making-of-Space-X-/blob/master/Phase%204/Background/background.gif

Source Code : Code Link
Location in repository : \Phase 4\Background

Now we need to add this to the game . The background will be drawn regardless of what’s going on in the game so let us straightaway merge the code in the game code, resulting in :

https://github.com/jrathod9/Making-of-Space-X-/blob/master/Phase%204/BackgroundMerged/GameWithBackground.gif

Source Code : Code Link
Location in repository : \Phase 4\BackgroundMerged

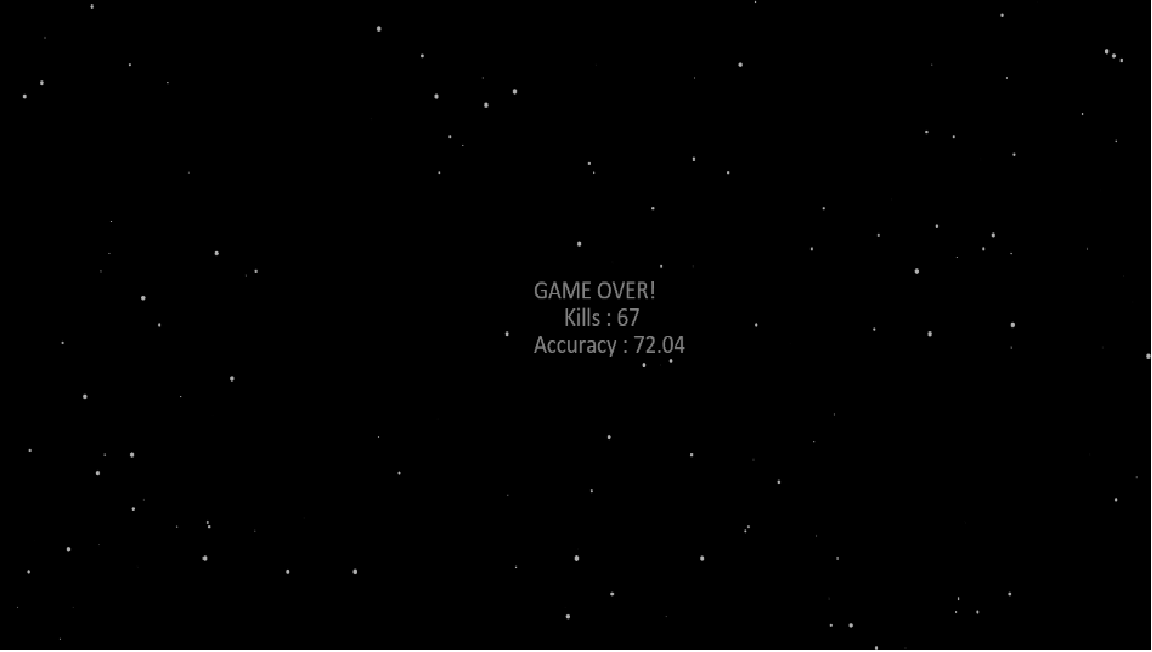
Its time to wrap it up by calculating the score and handling the game over condition.

Game 0ver🎌:

To calculate the score there may be different ways. It totally depends on you how do you want to calculate the score.
I personally feel it is best to check the Accuracy and Level Reached:

var alive = 1; //1 alive 0 dead  
..
..
function draw(){
//Enter code to draw Stars  
..
..
if(alive)
{
//Rest of the game  
..
..
//Check if alien touches shuttle or crosses screen to reduce health  
..
..
if(health == 0) //Check if health is 0  
alive = 0;
..
..
}
else
{
//Score screen  
c.beginPath();
c.fillStyle = 'rgba(255,255,255,0.5)';
c.font = "30px Calibri";
c.fillText("GAME OVER!" , (window.innerWidth-20)/2 - 55 , (window.innerHeight-20)/2 - 30);
c.fillText("Kills : " + kills , (window.innerWidth-20)/2 - 15 , (window.innerHeight-20)/2 );
c.fillText("Accuracy : " + (kills*100/totalBullets).toFixed(2), (window.innerWidth-20)/2 - 55 , (window.innerHeight-20)/2 + 30);
}
requestAnimationFrame();
}
draw();
..
..

This is how the game over screen will look:

https://github.com/jrathod9/Making-of-Space-X-/blob/master/Phase%204/Final/GameOver.png

So we are now ready with the final game:
Source Code : FINAL GAME
Location in repository : \Phase 4\Final

I’ve added a flickering effect to the alien as it looks cool. 😉
Enjoy playing and share it with your friends too! You can now experiment with the code to add your own effects, functionalities, audio, video and much more.

Play This Game
Play Another Version

Well this is the end of the series. Hope you try and create more such games and visuals on canvas.

If you liked canvas check THIS out!
Do leave suggestion/comments if any.
Cheers!🍬


Written by : Jay Rathod💻
Links : Portfolio | Github | Codepen | Linkedin | Instagram

HTML Canvas Games from Scratch #3

Reading Time: 5 minutes

Hey, devs!🎮
So we are all set to begin creating the game👾.
Let’s do it!

Phase 3

Before we jump into coding, let us plan things.
Objects we will need :

  • Player (The space shuttle)🚀
  • Alien👾
  • Bullets

Let us define these objects :

//Shuttle object
var shuttle = function(x,y){
this.x = x;
this.y = y;
}
//Alien object
var alien = function(x,y){
this.x = x;
this.y = y;
}
//Bullet object
var bullet = function(x,y){
this.x = x;
this.y = y;
}
//Since we will handle multiple bullets and Aliens
var Bullets = new Array();
var Aliens = new Array();

Other variables that we will need to define are :

var totalBullets = 0; //bullets on screen
var health = 90; //health of player
var kills = 0; //total aliens killed
var maxAliens = 5; //Max aliens on the screen
var bulletSpeed = 7; //Speed of the bullet
var alienSpeed = 0.2; //Speed of the aliens

Note : These values are selected by hit and trial.
Now we will need alien and shuttle sprites. I have already made these using fillRect() functions.
Download code from this link : Code Link
Location in repository : \Phase 3\Sprites
Note : It is ok if you don’t try to understand drawShuttle() and drawAlien() as it isn’t very important, those are just figures made using rectangles. You will be using images for sprites in the future mostly.
Result :

HTML Canvas Games from Scratch #3
Space Shuttle will be positioned at the bottom center.
Alien will have a constrained random position at approximately the top part of the screen.

Now we will work on the same code that you’ve downloaded.
Let us add an event listener to enable the space shuttle to move using the arrow keys. (As we did in the previous post)

var keys = []; //Add this before the draw() definition
window.addEventListener("keydown", keysPressed, false );
function keysPressed(e) {
// store an entry for every key pressed
keys[e.keyCode] = true;
window.addEventListener("keyup", keysReleased, false);
}
function keysReleased(e) {
    // mark keys that were released
keys[e.keyCode] = false;
}

So we need to adjust the position of the space shuttle before re-drawing it on the canvas. Inside the draw() function, before drawing the space shuttle :

//Handling arrow key presses and shuttle movement boundaries
// left
if (keys[37]) {
if(player.x >= 70)
player.x -= shuttleSpeedh;
}
// right
if (keys[39]) {
if(player.x <= window.innerWidth - 50)
player.x += shuttleSpeedh;
}
// down
if (keys[38]) {
if(player.y >= window.innerHeight/2)
player.y -= shuttleSpeedv;
}
// up
if (keys[40]) {
if(player.y <= window.innerHeight - baseBottomh - midBottomh - cannonh)
player.y += shuttleSpeedv;
}

Run this code to check what are the constraints to the movement of the space shuttle.
Note : shuttleSpeedh and shuttleSpeedv respresent horizontal and vertical velocity. These have been defined in the file at the top.
Result :
HTML Canvas Games from Scratch #3
Here’s the source code : Code link
Location in repository : \Phase 3\MovingShuttle

Now let us fill the array of aliens:

//Initial array of aliens
for(a = 0; a < maxAliens; a++){
var temp = new alien(Math.random()*(window.innerWidth-100)+60, Math.random()*(window.innerHeight/2-300));
Aliens.push(temp); //We already defined this array
}

To draw all these aliens we need to make changes in out draw() function. Just add a loop where we are drawing a single alien:

for(a = 0 ; a < Aliens.length ; a++)
drawAlien(Aliens[a]);

Result :
HTML Canvas Games from Scratch #3
Here’s the source code : Code Link
Location in repository : \Phase 3\SpawnAliens

Moving on, we now need to make the space shuttle launch bullets.
This will happen on pressing spacebar. But only 1 bullet will be launched on pressing spacebar once. So the event we use will be keyRelease. Remember we have already defined it?
Let us add more functionality to it.
js  function keysReleased(e) { if(e.keyCode==32){ //keycode of spacebar var temp = new bullet(player.x , player.y - midBottomh - cannonh); totalBullets++; Bullets.push(temp); } }  
Now let us draw all the bullets on the canvas;

function drawBullet(thisBullet){
c.fillStyle = bulletColors[Math.floor(Math.random()*6)];
c.beginPath();
c.arc(thisBullet.x,thisBullet.y - cannonh + 10, 2.5 , 0 , Math.PI*2 ,false);
c.fillRect(thisBullet.x-2.5,thisBullet.y - cannonh + 10  ,5,5);
c.closePath();
c.fill();
}

Last but not the least lets draw these bullets on the canvas and make them move . This should be added inside draw():

//Check bullets that left the screen and remove them from array
for(a = 0 ; a < Bullets.length ; a++){
if(Bullets[a].y <=0 ){
Bullets.splice(a,1); //Removes 1 element from the array from index 'a'
}
}
//Update bullet coordinates to make it move and draw bullets
for(a = 0 ; a < Bullets.length ; a++){
Bullets[a].y -= bulletSpeed; //Already defined at the top
drawBullet(Bullets[a]);
}

Result :
HTML Canvas Games from Scratch #3
Here’s the source code : Code link
Location in repository : \Phase 3\Bullets

Moving on to the last thing that we will be doing in this phase. Make the aliens move.

Aliens[a].y += alienSpeed; //Add this inside the loop
//where we use drawAlien();

So we have set the aliens in motion!👾

Final source code for this phase : Code Link
Location in repository :  \Phase 3\Final

We are almost done with the game. This phase was about the aesthetics of the game. Next phase will be the final phase where we will add the game logic and a final touch with a good background and a visible healthbar.
Do leave comments/suggestions if any.
Cheers!🍺

 Play the game :

Star this game!


Written by : Jay Rathod💻
Links : Portfolio | Github | Codepen | Linkedin | Instagram

HTML Canvas Games from Scratch #2

Reading Time: 7 minutesHey folks!🎮
So in the previous post I tried to lay a foundation to start understanding canvas. I hope that by now you are a bit comfortable with it. So in the previous post we saw:

  • File structure and boilerplate📁
  • Some important javascript functions for drawing✏️
  • Defining a particle and drawing it on the canvas (hope you remember atom😉)
  • requestAnimationFrame()🔄
  • One and two dimensional uniform motion of the particle🏃
  • Gaining control over the Math.random() function🎲

Phase 2

Till now we were have worked with one particle, but that’s not how games are right? At least most of them. Handling multiple particles is not as tough as you might think. Let’s see how its done!
First of all, will the object definition of the particle change?
Well, it depends on the properties of these particles.
(We will see this later on)

Let us continue with the same particle definition that we previously used:

var particle = function(x,y,radius){
   this.x = x;
   this.y = y;
   this.radius = radius;
}

Now instead of defining one particle, let us define an array of particles:

var particleArray = new Array();

Let us now define 50 particles with random positions on the screen. But what are the dimensions of the screen?
We already have :

  • window.innerWidth
  • window.innerHeight

So the coordinates of the screen will be in the range:

  • X : 0 – window.innerWidth
  • Y : 0 – window.innerHeight

So the code goes like this :

var totalParticles = 50;         //number of particles 
var maxRadius = 30;               //maximum value of radius   
var particle = function(x,y,radius){
    this.x = x;
    this.y = y;
    this.radius = radius;
}
var particleArray = new Array(); //array of particles        
var i;                          //loop variable 
for(i = 0 ; i < totalParticles ; i++) {
    //Defining properties of the particle
    var xcoord = Math.random()*window.innerWidth;
    var ycoord = Math.random()*window.innerHeight;
    var rad = Math.random()*maxRadius;
    //New particle with above properties
    var tempParticle = new particle(xcoord,ycoord,rad);
    //Push tempParticle into the array
    particleArray.push(tempParticle);
}

I’ve tried to keep the code readable and obvious. Just read it and you should understand what is happening.
What’s left? Let us draw these particles on the canvas!
Just add the following code :

c.fillStyle = 'aqua';
//Drawing the particles
for(i = 0 ; i < totalParticles ; i++ ){
    c.beginPath();
    c.arc(particleArray[i].x,particleArray[i].y,particleArray[i].radius,0, Math.PI*2,false);
    c.closePath();
    c.fill();
}

Result:

HTML Canvas Games from Scratch #2

Here’s the source code : Code link
Location in repository : \Phase 2\ParticleArray

Note : On refreshing the page you will find a new configuration everytime.
Also we haven’t used the requestAnimationFrame() function as we just wanted static particles as of now.

What next? Let us give all the particles some random velocities🚀.
We need to add two properties for the particle object “x velocity” and “y velocity“:

var particle = function(x,y,vx,vy,radius){
this.x = x;
this.y = y;
this.vx = vx;              //x vel
this.vy = vy;              //y vel
this.radius = radius;
}

Now since we have added new properties for this object, we must also define its values for all the defined instances.

Wait, did I just go too hard on you?😝

Ok let me reframe that:
Since we added two new properties to the particle object, we also need to give the value of these properties for all the particles that are stored in the array.
So inside the for loop in which we are defining and adding particles to the array :

{
    ...
    ...
    var xvel = Math.random()*6 - 3;
    var yvel = Math.random()*6 - 3;
    ...
    var tempParticle = new particle(xcoord,ycoord,xvel,yvel,rad);
    ...
    ...
}

Try figuring out the range of (xvel, yvel).

Now we are ready with particles and their velocities. Lets start drawing them on the canvas. This time we will use requestAnimationFrame():

c.fillStyle = 'aqua';        //define fillStyle
function draw(){
    //Clears the entire canvas
    c.clearRect(0,0,window.innerWidth,window.innerHeight);
    //Update the value of the coordinates (according to velocity)
    for(i = 0 ; i < totalParticles ; i++ ){
        particleArray[i].x += particleArray[i].vx;
        particleArray[i].y += particleArray[i].vy;
    }
    //Drawing the particles
    for(i = 0 ; i < totalParticles ; i++ ){
        c.beginPath();
        c.arc(particleArray[i].x,particleArray[i].y,particleArray[i].radius,0, Math.PI*2,false);
        c.closePath();
        c.fill();
    }
    requestAnimationFrame(draw);
}
draw();

Result :

HTML Canvas Games from Scratch #2

Here’s the source code : Code link

Location in repository : \Phase 2\ParticleArrayMoving

It must be noted that the particles will soon disappear leaving a black screen. The reason being that the canvas extends infinitely, we just get to see a part which our window can capture.
To confine the particles to our window, we must make the window act as a box 🔳. Particles must collide and bounce back inside like this:

HTML Canvas Games from Scratch #2

These conditions are to be taken care of every time before drawing the particles. Let us code them:

//Checking for collison with walls
for(i = 0 ; i < totalParticles ; i++ ){
        if(particleArray[i].x > window.innerWidth || particleArray[i].x < 0)
            particleArray[i].vx*=-1;
        if(particleArray[i].y > window.innerHeight || particleArray[i].y < 0)
            particleArray[i].vy*=-1;
    }

Result :

HTML Canvas Games from Scratch #2

Here’s the source code : Code link
Location in repository : \Phase 2\ParticleArrayMovingCollisions

Notice the particles bouncing off the edges.

Practice Sesh💻 : You can try giving a different color to all the particles. You can also try to making all the particles twinkle/shimmer✨, by changing its opacity (the ‘a‘ in rgba).

Solutions to these : Link to code

Location in repository : \Phase 2\Practice Sesh

Interacting with the canvas:

Yes, chill❄️. It is possible. Obviously. Who would call it a game otherwise?
Let us talk about the addEventListener() method. As the name suggests, it simple listens to events. Events in this case are keyboard inputs, mouse clicks , changes in mouse movements etc.

Syntax:

window.addEventListener(Event,Function,useCapture);

Event : An event is nothing but a trigger. It is used to execute a coded response. Eg : click , onmousedown , onkeypress , onkeyup etc. (Know more..)
Function: This is the function that is to be called when that specific event occurs. It is defined somewhere in the code.
useCapture : This is either true or false. It is optional. It is used to define whether the event should be executed in the Bubbling or Capturing phase (it is not important right now, though you can read more here). By default it is false.

Lets start with the most basic event and response :
For this you will need the javascript code where we had just 1 static particle.(try to write this code yourself once)
Source code : Code link
Location in repository : \Phase 1\Atom Particle
Just remove the line of code used to increment the speed. Thus getting us a static particle.
Now let us add a simple mouse click event : (append this snippet at the end of the code.js file)

window.addEventListener("click", move , false); //define event listener
function move(e)            //response function                                              
{
    atom.x = e.x;            //update x coordinate of atom        
    atom.y = e.y;            //update y coordinate of atom
}

What is ‘e’ ?
e here represents the event, and the event here is click. It must be passed as a parameter to the function.
Every event has specific properties. For this click event, we have properties x and y which represent the coordinates of the cursor on clicking.

Coming back to the code, the function replaces coordinates of atom with the coordinates of the cursor. Thus moving it to the click position.
Check it out yourself.
Source code : Code link
Location in repository : \Phase 2\ParticleCanvasInteraction

Similarly, let us make atom move left , right, up and down with the arrow keys.
So this is what we need :

  • On pushing down an arrow key the particle should move.
  • On releasing the key the particle should stop its movement.

We will use the keydown and keyup events.
This even has a specific property called keyCode. Every key on the keyboard has a different keyCode. The keyCode values of arrow keys are :

  • Left : 37
  • Up : 38
  • Right : 39
  • Down : 40

Let us define a boolean array called “keys” which will hold true for all those keyCodes which are pressed.
Also we will need two event listeners, one that will check for keys pressed and the other that will check for keys released.

var keys = [];
window.addEventListener("keydown",keyPressed,false); //keydown listener
window.addEventListener("keyup",keyReleased,false);      //keyup listener
function keyPressed(e){             //sets value true when key pressed 
    keys[e.keyCode] = true;
}
function keyReleased(e){            //sets value false when key released
    keys[e.keyCode] = false;
}

Its not done yet. We need to make required adjustments in the draw() function, the effect of key presses on the coordinates :

function draw(){
..
..
    if(keys[37])                //if left is true
        atom.x-=xspeed;         //move left by xspeed
    else if(keys[39])         //else if right is true
        atom.x+=xspeed;         //move right by xspeed
    if(keys[38])                //if up is true
        atom.y-=yspeed;         //move up by yspeed
    else if(keys[40])         //else if down is true
        atom.y+=yspeed;         //move down by yspeed
..
..
}

Note : These are grouped this way because Up and Down cannot function together, and Left and Right cannot function together.


Also don’t forget to define xspeed and yspeed outside the draw function.

Result :
HTML Canvas Games from Scratch #2
Source code : Code link
Location in repository : \Phase2\ParticleCanvasInteractionKeyboard

Now its your turn to play around with a few more such events.

Other things you can try :

  • Bound the motion of this particle to the box
  • Comment out the clearRect() function and see the output
  • Use the fillRect() function with black colour but opacity less than 1, instead of clearRect(). (Will give a nice trail effect)

This is all for this post. Till here I have covered everything it takes to create the game that I made. Now all we have to do is combine all this logic in one file ❗
In my opinion you may also start creating the game yourself, or try making some other game maybe ping-pong, flappy bird, snakes etc.

Do leave comments/suggestions (if any).
Cheers!🍭

Written by : Jay Rathod💻
Links : Portfolio | Github | Codepen | Linkedin | Instagram

HTML Canvas Games from Scratch #1

Reading Time: 7 minutes

Hey there! This is my first blog about HTML Canvas Game Dev video_game.
There are a lot of other tools and libraries available for game dev which are easier to use, but canvas remains my favorite as it takes us to the root of how to code game physics. It is also a great way for beginners to get a good grip on Javascript (speaking from experience).
Thanks to my friend Ronik Gandhi <@rawnix> for introducing me with canvas.

At the end of this series you will be able to build a basic 2D game on your own.

In this series I will walk you through the steps to build a classic Space Invaderspace_invader game which I named SPACE-X.

It will look like this.

Do star star my repo (https://github.com/jrathod9/Space-X) if you liked the game.

Let's get started rocket

[Note: We will be creating games for pc only. They won't be responsive.]

Basic Files and Boilerplate

📦Space-X
┣ 📂assets
┃ ┣ 📂Images
┃ ┗ 📂audio
┣ 📜index.html
┗ 📜code.js

Get these folders and files ready. As of now we won't be using any assets, we will instead use javascript functions to create shapes.

This game without any images can be played [here] https://codepen.io/jrathod9/full/jXwMWQ

The index.html file will look something like :

<!DOCTYPE html>
<html>
<head>
<title>Space-X</title>
</head>
<body>
<canvas id="canvas" style="background-color: black"></canvas>
</body>
<script type="text/javascript" src="code.js"></script>
</html>  

This index.html file consists of a canvas tag which is present inside the body tag.
There will be no more changes to this. Rest of the coding will be done in the code.js file.
The code.js file is linked after the closing body tag.

The code.js file will look something like:

var canvas = document.querySelector('#canvas');
var c = canvas.getContext('2d');
canvas.width = window.innerWidth;
canvas.height = window.innerHeight;  
  • The querySelector() method returns the first element that matches a specified CSS selector(s) in the document.
  • The getContext() method returns an object that provides methods and properties to draw on the canvas. In this case since '2d' is mentioned, we can draw text, lines, rectangles, circles etc.
  • Next we set the height and width of the canvas equal to the device window's height and width device (this can be changed according to your preference).

Now we are all set to begin coding the game!

Clone/Download this repository before beginning for all the source code.

Phase 1

In this phase we will be working with particles and particle physics.
It is important to keep this in mind that the coordinate system of the canvas is laid down such that the origin is at top left corner of the screen :

https://processing.org/tutorials/drawing/imgs/drawing-05.svg

Before getting your hands dirty, these are some important methods you should be familiar with to draw on a canvas:

c.clearRect(x1,y1,x2,y2); //clears the canvas inside this rectangular area  
c.beginPath(); //Used to begin drawing a shape  
c.closePath(); //Used to finish drawing a shape  
c.fillStyle = 'red'; //Defines color to be filled in the shapes  
c.fillStyle = '#ffffff'; //rgb,rgba and hex formats are also allowed  
c.fillStyle = 'rgb(12,243,32)';
c.fillStyle = 'rgba(233,12,32,0.4)';//'a' is used to define opacity  
c.fill(); //Fills color  
c.strokeStyle = 'red'; ` //Defines stroke color (rgb,rgba,hex)  
c.stroke(); //Strokes the boundary or the figure  
c.font = "50px Calibri"; //Defines font properties of text  
c.fillText("text" , x, y); //Writes text,top left of text is at (x,y)  
c.arc(centerx,centery,radius, //Creates an arc with given properties  
start angle in radian ,
ending angle in rad ,
counterclockwise true or false);
c.moveTo(x,y); //Moves context cursor to (x,y)  
c.lineTo(x,y); //Draws line from current context cursor coordinate to (x,y)  

NOTE : It is better to use beginPath() and closePath() separately for each connected figure.

A few sample code snippets: Code Link

Location in repository: \Phase 1\Sample Code

https://github.com/jrathod9/Making-of-Space-X-/blob/master/Phase%201/Sample%20Code/codesnippetexamples.png?raw=true)

Try playing around with the code a little to get a better understanding of the working.
Also it takes time to get used to the syntax of these functions, so hands-on practice is the only solution.

Now let us try to code a particle in canvas.
Consider a particle object in a two dimensional plane. It will have properties:

  • X Coordinate
  • Y Coordinate
  • Radius

It is considered that the particle is a circle.
This is how we can represent the same in javascript :

var particle = function(x,y,radius){
this.x = x;
this.y = y;
this.radius = radius;
//'this' refers to the owner object, i.e. an instance of particle  
}  

The above code defines an object type which is like a datatype , specifically it is a user-defined datatype. That means, now we can create variables of this type.
Lets create one named "atom".

var atom = new particle(100,100,30);  

This line creates a particle which can be referred with the variable "atom". It has the coordinates (100,100) and its radius is 50, but we still cannot see it on the canvas.

Note : All quantities are to be considered in 'pixels'.

Let us bring it to life by drawing it.

c.beginPath();
c.fillStyle = 'aqua';
c.arc(atom.x,atom.y,atom.radius,0, Math.PI*2,false);
c.closePath();
c.fill();  

It is now drawn on the canvas. But now what if you want to set it in motion let us say to the right ?
You need a continuous loop in which:

  • Canvas is cleared
  • X coordinate of atom is incremented
  • Atom is re-rendered on the canvas

The continuous loop is generated using the requestAnimationFrame() method.
The requestAnimationFrame() method calls the function, which is passed as a parameter, 60 times in one second. So now, we need a function for repetitive calling. Let us call this function 'draw' :

var xspeed = 1; //Define x direction speed  
function draw(){
//Clears the entire canvas  
c.clearRect(0,0,window.innerWidth,window.innerHeight);
//Update x coordinate  
atom.x += speed;
//Drawing the particle  
c.beginPath();
c.fillStyle = 'aqua';
c.arc(atom.x,atom.y,atom.radius,0, Math.PI*2,false);
c.closePath();
c.fill();
requestAnimationFrame(draw); //Called inside the function  
}
draw(); //Initial function call  

Result :
https://github.com/jrathod9/Making-of-Space-X-/blob/master/Phase%201/Atom%20Particle/MovingAtom.gif?raw=true In every consecutive function call, x coordinate of atom is incremented by the value of xspeed variable. To increase the speed, increase the value of xspeed.
Here is the source code : Code link

Location in repository : \Phase 1\Atom Particle

Similarly if you introduce a variable yspeed, which updates the y coordinate of atom, it will lead to a uniform straight line motion in the 2d plane.

...
...
var yspeed = 2;
function draw(){
atom.y += yspeed;
...
...
}
draw();  

Result:

https://github.com/jrathod9/Making-of-Space-X-/blob/master/Phase%201/Atom%20Particle/MovingAtom2d.gif?raw=true

Javascript Math.random() function :

This deserves a separate section as it is very important to understand the working of the random function and how to control it. This function will be used very often in games for example:

  • To spawn new enemies at random locations
  • To spawn random powerups at random locations
  • To give random moving directions to objects etc.

Syntax:

var x = Math.random();  

x gets assigned a random float value between 0 and 1 .

Note: value is inclusive of 0 but not 1.

Few outputs of the random function:

  • 0.1882848343757757
  • 0.3605824495503056
  • 0.04217502958085739

How to get a random number between 0 and 1000?

var x = Math.random()*1000;  

This still gives a float value. For integer values:

var x = Math.ceil(Math.random()*1000);
//Output: integer between 0 to 1000 both inclusive  

Math.ceil() function rounds a number up to the next largest whole number or integer.
There is another function called Math.floor() which returns the largest integer less than or equal to a given number.

Note : Lower bound is still 0.

How to get a random number between 500 and 1000?

var x = Math.ceil(Math.random()*500) + 500;  

Here initially Math.ceil(Math.random()*500) function returns values between {0,500} , thus on adding 500 to this range we get the new range {500,1000}.

How to get a negative range lets say -250 to 350?

var x = Math.ceil(Math.random()*500) - 250;  

If you aren't able to figure out how, try finding individual outputs of all the functions in the code one at a time.

This is all for this blog, in the next blog we shall see:

  • How to handle multiple particles
  • Random function in action
  • Collisions
  • Controlling the objects through user input

Written by : Jay Rathodcomputer
Links : Portfolio | GitHub | Codepen | LinkedIn | Instagram

Creating your own ANIMATIONS

Reading Time: 2 minutesHave you ever dreamt how Optimus Prime from TRANSFORMERS look so realistic , how the animation of PIXAR  is  so  pragmatic ?

Why these HOLLYWOOD people manage to produce such a high quality graphics for their work? Is there something magical with them, perhaps yes, they have with them the best team of computer artistic with their powerful software.

AUTODESK 3DS MAX is one of the software which is widely used in film industries. It is one of the most powerful tools which could transform your creative ideas into your movie screen and animations. Even if you are not a good programmer you can smoothly start with 3ds max to run you creative ideas.

To start with 3ds max you have to create a basic  3d structure for your  object , this process is known as MODELING , there are various (plane box) modeling technique provided by  3DS  to convert  your simple 2D image into 3D model . For this you need to have top view, side view, front view of the model (I know its scaring 1st Yr Engg. Drawing again .. phew..!!)

After creating your basic 3D structure, you apply  rigging to your object , which means to define  your object movements and  prepare your object for animation and finally apply animation to it. There are many steps involved in this process before you get you final output which involves adding UV to your object, rendering your scenes ,enveloping your geometry, inverse  kinetics   and there are much more to explore as you become familiar with 3DS MAX.

There are various tools and technique available in 3DS MAX which provide you the above process. When you start using 3DS MAX you will explore more about  tools and technique

The software itself costs around $3800/yr. But not to worry!!! Where there is will there is a way!!! AUTODESK STUDENT provides free software  to students with 3 year license.

And Digital Tutors is one of the best place to learn make stunning movies, games…

Log on to http://www.digitaltutors.com/tutorial/1154-Introduction-to-3ds-Max-2014 for more info

So just go download your 3DS MAX, start watching the tutorials & let you imagination come out into your’s  laptop screens.


CEV - Handout