You must have heard about AI generating many artworks, especially images; ever wondered how this works? In this blog, We will brief you about AI-generated pictures and how they are generated and processed further.
AI is the abbreviation of Artificial Intelligence. It refers to a computer that is capable of mimicking human intelligence. This can be done by training an AI system on a large dataset using some algorithms. So artificial intelligence is trained on a large dataset to generate the described image by the user. AI images can be realistic or abstract and convey a specific theme or message.
An AI text-to-image generator uses a machine learning technique known as a neural network which can take text as input and generate an image as output. To do this, a neural network requires a lot of training. We can understand this by taking an analogy of a toddler learning for the first time to paint and then making a connection between the painting, objects, and words. To generate images, the system uses two neural networks. The first neural network is used to create the image based on the text input by the user. The second neural network analyzes the generated image with reference images. By comparing the photos, it creates a score to determine the accuracy of the generated image. There are a few different types of text-to-image generators. One of them is using diffusion models.Diffusion models are trained on a large dataset of hundreds of millions of images.
A word describes each image so the model can learn the relationship between text and images. It is observed that during this training process, the model also knows other conceptual information, such as what kind of elements would make the image more clear and sharp.
After the model is trained, the models learn to take a text prompt provided by the user, create an LR(low-resolution) image, and then gradually add new details to turn it into a complete image. The same process is repeated until the HR(high-resolution) image is produced.
Green dragon on table
Diffusion models don’t just modify the existing images; they generate everything from scratch without referencing any images available online. It means that if you ask them to generate an image of a “dragon on the table,” they would not find an image of the dragon and table individually on the internet and then process further to put the dragon on the table instead of that they will create the image entirely from scratch based on their understanding of the texts during the training time. Sloth in pink water
There are many benefits of using diffusion models over other models. Firstly, these are more efficient to train. The images generated by them are more realistic and connected to the world. Also, it makes it easier to control the generated image, you can just use the color of the dragon(let’s say green dragon) in the text prompt, and the models will generate the image.
Hey, devs!🎮 So we are all set to begin creating the game👾. Let’s do it!
Phase 3
Before we jump into coding, let us plan things. Objects we will need :
Player (The space shuttle)🚀
Alien👾
Bullets
Let us define these objects :
//Shuttle objectvarshuttle=function(x,y){this.x=x;this.y=y;}//Alien objectvaralien=function(x,y){this.x=x;this.y=y;}//Bullet objectvarbullet=function(x,y){this.x=x;this.y=y;}//Since we will handle multiple bullets and AliensvarBullets=newArray();varAliens=newArray();
Other variables that we will need to define are :
vartotalBullets=0;//bullets on screenvarhealth=90;//health of playervarkills=0;//total aliens killedvarmaxAliens=5;//Max aliens on the screenvarbulletSpeed=7;//Speed of the bulletvaralienSpeed=0.2;//Speed of the aliens
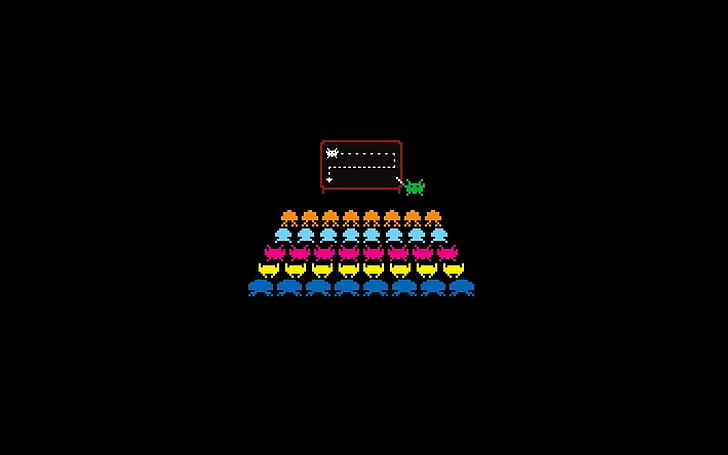
Note : These values are selected by hit and trial. Now we will need alien and shuttle sprites. I have already made these using fillRect() functions. Download code from this link : Code Link Location in repository : \Phase 3\Sprites Note : It is ok if you don’t try to understand drawShuttle() and drawAlien() as it isn’t very important, those are just figures made using rectangles. You will be using images for sprites in the future mostly. Result :
Space Shuttle will be positioned at the bottom center. Alien will have a constrained random position at approximately the top part of the screen. Now we will work on the same code that you’ve downloaded. Let us add an event listener to enable the space shuttle to move using the arrow keys. (As we did in the previous post)
varkeys=[];//Add this before the draw() definitionwindow.addEventListener("keydown",keysPressed,false);functionkeysPressed(e){// store an entry for every key pressedkeys[e.keyCode]=true;window.addEventListener("keyup",keysReleased,false);}functionkeysReleased(e){// mark keys that were releasedkeys[e.keyCode]=false;}
So we need to adjust the position of the space shuttle before re-drawing it on the canvas. Inside the draw() function, before drawing the space shuttle :
//Handling arrow key presses and shuttle movement boundaries// leftif(keys[37]){if(player.x >= 70)player.x-=shuttleSpeedh;}// rightif(keys[39]){if(player.x <= window.innerWidth-50)player.x+=shuttleSpeedh;}// downif(keys[38]){if(player.y >= window.innerHeight/2)player.y-=shuttleSpeedv;}// upif(keys[40]){if(player.y <= window.innerHeight-baseBottomh-midBottomh-cannonh)player.y+=shuttleSpeedv;}
Run this code to check what are the constraints to the movement of the space shuttle. Note : shuttleSpeedh and shuttleSpeedv respresent horizontal and vertical velocity. These have been defined in the file at the top. Result : Here’s the source code : Code link Location in repository : \Phase 3\MovingShuttle
Now let us fill the array of aliens:
//Initial array of aliensfor(a=0;a<maxAliens;a++){vartemp=newalien(Math.random()*(window.innerWidth-100)+60,Math.random()*(window.innerHeight/2-300));Aliens.push(temp);//We already defined this array}
To draw all these aliens we need to make changes in out draw() function. Just add a loop where we are drawing a single alien:
for(a=0;a<Aliens.length;a++)drawAlien(Aliens[a]);
Result : Here’s the source code : Code Link Location in repository : \Phase 3\SpawnAliens
Moving on, we now need to make the space shuttle launch bullets. This will happen on pressing spacebar. But only 1 bullet will be launched on pressing spacebar once. So the event we use will be keyRelease. Remember we have already defined it? Let us add more functionality to it. js function keysReleased(e) { if(e.keyCode==32){ //keycode of spacebar var temp = new bullet(player.x , player.y - midBottomh - cannonh); totalBullets++; Bullets.push(temp); } } Now let us draw all the bullets on the canvas;
Last but not the least lets draw these bullets on the canvas and make them move . This should be added inside draw():
//Check bullets that left the screen and remove them from arrayfor(a=0;a<Bullets.length;a++){if(Bullets[a].y <=0){Bullets.splice(a,1);//Removes 1 element from the array from index 'a'}}//Update bullet coordinates to make it move and draw bulletsfor(a=0;a<Bullets.length;a++){Bullets[a].y-=bulletSpeed;//Already defined at the topdrawBullet(Bullets[a]);}
Result : Here’s the source code : Code link Location in repository : \Phase 3\Bullets
Moving on to the last thing that we will be doing in this phase. Make the aliens move.
Aliens[a].y+=alienSpeed;//Add this inside the loop//where we use drawAlien();
So we have set the aliens in motion!👾
Final source code for this phase : Code Link Location in repository : \Phase 3\Final
We are almost done with the game. This phase was about the aesthetics of the game. Next phase will be the final phase where we will add the game logic and a final touch with a good background and a visible healthbar. Do leave comments/suggestions if any. Cheers!🍺
Reading Time: 7minutesHey folks!🎮 So in the previous post I tried to lay a foundation to start understanding canvas. I hope that by now you are a bit comfortable with it. So in the previous post we saw:
File structure and boilerplate📁
Some important javascript functions for drawing✏️
Defining a particle and drawing it on the canvas (hope you remember atom😉)
requestAnimationFrame()🔄
One and two dimensional uniform motion of the particle🏃
Gaining control over the Math.random() function🎲
Phase 2
Till now we were have worked with one particle, but that’s not how games are right? At least most of them. Handling multiple particles is not as tough as you might think. Let’s see how its done! First of all, will the object definition of the particle change? Well, it depends on the properties of these particles. (We will see this later on)
Let us continue with the same particle definition that we previously used:
Now instead of defining one particle, let us define an array of particles:
varparticleArray=newArray();
Let us now define 50 particles with random positions on the screen. But what are the dimensions of the screen? We already have :
window.innerWidth
window.innerHeight
So the coordinates of the screen will be in the range:
X : 0 – window.innerWidth
Y : 0 – window.innerHeight
So the code goes like this :
vartotalParticles=50;//number of particles varmaxRadius=30;//maximum value of radius varparticle=function(x,y,radius){this.x=x;this.y=y;this.radius=radius;}varparticleArray=newArray();//array of particles vari;//loop variable for(i=0;i<totalParticles;i++){//Defining properties of the particlevarxcoord=Math.random()*window.innerWidth;varycoord=Math.random()*window.innerHeight;varrad=Math.random()*maxRadius;//New particle with above propertiesvartempParticle=newparticle(xcoord,ycoord,rad);//Push tempParticle into the arrayparticleArray.push(tempParticle);}
I’ve tried to keep the code readable and obvious. Just read it and you should understand what is happening. What’s left? Let us draw these particles on the canvas! Just add the following code :
c.fillStyle='aqua';//Drawing the particlesfor(i=0;i<totalParticles;i++){c.beginPath();c.arc(particleArray[i].x,particleArray[i].y,particleArray[i].radius,0,Math.PI*2,false);c.closePath();c.fill();}
Result:
Here’s the source code : Code link Location in repository : \Phase 2\ParticleArray
Note : On refreshing the page you will find a new configuration everytime. Also we haven’t used the requestAnimationFrame() function as we just wanted static particles as of now.
What next? Let us give all the particles some random velocities🚀. We need to add two properties for the particle object “x velocity” and “y velocity“:
Now since we have added new properties for this object, we must also define its values for all the defined instances.
Wait, did I just go too hard on you?😝
Ok let me reframe that: Since we added two new properties to the particle object, we also need to give the value of these properties for all the particles that are stored in the array. So inside the for loop in which we are defining and adding particles to the array :
Now we are ready with particles and their velocities. Lets start drawing them on the canvas. This time we will use requestAnimationFrame():
c.fillStyle='aqua';//define fillStylefunctiondraw(){//Clears the entire canvasc.clearRect(0,0,window.innerWidth,window.innerHeight);//Update the value of the coordinates (according to velocity)for(i=0;i<totalParticles;i++){particleArray[i].x+=particleArray[i].vx;particleArray[i].y+=particleArray[i].vy;}//Drawing the particlesfor(i=0;i<totalParticles;i++){c.beginPath();c.arc(particleArray[i].x,particleArray[i].y,particleArray[i].radius,0,Math.PI*2,false);c.closePath();c.fill();}requestAnimationFrame(draw);}draw();
Location in repository : \Phase 2\ParticleArrayMoving
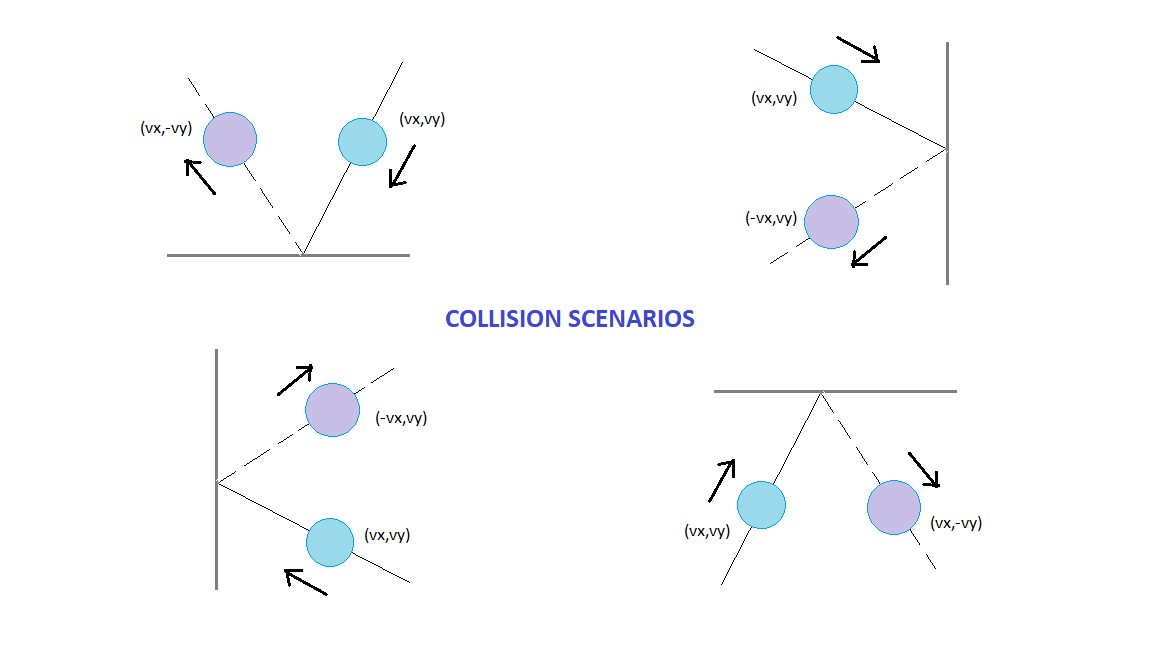
It must be noted that the particles will soon disappear leaving a black screen. The reason being that the canvas extends infinitely, we just get to see a part which our window can capture. To confine the particles to our window, we must make the window act as a box 🔳. Particles must collide and bounce back inside like this:
These conditions are to be taken care of every time before drawing the particles. Let us code them:
//Checking for collison with wallsfor(i=0;i<totalParticles;i++){if(particleArray[i].x>window.innerWidth||particleArray[i].x<0)particleArray[i].vx*=-1;if(particleArray[i].y>window.innerHeight||particleArray[i].y<0)particleArray[i].vy*=-1;}
Result :
Here’s the source code : Code link Location in repository : \Phase 2\ParticleArrayMovingCollisions
Notice the particles bouncing off the edges.
Practice Sesh💻 : You can try giving a different color to all the particles. You can also try to making all the particles twinkle/shimmer✨, by changing its opacity (the ‘a‘ in rgba).
Yes, chill❄️. It is possible. Obviously. Who would call it a game otherwise? Let us talk about the addEventListener() method. As the name suggests, it simple listens to events. Events in this case are keyboard inputs,mouse clicks , changes in mouse movements etc.
Event : An event is nothing but a trigger. It is used to execute a coded response. Eg : click , onmousedown , onkeypress , onkeyup etc. (Know more..) Function: This is the function that is to be called when that specific event occurs. It is defined somewhere in the code. useCapture : This is either true or false. It is optional. It is used to define whether the event should be executed in the Bubbling or Capturing phase (it is not important right now, though you can read more here). By default it is false.
Lets start with the most basic event and response : For this you will need the javascript code where we had just 1 static particle.(try to write this code yourself once) Source code : Code link Location in repository : \Phase 1\Atom Particle Just remove the line of code used to increment the speed. Thus getting us a static particle. Now let us add a simple mouse click event : (append this snippet at the end of the code.js file)
window.addEventListener("click",move,false);//define event listenerfunctionmove(e)//response function {atom.x=e.x;//update x coordinate of atom atom.y=e.y;//update y coordinate of atom}
What is ‘e’ ? e here represents the event, and the event here is click. It must be passed as a parameter to the function. Every event has specific properties. For this click event, we have properties x and y which represent the coordinates of the cursor on clicking.
Coming back to the code, the function replaces coordinates of atom with the coordinates of the cursor. Thus moving it to the click position. Check it out yourself. Source code : Code link Location in repository : \Phase 2\ParticleCanvasInteraction
Similarly, let us make atom move left , right, up and down with the arrow keys. So this is what we need :
On pushing down an arrow key the particle should move.
On releasing the key the particle should stop its movement.
We will use the keydown and keyup events. This even has a specific property called keyCode. Every key on the keyboard has a different keyCode. The keyCode values of arrow keys are :
Left : 37
Up : 38
Right : 39
Down : 40
Let us define a boolean array called “keys” which will hold true for all those keyCodes which are pressed. Also we will need two event listeners, one that will check for keys pressed and the other that will check for keys released.
varkeys=[];window.addEventListener("keydown",keyPressed,false);//keydown listenerwindow.addEventListener("keyup",keyReleased,false);//keyup listenerfunctionkeyPressed(e){//sets value true when key pressed keys[e.keyCode]=true;}functionkeyReleased(e){//sets value false when key releasedkeys[e.keyCode]=false;}
Its not done yet. We need to make required adjustments in the draw() function, the effect of key presses on the coordinates :
functiondraw(){....if(keys[37])//if left is trueatom.x-=xspeed;//move left by xspeedelseif(keys[39])//else if right is trueatom.x+=xspeed;//move right by xspeedif(keys[38])//if up is trueatom.y-=yspeed;//move up by yspeedelseif(keys[40])//else if down is trueatom.y+=yspeed;//move down by yspeed....}
Note : These are grouped this way because Up and Down cannot function together, and Left and Right cannot function together.
Also don’t forget to define xspeed and yspeed outside the draw function.
Result : Source code : Code link Location in repository : \Phase2\ParticleCanvasInteractionKeyboard
Now its your turn to play around with a few more such events.
Other things you can try :
Bound the motion of this particle to the box
Comment out the clearRect() function and see the output
Use the fillRect() function with black colour but opacity less than 1, instead of clearRect(). (Will give a nice trail effect)
This is all for this post. Till here I have covered everything it takes to create the game that I made. Now all we have to do is combine all this logic in one file ❗ In my opinion you may also start creating the game yourself, or try making some other game maybe ping-pong, flappy bird, snakes etc.
Hey there! This is my first blog about HTML Canvas Game Dev . There are a lot of other tools and libraries available for game dev which are easier to use, but canvas remains my favorite as it takes us to the root of how to code game physics. It is also a great way for beginners to get a good grip on Javascript (speaking from experience). Thanks to my friend Ronik Gandhi <@rawnix> for introducing me with canvas.
At the end of this series you will be able to build a basic 2D game on your own.
In this series I will walk you through the steps to build a classic Space Invader game which I named SPACE-X.
This index.html file consists of a canvas tag which is present inside the body tag. There will be no more changes to this. Rest of the coding will be done in the code.js file. The code.js file is linked after the closing body tag.
The querySelector() method returns the first element that matches a specified CSS selector(s) in the document.
The getContext() method returns an object that provides methods and properties to draw on the canvas. In this case since '2d' is mentioned, we can draw text, lines, rectangles, circles etc.
Next we set the height and width of the canvas equal to the device window's height and width device (this can be changed according to your preference).
Now we are all set to begin coding the game!
Clone/Download this repository before beginning for all the source code.
Phase 1
In this phase we will be working with particles and particle physics. It is important to keep this in mind that the coordinate system of the canvas is laid down such that the origin is at top left corner of the screen :
Before getting your hands dirty, these are some important methods you should be familiar with to draw on a canvas:
c.clearRect(x1,y1,x2,y2);//clears the canvas inside this rectangular area c.beginPath();//Used to begin drawing a shape c.closePath();//Used to finish drawing a shape c.fillStyle='red';//Defines color to be filled in the shapes c.fillStyle='#ffffff';//rgb,rgba and hex formats are also allowed c.fillStyle='rgb(12,243,32)';c.fillStyle='rgba(233,12,32,0.4)';//'a' is used to define opacity c.fill();//Fills color c.strokeStyle='red'; ` //Defines stroke color (rgb,rgba,hex) c.stroke();//Strokes the boundary or the figure c.font="50px Calibri";//Defines font properties of text c.fillText("text",x,y);//Writes text,top left of text is at (x,y) c.arc(centerx,centery,radius,//Creates an arc with given properties startangleinradian,endingangleinrad,counterclockwisetrueorfalse);c.moveTo(x,y);//Moves context cursor to (x,y) c.lineTo(x,y);//Draws line from current context cursor coordinate to (x,y)
NOTE : It is better to use beginPath() and closePath() separately for each connected figure.
Try playing around with the code a little to get a better understanding of the working. Also it takes time to get used to the syntax of these functions, so hands-on practice is the only solution.
Now let us try to code a particle in canvas. Consider a particle object in a two dimensional plane. It will have properties:
X Coordinate
Y Coordinate
Radius
It is considered that the particle is a circle. This is how we can represent the same in javascript :
varparticle=function(x,y,radius){this.x=x;this.y=y;this.radius=radius;//'this' refers to the owner object, i.e. an instance of particle }
The above code defines an object type which is like a datatype , specifically it is a user-defined datatype. That means, now we can create variables of this type. Lets create one named "atom".
varatom=newparticle(100,100,30);
This line creates a particle which can be referred with the variable "atom". It has the coordinates (100,100) and its radius is 50, but we still cannot see it on the canvas.
Note : All quantities are to be considered in 'pixels'.
It is now drawn on the canvas. But now what if you want to set it in motion let us say to the right ? You need a continuous loop in which:
Canvas is cleared
X coordinate of atom is incremented
Atom is re-rendered on the canvas
The continuous loop is generated using the requestAnimationFrame() method. The requestAnimationFrame() method calls the function, which is passed as a parameter, 60 times in one second. So now, we need a function for repetitive calling. Let us call this function 'draw' :
varxspeed=1;//Define x direction speed functiondraw(){//Clears the entire canvas c.clearRect(0,0,window.innerWidth,window.innerHeight);//Update x coordinate atom.x+=speed;//Drawing the particle c.beginPath();c.fillStyle='aqua';c.arc(atom.x,atom.y,atom.radius,0,Math.PI*2,false);c.closePath();c.fill();requestAnimationFrame(draw);//Called inside the function }draw();//Initial function call
Result : In every consecutive function call, x coordinate of atom is incremented by the value of xspeed variable. To increase the speed, increase the value of xspeed. Here is the source code : Code link
Location in repository : \Phase 1\Atom Particle
Similarly if you introduce a variable yspeed, which updates the y coordinate of atom, it will lead to a uniform straight line motion in the 2d plane.
This deserves a separate section as it is very important to understand the working of the random function and how to control it. This function will be used very often in games for example:
To spawn new enemies at random locations
To spawn random powerups at random locations
To give random moving directions to objects etc.
Syntax:
varx=Math.random();
x gets assigned a random float value between 0 and 1 .
Note: value is inclusive of 0 but not 1.
Few outputs of the random function:
0.1882848343757757
0.3605824495503056
0.04217502958085739
How to get a random number between 0 and 1000?
varx=Math.random()*1000;
This still gives a float value. For integer values:
varx=Math.ceil(Math.random()*1000);//Output: integer between 0 to 1000 both inclusive
Math.ceil() function rounds a number up to the next largest whole number or integer. There is another function called Math.floor() which returns the largest integer less than or equal to a given number.
Note : Lower bound is still 0.
How to get a random number between 500 and 1000?
varx=Math.ceil(Math.random()*500)+500;
Here initially Math.ceil(Math.random()*500) function returns values between {0,500} , thus on adding 500 to this range we get the new range {500,1000}.
How to get a negative range lets say -250 to 350?
varx=Math.ceil(Math.random()*500)-250;
If you aren't able to figure out how, try finding individual outputs of all the functions in the code one at a time.
This is all for this blog, in the next blog we shall see:
Reading Time: 5minutesSketching is an art to put down your emotions, your surrounding or anything that allured you.
It is a very effective way for expressing your emotions.. Sketching varies from being the one a professional artist does in preparation of his painting or a random doodling with no end goal. It is also used in a form of concise rendition with a very impactful presentation of a social awareness message.
It is an art with no rules.. Where no one can make any mistakes. Because rather than going into the specifics the essence of the element matters.
Basically there are three types of sketching:
Croquis
Pochade
Portrait sketch
They are not as complex as their names suggests:
Croquis sketch is used in order to remember the scene or a person in a more permanent type of way. Nowadays fashion designers use this term for the quick sketch of a model.
Pochade sketch is used to capture the atmosphere i.e. the fleeting effect of the light etc. As opposed to Croquis which is a line art Pochade deals more with the shade and atmosphere of the scene.
Portrait sketch is used for the artistic representation of a person with predominance given to its expression.
Conventionally it is done by using different kinds of pencils for example the professional graphite pencils (h, 2h, 3h, hb, b, 2b, 4b, 6b) and even charcoal and carbon pencils. But again it can be done using pens, ink, water colours, oil paints, pastels etc. Here the grade ‘h’ defines hardness and ‘b’ defines blackness. The ‘h’ grade pencils are hard and smudge-free so they are predominantly used for technical drawings and light sketches. The ‘b’ grade is used by the artists for brush-like expressions and smoother look.
Predominantly the sketch comprises of 5 types of strokes.
Lines
Cross-hatching
Circular stroke
Directional stroke
Tapping
The different types of shades are created simply by using different type ‘b’ grade graphite pencil. This shades is done by adding layers of the strokes one after the other.
As mentioned earlier there are no specific rules for sketching. But there are few techniques for a beginner to make this experience easy and delightful!
Use appropriate materials.
Choose the pencil according to the type of the sketch. The ‘h’ grade pencil are hardest and used for non-bendable lines. They are mostly used in industrial drawing.
The ‘b’ grade pencil are softer and smudge easily. Hence they are used for making smudges lines and shading your drawing.
Fine art paper can be used for your sketch rather than the smooth one… As it gives nice texture and improves the overall appearance.
Choose a subject.
For a beginner it would be better if you use an object or an image as a base for your sketch. It’ll make it much easier than imagining it.
If you are using a physical object, than take a few minutes to observe the object thoroughly. Notice it’s source of light, make the sketch lighter and darker with accordance to the effect of the light . See if the object is in motion and make the sketch in its accordance. If it helps first visualise it in the form of primary shapes (Square, Triangle, circle etc.) and use them as a base to get the dimensions right.
If you are using an image then divide the image in equal 4,9,25 or so parts according to your convenience. Then replicate each smaller part in your drawing paper as dealing with the smaller part is much simpler than dealing with the whole. It even helps in getting the dimensions right!
Don’t draw heavily
Use light strokes whenever you are sketching as usually it’s a base draft of an image. Therefore always use light and lot of short quick strokes. Using light strokes even helps in erasing the mistakes.
Next step use darker pencil
Once after completing the rough primary sketch, use darker (6b) pencil to define the strokes more precisely and adding details to them. This strokes are also used to get the inner details right. If you want a smoother final product u can always smudge it with the help of cotton or soft cloth.
Erase all the extra smudge prints
Usually while using softer pencil you’ll notice smudges on the paper. So remove all this smudges by using a soft eraser lightly. Keep in mind to use a soft eraser as a putty one might tear the page.
Perfect your lines.
Add further details and repeat the earlier steps with them until you a satisfied with the end result. Many times the soft border gives an unprofessional look to after erasing the extra smudge u can highlight the sketch using a harder pencil (H grade).
Voila!
You have your beautiful sketch ready.Now you you wish you can spray fixative so that the sketch is preserved and is avoided from smudging
Sketching is not that hard as people seem to believe. There are no right and wrong in it. Above mentioned technique just makes it simpler so use them and let yourself indulge in this beautiful experience and let the magic begin!
These are some of my own attempts at sketching:
An artistic representation of a landscape.Portrait of Marilyn Monroe.

 There are a few different types of text-to-image generators. One of them is using diffusion models.Diffusion models are trained on a large dataset of hundreds of millions of images.
A word describes each image so the model can learn the relationship between text and images. It is observed that during this training process, the model also knows other conceptual information, such as what kind of elements would make the image more clear and sharp.
After the model is trained, the models learn to take a text prompt provided by the user, create an LR(low-resolution) image, and then gradually add new details to turn it into a complete image. The same process is repeated until the HR(high-resolution) image is produced.
Green dragon on table
Diffusion models don’t just modify the existing images; they generate everything from scratch without referencing any images available online. It means that if you ask them to generate an image of a “dragon on the table,” they would not find an image of the dragon and table individually on the internet and then process further to put the dragon on the table instead of that they will create the image entirely from scratch based on their understanding of the texts during the training time.
There are a few different types of text-to-image generators. One of them is using diffusion models.Diffusion models are trained on a large dataset of hundreds of millions of images.
A word describes each image so the model can learn the relationship between text and images. It is observed that during this training process, the model also knows other conceptual information, such as what kind of elements would make the image more clear and sharp.
After the model is trained, the models learn to take a text prompt provided by the user, create an LR(low-resolution) image, and then gradually add new details to turn it into a complete image. The same process is repeated until the HR(high-resolution) image is produced.
Green dragon on table
Diffusion models don’t just modify the existing images; they generate everything from scratch without referencing any images available online. It means that if you ask them to generate an image of a “dragon on the table,” they would not find an image of the dragon and table individually on the internet and then process further to put the dragon on the table instead of that they will create the image entirely from scratch based on their understanding of the texts during the training time.  Sloth in pink water
There are many benefits of using diffusion models over other models. Firstly, these are more efficient to train. The images generated by them are more realistic and connected to the world. Also, it makes it easier to control the generated image, you can just use the color of the dragon(let’s say green dragon) in the text prompt, and the models will generate the image.
Sloth in pink water
There are many benefits of using diffusion models over other models. Firstly, these are more efficient to train. The images generated by them are more realistic and connected to the world. Also, it makes it easier to control the generated image, you can just use the color of the dragon(let’s say green dragon) in the text prompt, and the models will generate the image.