Web3.0, Blockchain and Dapps

Reading Time: 6 minutes

We have already entered the era of Web3.0, which is the next evolution of the internet…. Wait! Web3.0? Are you serious? Why can we not have just a single web? What’s the matter with these different versions of the web? Oh wait, I got it! It’s all about breaking the monotonous “Web” into different versions just to sound cool, yeah?

Well, I wouldn’t deny the fact that, yes, it indeed “sounds cool”, but there is a whole story behind it…. want to know about why there have been different versions of the web and what makes web3.0 the buzzword in the community? Well, ride with me to explore this journey ahead.

  • Introduction

Web 1.0 vs Web 2.0 vs Web 3.0. We all understand the hype about Web… | by Nazhim Kalam | Enlear Academy

Do you like to create content? Writing articles, blogs and sharing information to show it to people surfing over the internet… well this was what Web1.0 was all about. Coined by Tim Berners Lee, it only had static pages in order to serve the content created by the users, the time between 1991 and 2004, when there were only a few who created the content and the rest of the people used to watch that over the internet.

Then came Web2.0, which we have been using, increased the interactivity of the users by not just providing them with the content but enabling them to interact with each other over the internet. Do you want food and groceries to be delivered to your place, want to book a ride for going out, or would you like to get feedback on your service…? Well this phase of the web addresses all these questions and provides solutions for them.

Now let me come back to where I dropped off… We have already entered the “Era of Web3.0”, which is the next evolution of the internet, that is based on openness (which means a small group of the organization will not control the content and the code but on open source platforms – means anyone, from anywhere in the world, who will be having the access to the internet will be able to use the same) and decentralization (means no permission will be needed from a central authority for posting anything on web and users will be able to interact with the services without the authorization from central authority).

As a result, Web 3.0 applications will run on the blockchain, and such decentralized apps are referred to as dApps (discussed later below). It will even use machine learning to effectively use the data, giving valuable insights to the companies and fruitful results to the consumers but it doesn’t just stop here. The application of Virtual Reality is also immense, where people can be exposed to virtual environments in various domains such as military, sports, medical, just to name a few, before they go into the real world.

  • Blockchain

Blockchain Technology Explained and What It Could Mean for the Caribbean - Caribbean Development Trends

The heart of Web3.0, blockchain, is a distributed database or ledger that is shared among the nodes (nodes are the devices or computers that participate in a blockchain network and continuously exchange the newest information or the transaction on the blockchain) of a computer network.

The first decentralized blockchain was conceptualized by a person (or group of people) known as Satoshi Nakamoto, who is known as Bitcoin’s pseudonymous creator. In a research paper introducing the digital currency, he (they) referred to it as “a new electronic cash system that’s fully peer-to-peer, with no trusted third party.” After this event, there was no going back.

As a database, a blockchain stores information electronically in digital format. Compared to a normal database, which usually stores data in the form of tables (for a simpler explanation of database, we can consider Excel sheets – as they have the data organized in the form of rows and columns), blockchain structures its data into blocks, that records the data, and distributes it over the network of nodes but do not allow it to be edited. In this way, a blockchain is the foundation for immutable ledgers, or records of transactions that cannot be altered, deleted, or destroyed.

Distributing the data among several network nodes at various locations, not only creates redundancy (means multiple copies of the same data available all over the network) but also maintains the fidelity of the data stored therein—if somebody tries to alter a record at one instance of the database, the other nodes would not be altered and thus would prevent a bad actor from doing so.

If one user tampers with a record of transactions, then, all other nodes would cross-reference each other and easily pinpoint the node with the incorrect information. This system helps to establish an exact and transparent order of events. This way, no single node within the network can alter information held within it.

Web3.0, Blockchain and Dapps

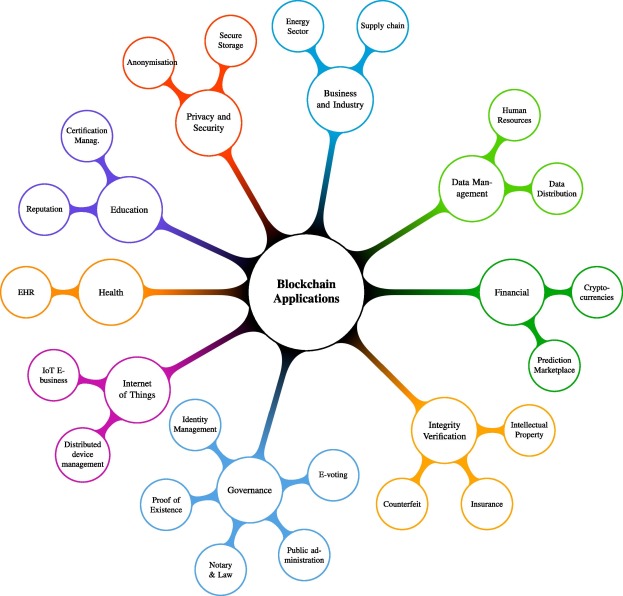
Because of this, the information and history of the data stored on the blockchain are irreversible. Blockchain can find its applications in various places such as in:

  • Secure sharing of medical data
  • NFT (non-fungible token) marketplace
  • Cross-borderer payments
  • Supply chain and logistics monitoring
  • Anti-money laundering tracking system
  • Voting mechanism
  • Crypto exchanges
  • Secure IoT (internet of things) network

  • Dapps

What Are dApps?

Decentralized applications (dApps) are digital applications or programs that exist and run on a blockchain or network of computers directly connected with each other on the network (P2P or peer-to-peer network) instead of a single computer. These are outside the purview and control of a single authority.

Well, this was somewhat a broader definition, and to understand it better, let’s understand it through an example…

A standard web app, such as Ola, Uber, Twitter, Amazon, etc, runs on a computer system that is owned and operated by an organization, giving it full authority over the app and its workings. There may be multiple users using the app on one side, but the backend is controlled by a single organization. DApps can run on a P2P network or a blockchain network.

Web3.0, Blockchain and Dapps

A peer-to-peer (P2P) service is a decentralized platform whereby two individuals interact directly with each other, without intermediation by a third party. Here the buyer and the seller directly communicate with each other without the involvement of another party or organization between them. Also, as it runs on a blockchain network, hence whatever data once registered on it, cannot be deleted by anyone.

dApps use smart contracts (these are basically a piece of code which are embedded inside the block of a blockchain, in order to carry out computations and transactions, like Ethereum blockchain uses Solidity language to write, store and run codes inside its block) to complete the transaction between two anonymous parties without the need to rely on a central authority.

A smart contract is a self-executing contract with the terms of the agreement between buyer and seller being directly written into lines of code.

Web3.0, Blockchain and Dapps

Ethereum dApps use smart contracts for their logic. They are deployed on the Ethereum network and use the platform’s blockchain for data storage. Ethereum provides flexible dApps development, hence helping in the rapid deployment of dApps for a variety of industries including banking and finance, gaming, social media, online shopping, and many more.

  •  Conclusion

We can finally see the story behind the different versions of the Web and how the blockchain and decentralization have already been bringing the revolution in the tech domain. The digital world is changing rapidly, and companies need to keep up with the swiftly moving tech environment. Along with the survival of the fittest, it’s also about the survival of the swiftest! You can beat your competition in the market if your company not only adapts to modern technology but if it’s also able to adjust itself to the modern environment faster than the others.

Primer to HTML, CSS, BOOTSTRAP

Reading Time: 10 minutes

Landed here surfing through various amazing websites, wondering how they are designed?
Interested in front-end development, but just a beginner?
You are at the right place!
It’s never too late to start. So let’s get started.

1 Introduction to HTML, CSS and BOOTSTRAP

1.1 HTML

Hyper Text Markup Language was created by Tim Berners-Lee in 1991, is a markup language used for structuring and presenting content on Web.

  • Created to build the structure of the website.
  • Consists of several elements represented by tags.
  • These elements are rendered on the browsers in form of viewable content.

1.2 CSS

Cascading Style Sheets (CSS) is a simple language created to style the HTML elements.

  • Styling can be done using tag names, class names and id’s assigned to various elements in our HTML document.

Primer to HTML, CSS, BOOTSTRAP

1.3 BOOTSTRAP

Bootstrap is a very popular and useful framework of HTML, CSS and JS for creating responsive website designs.

  • It has inbuilt HTML, CSS based designs for different elements like button, divisions, images, lists, tables and many more; which can be directly used to create a responsive design very fast.


2 BOOTSTRAP basics

2.1 Bootstrap GRID

Bootstrap gridding system divides the page into 12 identical columns and multiple rows, which you can use to place HTML elements. More than 1 column(s) can be combined to achieve more width.
Primer to HTML, CSS, BOOTSTRAP

The gridding system consists of 4 classes:
xs – for screens less than 768px width
sm – for screens equal to or greater than 768px width
md – for screens equal to or greater than 992px width
lg – for screens equal to or greater than 1200px width

example:
<div class="row">
  <div class="col-sm-4">...</div>
  <div class="col-sm-8">...</div>
</div>
here you can verify there are two columns having a
span on 4 and 8 columns of the bootstrap grid system adding up to 12

2.2 Bootstrap classes

Contextual inbuilt classes can be used on different HTML elements to style them without having to write CSS code ourselves(you can assume that CSS is already written for the classes we are using). In this section we will discuss some important contextual classes provided by bootstrap.

  • Classes for div containers
    .container and .container-fluid are the bootstrap classes which can be assigned to a container div
    .container sets the division width less than screen width by rendering left and right margins.
    .container-fluid sets the division width= screen width.
    Primer to HTML, CSS, BOOTSTRAP
  • Classes for background color
    .bg-primary, .bg-success, .bg-info, .bg-warning, .bg-danger
    background color will automatically appear for the particular element when you assign any of these classes for it.Primer to HTML, CSS, BOOTSTRAP
  • Classes for text color
    .text-muted, .text-primary, .text-success, .text-info, .text-warning, .text-danger
    text color will automatically appear for the particular element when you assign any of these classes for it.
  • Classes for button
    .btn,.btn-default,.btn-primary,.btn-success,.btn-info,.btn-warning,.btn-danger,.btn-link
    button color will automatically appear for the particular button, when you assign any of these classes for it..btn-lg,
    .btn-sm,
    .btn-xs
    any of these classes when assigned to a button, resizes the button.
    Primer to HTML, CSS, BOOTSTRAP

These are some of the important classes we discussed. Bootstrap provides many more classes for many other elements. We will be using these classes and introduce other classes further.

2.3 Modifying style using CSS

After use of contextual classes that bootstrap provides, you might be feeling limited in no. of options. For example; for text coloring using class, the range of colors that bootstrap provides is very less (red(danger) ,yellow(warning) ,green(success) … etc). also, the other styling is very particular, like the button border, border-radius, font etc. The question is, do we have to work with these restrictions? This way, all the websites made using bootstrap will look identical with just changes in the content.
Primer to HTML, CSS, BOOTSTRAP
Fortunately this doesn’t happen. We can do all types of styling changes using CSS. We just have to assign a different class(not bootstrap classes) to the target element and set/update any CSS property of our choice. The CSS will be rendered on the target element.

example:
<div class="container">
<p>we are modifying CSS of a button.</p>
<button class="btn btn-lg btn-danger colorchange"></button>
</div>
<style>
.colorchange{
  background-color: #000000;
  border-radius: 20px;
}
.colorchange:hover{
  background-color: green;
  transition:0.7s;
}
</style>


After a brief intro to the languages and frameworks we will be using further and learning bootstrap basics, lets get our hands on and start making a beautiful static responsive website.


3 Let’s start building 😉

Prerequisites
  • Basics of HTML and CSS
  • Some theory about bootstrap that we discussed above

3.1 Setting up environment to start off

Directory structure will be like-

Project folder

  • index.html
  • style.css
  • assets folder (containing images to be used)

To start off, all you need is a text editor. I prefer Brackets text editor because it comes along with autocomplete feature, which saves time and I’ll be using Brackets throughout. There are several alternatives to brackets like sublime text editor, atom etc.

Another requirement to start off is Bootstrap.

  • You can download it from getbootstrap.com
  • or you can use bootstrap CDN(which I’ll be doing).
  • NOTE: If you use CDN, internet connection will be needed for bootstrap to do the rendering.
<link rel="stylesheet" href="https://maxcdn.bootstrapcdn.com/bootstrap/3.4.1/css/bootstrap.min.css">
<script src="https://ajax.googleapis.com/ajax/libs/jquery/3.4.1/jquery.min.js"></script>
<script src="https://maxcdn.bootstrapcdn.com/bootstrap/3.4.1/js/bootstrap.min.js"></script>
  • another font-awesome CDN is to be included in our html file. The various icons that we will include in our website(in following sections) uses this.
<link rel="stylesheet" href="https://cdnjs.cloudflare.com/ajax/libs/font-awesome/4.7.0/css/font-awesome.min.css">

you can copy these CDNs in the head tag.

Setting up
index.html to begin.

<html>
   <head>
     <meta charset="utf-8">
     <meta name="viewport" content="width=device-width, initial-scale=1">
     <link rel="stylesheet" href="https://maxcdn.bootstrapcdn.com/bootstrap/3.4.1/css/bootstrap.min.css">
     <script src="https://ajax.googleapis.com/ajax/libs/jquery/3.4.1/jquery.min.js"></script>
     <script src="https://maxcdn.bootstrapcdn.com/bootstrap/3.4.1/js/bootstrap.min.js"></script>
     <link rel="stylesheet" href="https://cdnjs.cloudflare.com/ajax/libs/font-awesome/4.7.0/css/font-awesome.min.css">
     <link rel="stylesheet" href="./style.css">
     <title>
       My first Bootstrap Template.
     </title>
   </head>
   <body>
   </body>
   </html>

meta tag is used for proper zooming and rendering during the first load of the page on browser. Test run index.html once. Now we have set up the environment required for making our website.
Don’t forget to link your CSS file to this in head tag.

3.2 Making different sections

The sections we will be building will be:

  • HOME
  • GALLERY
  • TEAM
  • CONTACT

Now, I’ll provide you the source code used. Notice the Bootstrap classes being used. Also watch the styling changes that I’m making in the CSS file to change the designs of the target elements. All sections here, are child elements of body tag. You can use my source code given below. Feel free to work around with your own ideas and tweaking.

HOME

This section will contain the page which first loads on user’s screen. This will contain Logo, Menu, Text in middle, Background image.

Primer to HTML, CSS, BOOTSTRAP
index.html:

<div class="container-fluid home" id="home">
            <nav class="navbar">
                <div class="container">
                    <div class="navbar-header">
                        <a class="navbar-brand" href="#">LOGO</a>
                    </div>
                    <ul class="nav navbar-nav navigation" >
                        <li><a href="#home">HOME</a></li>
                        <li><a href="#gallery">GALLERY</a></li>
                        <li><a href="#team">TEAM</a></li>
                        <li><a href="#contact">CONTACT</a></li>
                    </ul>
                </div>
            </nav>
            <div class="row">
                <div class="col-sm-3"></div>
                <div class="col-sm-6">
                    <h1>QUOTE:</h1>
                    <H3>"Dreams of great dreamners are always transcended,<br><br> - A.Kalam"</H3>
                </div>
                <div class="col-sm-3"></div>
            </div>
        </div>

style.css:

.home{
    background-image: linear-gradient(rgba(0,0,0,.6),rgba(0,0,0,.6)),url(https://wallup.net/wp-content/uploads/2018/09/25/607518-leaves-dark-macro-water_drops-camera-748x421.jpg);
    background-size: cover;
}
.home .row{
    margin-top: 10%;
    margin-bottom: 15%;
}
.navbar{
    margin-top: 5%;
}
.navbar ul{
    float: right;
}
.nav li{
    border-bottom: 1px solid whitesmoke;
    text-align: center;
}
.navbar-brand{
    color: white;
    border: 1px solid white;
    border-radius: 50px;
}
.nav li a:hover{
    color: black;
}
.nav li a{
    color: white;
}
.home .row h1{
    color: cadetblue;
    margin: 50px;
    margin-left: 0;
    border-bottom: 1px solid cadetblue;
}
.home .row h3{
    color: white;
    margin: 30px;
}


GALLERY

This section in our page will contain an image carousel with left and right swipe controls to view different images of gallery.
Primer to HTML, CSS, BOOTSTRAP

index.html

<div class="container-fluid gallery" id="gallery">
            <div class="container-fluid">
                <h1>Gallery</h1>
                <center><p>Galleries are pages which contain large numbers of media content—almost always, images—with little or no supporting
                text. Large numbers of galleries have been deleted from Wikipedia per WP:NOT. This is usually cited in this context as
                WP:NOT an image gallery, which is a paraphrase of the official policy that Wikipedia articles are not mere collections
                of photographs or media files. There are, therefore, very few gallery-articles left on Wikipedia in the main article
                namespace (see [1]). This page defines how, when, and where gallery-articles should and should not be used. It is not
                concerned with the use of the gallery feature within pages that are predominantly text-based articles</p></center>
                <div id="myCarousel" class="carousel slide" data-ride="carousel">
                    <!-- Indicators -->
                    <ol class="carousel-indicators">
                        <li data-target="#myCarousel" data-slide-to="0" class="active"></li>
                        <li data-target="#myCarousel" data-slide-to="1"></li>
                        <li data-target="#myCarousel" data-slide-to="2"></li>
                    </ol>
                    <!-- Wrapper for slides -->
                    <div class="carousel-inner">
                        <div class="item active">
                            <center><img src="https://hrexecutive.com/wp-content/uploads/2018/10/GettyImages-869538734broken700-700x450.jpg"></center>
                        </div>
                        <div class="item">
                            <center><img src="https://kubesystems.com/wp-content/uploads/2016/05/bg-dark-3-700x450.jpg"></center>
                        </div>
                        <div class="item">
                            <center><img src=""></center>
                        </div>
                    </div>
                    <!-- Left and right controls -->
                    <a class="left carousel-control" href="#myCarousel" data-slide="prev">
                        <span class="glyphicon glyphicon-chevron-left""></span>
                    </a>
                    <a class="right carousel-control" href="#myCarousel" data-slide="next">
                        <span class="glyphicon glyphicon-chevron-right""></span>
                    </a>
                </div>
            </div>
        </div>

style.css

/*GALLERY*/
.gallery{
    background-color: black;
}
.gallery .container-fluid{
    margin-top: 100px;
    margin-bottom: 60px;
    background-color: url(https://wallup.net/wp-content/uploads/2018/09/25/607518-leaves-dark-macro-water_drops-camera-748x421.jpg);
}
.gallery h1{
    padding-bottom: 30px;
    margin-bottom: 20px;
    border-bottom: 1px solid white;
    color: white;
    font-weight: lighter;
    text-align: center;
}
.gallery .item{
    text-align: center;
}
.gallery .item img{
    text-align: center;
}
.gallery p{
    text-align: center;
    width: 70%;
}


OUR TEAM

This section of our page will display 3 team members in form of cards. The cards will contain personal information about each member.
Primer to HTML, CSS, BOOTSTRAP

index.html

<div class="container-fluid team" id="team">
            <div class="container">
                <h1>Our Team</h1>
            <div class="row">
                <div class="col-sm-4">
                    <center>
                        <div class="shift s1">
                            <img src="https://biobaseddelta.com/wp-content/uploads/2018/08/person-450x340.jpeg" />
                            <h3>Member 1</h6><span>Designation</span><br><br>
                            <i class="fa fa-facebook"></i><i class="fa fa-twitter"></i><i class="fa fa-google-plus"></i><i
                                class="fa fa-instagram"></i>
                            <center>
                                <p>
                                    A team is a group of individuals (human or non-human) working together to achieve their goal.
                                    As defined by Professor Leigh Thompson of the Kellogg School of Management, "[a] team is a group of people who are
                                    interdependent with respect to information, resources, knowledge and skills and who seek to combine their efforts to
                                    achieve a common goal".[1]
                                    Team members need to learn how to help one another, help other team members realize their true potential, and create an
                                    environment that allows everyone to go beyond their limitations.[4]
                                </p>
                            </center>
                        </div>
                    </center>
                </div>
                <div class="col-sm-4">
                    <center>
                        <div class="shift s1">
                            <img src="https://biobaseddelta.com/wp-content/uploads/2018/08/person-450x340.jpeg" />
                            <h3>Member 1</h6><span>Designation</span><br><br>
                                <i class="fa fa-facebook"></i><i class="fa fa-twitter"></i><i class="fa fa-google-plus"></i><i
                                    class="fa fa-instagram"></i>
                                <center>
                                    <p>
                                        A team is a group of individuals (human or non-human) working together to achieve their goal.
                                        As defined by Professor Leigh Thompson of the Kellogg School of Management, "[a] team is a group
                                        of people who are
                                        interdependent with respect to information, resources, knowledge and skills and who seek to
                                        combine their efforts to
                                        achieve a common goal".[1]
                                        Team members need to learn how to help one another, help other team members realize their true
                                        potential, and create an
                                        environment that allows everyone to go beyond their limitations.[4]
                                    </p>
                                </center>
                        </div>
                    </center>
                </div>
            </div>
        </div>
        </div>

style.css

/*TEAM*/
        .shift{
           text-align: center;
           background-color: #fff;
           padding: 30px;
           margin-top: 30px;
           margin-bottom: 50px;
           width: 100%;
           position: relative;
       }
       .shift .row{
           margin-top: 50px;
           margin-bottom: 50px;
       }
       .team h1{
           text-align: center;
           border-bottom: 1px solid black;
           margin: 30px;
       }
       .shift:hover{
           box-shadow: 0 4px 8px 0 rgba(0, 0, 0, 0.2), 0 6px 20px 0 rgba(0, 0, 0, 0.19);
       }
       .shift i{
           font-size: 0;
           padding: 0;
           margin-left: 5px;
           margin-right: 5px;
           border-radius: 60px;
           visibility: hidden;
       }
       .s1:hover > i{
           visibility: visible;
           font-size: 17;
           padding: 8px;
           border: 1px solid white;
           transition: 0.3s;
       }
       .team img{
           text-align: center;
           width: 50%;
           height: auto;
       }
       .team p{
           width: 90%;
       }


CONTACT

This section will contain a contact form (made using form tag) and other contact details. At the end of the page there is a simple footer section.
Primer to HTML, CSS, BOOTSTRAP

index.html

<div class="container-fluid contact" id="contact">
    <div class="container">
        <h1>Contact</h1>
        <div class="row">
        <div class="col-sm-6">
            <h2>Get In Touch</h2>
            <form>
                <input type="text" placeholder="Your Name" required><br>
                <input type="email" placeholder="Your eMail" required><br>
                <input type="number" placeholder="Your Contact No." required><br>
                <textarea></textarea>
                <button type="submit" class="btn btn-primary x">Send Message</button>
            </form>
        </div>
        <div class="col-sm-1"></div>
        <div class="col-sm-5">
            <h4>EMAIL</h4>
            probootstrap@gmail.com<br><br>
            <h4>PHONE</h4>
            +30 976 1382 9921<br><br>
            <h4>FAX</h4>
            +30 976 1382 9922<br><br>
            <h4>ADDRESS</h4>
            San Francisco, CA<br>
            4th Floor8 Lower<br>
            San Francisco street, M1 50F<br>
        </div>
        </div>
    </div>
</div>
<div class="container-fluid foot">
    <i class="fa fa-twitter" aria-hidden="true"></i>
    <i class="fa fa-facebook" aria-hidden="true"></i>
    <i class="fa fa-instagram" aria-hidden="true"></i>
    <i class="fa fa-linkedin" aria-hidden="true"></i><br><br>
    © 2020.<br>
    Designed by: Shreyash .K<br>
    Demo bootstrap template.
</div>

style.css

/*CONTACT*/
.contact{
    background-image: linear-gradient(rgba(0,0,0,.7),rgba(0,0,0,.7)),url(https://www.pixelstalk.net/wp-content/uploads/images2/Free-Hd-Dark-Wallpapers-Images.jpg);
    background-size: cover;
}
.contact .container h1{
    color: white;
    text-align: center;
    border-bottom: 1px solid white;
}
.contact .container h2{
    color: silver;
}
.contact .container{
    margin-top: 50px;
    margin-bottom: 25px;
}
.contact form{
    background-color: silver;
    padding: 20px;
    border-radius: 10px;
}
.contact .row{
    margin-top: 50px;
}
.contact form input{
    width: 100%;
    margin: 10px;
    margin-left: 0;
    height: 25px;
}
.contact form textarea{
    width: 100%;
    height: 20%;
}
.contact form button{
    background-color: black;
    margin: 5px;
}
.contact .col-sm-5{
    color: silver;
}
.foot{
    text-align: center;
    padding: 25px;
    background-color: black;
    border-top: 1px solid white;
}
.foot i{
    color: white;
    padding: 5px;
}
.foot i:hover{
    background-color: white;
    color: black;
    transition: 0.4s;
}


And our first bootstrap website design is ready!
Hope you enjoyed it. You can now create more such designs using even more variety of elements and classes provided by bootstrap. Try experimenting different combinations of styling and make your design attractive to the viewer.
Thank you!
keep learning, keep growing.

YANTRIKA DIVISION,

TEAM CEV.

HTML Canvas Games from Scratch #4

Reading Time: 6 minutes

HTML Canvas Games from Scratch #4

Hello devs!🎮
Let us continue with the game👾
Now we need to implement these functionalities to complete the game:

  • Collide bullets with aliens
  • Healthbar for the player
  • Respawning of aliens
  • Background
  • Score calculation and game over

Let’s do it! 🚀

Phase 4

So we will begin with the code we left last time.
If you don’t already have it, you can download it from : HERE
So we will follow the order of functionalities given above.

Bullet alien collision💥:

So the alien should die if the bullet touches the alien’s body. To do this we will implement a distance() function which will take the coordinates of the alien and the bullet in consideration and check if any collisions occur. We will be iterating through the array Aliens and the array Bullets to check for each pair of {alien , bullet} to check for a collision. Let’s code!

//Checking for bullet kill  
for(i=0;i<Bullets.length;i++)
{
for(j=0;j<maxAliens;j++)
{
if(Math.abs(Bullets[i].x - Aliens[j].x) <= 18 && Bullets[i].y <= Aliens[j].y && Bullets[i].y>=Aliens[j].y-20 && (player.y - Aliens[j].y) >= 38 )
{
kills++;
Bullets[i].y = -10;
var addAlien = new alien(Math.random()*(window.innerWidth-100)+60, Math.random()*(window.innerHeight/2-300),Math.floor(Math.random()*2));
Aliens[j] = addAlien;
}
}
}

Now let us analyse this code.

We are traversing through both the arrays and checking for 4 conditions :

  • Absolute distance between bullet and alien in x axis is less than or equal to 18 (as the aliens are almost 36px in width).
  • The y coordinate of the bullet is less than the y coordinate of the alien.
  • The y coordinate of the bullet is greater than ( alien.y - 20 ).(as the aliens are almost 40px in height)
  • The y coordinate of the space shuttle (center) is at least 38px below the aliens center.(this ensures that the alien and space shuttle are not )

If these conditions are satisfied, we :

  • Update number of kills (variable kills++)
  • Send the bullet out of the screen (y = -10)
  • Add a new alien in place of the dead alien.

Source Code : Code Link
Location in repository : \Phase 4\BulletCollisions


Try and run this code yourself to see the output.

Healthbar❤️:

For this we define a new variable called healthBarHeight.
So out health bar height will depend on the health variable, which is initially valued 90. As the aliens touch the shuttle, or the aliens *pass beyond the screen *, the shuttle’s health is reduced.
Turning it into code :

//Drawing the health bar  
c.beginPath();
if(health == 90){
c.fillStyle = "green";
healthbarHeight = 90*6;
}
else if(health == 60){
c.fillStyle = "orange";
healthbarHeight = 60*6;
}
else if(health == 30){
c.fillStyle = "red";
healthbarHeight = 30*6;
}
else{
healthbarHeight = 0;
}
c.fillRect(20, 20, 20 , healthbarHeight );
c.closePath();
c.fill();

Note : All this is written inside the draw() function.

Well we also need to handle the cases where the player loses health. Write this inside the draw() function :

for( j=0 ; j<Aliens.length ; j++)
{
if(Math.abs(Aliens[j].y - testShuttle.y) <= 60 && Math.abs(Aliens[j].x - testShuttle.x)<=18 || Aliens[j].y >= window.innerHeight -30){
health-=30;
var addAlien = new alien(Math.random()*(window.innerWidth-100)+60, Math.random()*(window.innerHeight/2-300),Math.floor(Math.random()*2));
Aliens[j] = addAlien;
}
}

Try to check what conditions are handled.


Note : As soon as any of the conditions are satisfied, we have also killed the alien. Try removing the last 2 lines inside the if statement and then run the code and see the outcome.

The healthbar would looks something like this :
https://github.com/jrathod9/Making-of-Space-X-/blob/master/Phase%204/Health/Healthbar.png

Source Code : Code Link
Location in repository : \Phase 4\Health


Note : We still need to add the “Game Over” condition. We will do that at the end.

Before moving forward, let us code to increase the difficulty with score.
I.e. as kills increase, so will the speed of the aliens and the number of aliens:

var level = 0; //Declare this at the top  
//Increase difficulty with kills  
//Add this inside "Checking for bullet kill" after Aliens[j] = addAlien;  
if(kills % 10 == 0){
alienSpeed += 0.1;
}
if(kills % 20 == 0){
level++;
var levelupAlien = new alien(Math.random()*(window.innerWidth-100)+60, Math.random()*(window.innerHeight/2-300),Math.floor(Math.random()*2));
Aliens.push(levelupAlien);
maxAliens++;
}

At every 15 kills we add a new alien, and at every 10 kills we increase the speed.
Source Code : Code Link
Location in repository : \Phase 4\LevelUp

Background✴️:

The game is set in outer space, so whats missing?
Right! Stars✨!
Lets code this separately first:

var maxStars = 150; //Stars on the screen  
var starSpeed = 5;
//Star object  
var star = function(x,y ,rad){
this.x = x;
this.y = y;
this.rad = rad;
}
Stars = new Array(); //Array of stars  
//Filling the array  
for(a = 0; a<maxStars ; a++){
var temp = new star(Math.random()*(window.innerWidth-20), Math.random()*(window.innerHeight-20),Math.random()*3 );
Stars.push(temp);
}

Now we will be drawing these stars, but every time a star leaves the screen we will place it back on the top. Hence it will be like a single screen just repeating itself.
This is how most of the infinite runner games like temple run and subway surfers take up just a few MB of space.
So here goes the draw function :

function draw(){
//Clear window  
c.clearRect(0,0,window.innerWidth, window.innerHeight);
//Draw stars  
for(j = 0;j<maxStars ; j++){
c.beginPath();
c.fillStyle = 'rgba(255,255,255,0.7)';
c.arc(Stars[j].x,Stars[j].y,Stars[j].rad , 0 , Math.PI * 2 , false);
Stars[j].y += starSpeed;
//This part send the star back to the top  
if(Stars[j].y >= window.innerHeight-20){
Stars[j].y = 0;
}
c.closePath();
c.fill();
}
requestAnimationFrame(draw);
}
draw();

Result:
https://github.com/jrathod9/Making-of-Space-X-/blob/master/Phase%204/Background/background.gif

Source Code : Code Link
Location in repository : \Phase 4\Background

Now we need to add this to the game . The background will be drawn regardless of what’s going on in the game so let us straightaway merge the code in the game code, resulting in :

https://github.com/jrathod9/Making-of-Space-X-/blob/master/Phase%204/BackgroundMerged/GameWithBackground.gif

Source Code : Code Link
Location in repository : \Phase 4\BackgroundMerged

Its time to wrap it up by calculating the score and handling the game over condition.

Game 0ver🎌:

To calculate the score there may be different ways. It totally depends on you how do you want to calculate the score.
I personally feel it is best to check the Accuracy and Level Reached:

var alive = 1; //1 alive 0 dead  
..
..
function draw(){
//Enter code to draw Stars  
..
..
if(alive)
{
//Rest of the game  
..
..
//Check if alien touches shuttle or crosses screen to reduce health  
..
..
if(health == 0) //Check if health is 0  
alive = 0;
..
..
}
else
{
//Score screen  
c.beginPath();
c.fillStyle = 'rgba(255,255,255,0.5)';
c.font = "30px Calibri";
c.fillText("GAME OVER!" , (window.innerWidth-20)/2 - 55 , (window.innerHeight-20)/2 - 30);
c.fillText("Kills : " + kills , (window.innerWidth-20)/2 - 15 , (window.innerHeight-20)/2 );
c.fillText("Accuracy : " + (kills*100/totalBullets).toFixed(2), (window.innerWidth-20)/2 - 55 , (window.innerHeight-20)/2 + 30);
}
requestAnimationFrame();
}
draw();
..
..

This is how the game over screen will look:

https://github.com/jrathod9/Making-of-Space-X-/blob/master/Phase%204/Final/GameOver.png

So we are now ready with the final game:
Source Code : FINAL GAME
Location in repository : \Phase 4\Final

I’ve added a flickering effect to the alien as it looks cool. 😉
Enjoy playing and share it with your friends too! You can now experiment with the code to add your own effects, functionalities, audio, video and much more.

Play This Game
Play Another Version

Well this is the end of the series. Hope you try and create more such games and visuals on canvas.

If you liked canvas check THIS out!
Do leave suggestion/comments if any.
Cheers!🍬


Written by : Jay Rathod💻
Links : Portfolio | Github | Codepen | Linkedin | Instagram

HTML Canvas Games from Scratch #3

Reading Time: 5 minutes

Hey, devs!🎮
So we are all set to begin creating the game👾.
Let’s do it!

Phase 3

Before we jump into coding, let us plan things.
Objects we will need :

  • Player (The space shuttle)🚀
  • Alien👾
  • Bullets

Let us define these objects :

//Shuttle object
var shuttle = function(x,y){
this.x = x;
this.y = y;
}
//Alien object
var alien = function(x,y){
this.x = x;
this.y = y;
}
//Bullet object
var bullet = function(x,y){
this.x = x;
this.y = y;
}
//Since we will handle multiple bullets and Aliens
var Bullets = new Array();
var Aliens = new Array();

Other variables that we will need to define are :

var totalBullets = 0; //bullets on screen
var health = 90; //health of player
var kills = 0; //total aliens killed
var maxAliens = 5; //Max aliens on the screen
var bulletSpeed = 7; //Speed of the bullet
var alienSpeed = 0.2; //Speed of the aliens

Note : These values are selected by hit and trial.
Now we will need alien and shuttle sprites. I have already made these using fillRect() functions.
Download code from this link : Code Link
Location in repository : \Phase 3\Sprites
Note : It is ok if you don’t try to understand drawShuttle() and drawAlien() as it isn’t very important, those are just figures made using rectangles. You will be using images for sprites in the future mostly.
Result :

HTML Canvas Games from Scratch #3
Space Shuttle will be positioned at the bottom center.
Alien will have a constrained random position at approximately the top part of the screen.

Now we will work on the same code that you’ve downloaded.
Let us add an event listener to enable the space shuttle to move using the arrow keys. (As we did in the previous post)

var keys = []; //Add this before the draw() definition
window.addEventListener("keydown", keysPressed, false );
function keysPressed(e) {
// store an entry for every key pressed
keys[e.keyCode] = true;
window.addEventListener("keyup", keysReleased, false);
}
function keysReleased(e) {
    // mark keys that were released
keys[e.keyCode] = false;
}

So we need to adjust the position of the space shuttle before re-drawing it on the canvas. Inside the draw() function, before drawing the space shuttle :

//Handling arrow key presses and shuttle movement boundaries
// left
if (keys[37]) {
if(player.x >= 70)
player.x -= shuttleSpeedh;
}
// right
if (keys[39]) {
if(player.x <= window.innerWidth - 50)
player.x += shuttleSpeedh;
}
// down
if (keys[38]) {
if(player.y >= window.innerHeight/2)
player.y -= shuttleSpeedv;
}
// up
if (keys[40]) {
if(player.y <= window.innerHeight - baseBottomh - midBottomh - cannonh)
player.y += shuttleSpeedv;
}

Run this code to check what are the constraints to the movement of the space shuttle.
Note : shuttleSpeedh and shuttleSpeedv respresent horizontal and vertical velocity. These have been defined in the file at the top.
Result :
HTML Canvas Games from Scratch #3
Here’s the source code : Code link
Location in repository : \Phase 3\MovingShuttle

Now let us fill the array of aliens:

//Initial array of aliens
for(a = 0; a < maxAliens; a++){
var temp = new alien(Math.random()*(window.innerWidth-100)+60, Math.random()*(window.innerHeight/2-300));
Aliens.push(temp); //We already defined this array
}

To draw all these aliens we need to make changes in out draw() function. Just add a loop where we are drawing a single alien:

for(a = 0 ; a < Aliens.length ; a++)
drawAlien(Aliens[a]);

Result :
HTML Canvas Games from Scratch #3
Here’s the source code : Code Link
Location in repository : \Phase 3\SpawnAliens

Moving on, we now need to make the space shuttle launch bullets.
This will happen on pressing spacebar. But only 1 bullet will be launched on pressing spacebar once. So the event we use will be keyRelease. Remember we have already defined it?
Let us add more functionality to it.
js  function keysReleased(e) { if(e.keyCode==32){ //keycode of spacebar var temp = new bullet(player.x , player.y - midBottomh - cannonh); totalBullets++; Bullets.push(temp); } }  
Now let us draw all the bullets on the canvas;

function drawBullet(thisBullet){
c.fillStyle = bulletColors[Math.floor(Math.random()*6)];
c.beginPath();
c.arc(thisBullet.x,thisBullet.y - cannonh + 10, 2.5 , 0 , Math.PI*2 ,false);
c.fillRect(thisBullet.x-2.5,thisBullet.y - cannonh + 10  ,5,5);
c.closePath();
c.fill();
}

Last but not the least lets draw these bullets on the canvas and make them move . This should be added inside draw():

//Check bullets that left the screen and remove them from array
for(a = 0 ; a < Bullets.length ; a++){
if(Bullets[a].y <=0 ){
Bullets.splice(a,1); //Removes 1 element from the array from index 'a'
}
}
//Update bullet coordinates to make it move and draw bullets
for(a = 0 ; a < Bullets.length ; a++){
Bullets[a].y -= bulletSpeed; //Already defined at the top
drawBullet(Bullets[a]);
}

Result :
HTML Canvas Games from Scratch #3
Here’s the source code : Code link
Location in repository : \Phase 3\Bullets

Moving on to the last thing that we will be doing in this phase. Make the aliens move.

Aliens[a].y += alienSpeed; //Add this inside the loop
//where we use drawAlien();

So we have set the aliens in motion!👾

Final source code for this phase : Code Link
Location in repository :  \Phase 3\Final

We are almost done with the game. This phase was about the aesthetics of the game. Next phase will be the final phase where we will add the game logic and a final touch with a good background and a visible healthbar.
Do leave comments/suggestions if any.
Cheers!🍺

 Play the game :

Star this game!


Written by : Jay Rathod💻
Links : Portfolio | Github | Codepen | Linkedin | Instagram

HTML Canvas Games from Scratch #2

Reading Time: 7 minutesHey folks!🎮
So in the previous post I tried to lay a foundation to start understanding canvas. I hope that by now you are a bit comfortable with it. So in the previous post we saw:

  • File structure and boilerplate📁
  • Some important javascript functions for drawing✏️
  • Defining a particle and drawing it on the canvas (hope you remember atom😉)
  • requestAnimationFrame()🔄
  • One and two dimensional uniform motion of the particle🏃
  • Gaining control over the Math.random() function🎲

Phase 2

Till now we were have worked with one particle, but that’s not how games are right? At least most of them. Handling multiple particles is not as tough as you might think. Let’s see how its done!
First of all, will the object definition of the particle change?
Well, it depends on the properties of these particles.
(We will see this later on)

Let us continue with the same particle definition that we previously used:

var particle = function(x,y,radius){
   this.x = x;
   this.y = y;
   this.radius = radius;
}

Now instead of defining one particle, let us define an array of particles:

var particleArray = new Array();

Let us now define 50 particles with random positions on the screen. But what are the dimensions of the screen?
We already have :

  • window.innerWidth
  • window.innerHeight

So the coordinates of the screen will be in the range:

  • X : 0 – window.innerWidth
  • Y : 0 – window.innerHeight

So the code goes like this :

var totalParticles = 50;         //number of particles 
var maxRadius = 30;               //maximum value of radius   
var particle = function(x,y,radius){
    this.x = x;
    this.y = y;
    this.radius = radius;
}
var particleArray = new Array(); //array of particles        
var i;                          //loop variable 
for(i = 0 ; i < totalParticles ; i++) {
    //Defining properties of the particle
    var xcoord = Math.random()*window.innerWidth;
    var ycoord = Math.random()*window.innerHeight;
    var rad = Math.random()*maxRadius;
    //New particle with above properties
    var tempParticle = new particle(xcoord,ycoord,rad);
    //Push tempParticle into the array
    particleArray.push(tempParticle);
}

I’ve tried to keep the code readable and obvious. Just read it and you should understand what is happening.
What’s left? Let us draw these particles on the canvas!
Just add the following code :

c.fillStyle = 'aqua';
//Drawing the particles
for(i = 0 ; i < totalParticles ; i++ ){
    c.beginPath();
    c.arc(particleArray[i].x,particleArray[i].y,particleArray[i].radius,0, Math.PI*2,false);
    c.closePath();
    c.fill();
}

Result:

HTML Canvas Games from Scratch #2

Here’s the source code : Code link
Location in repository : \Phase 2\ParticleArray

Note : On refreshing the page you will find a new configuration everytime.
Also we haven’t used the requestAnimationFrame() function as we just wanted static particles as of now.

What next? Let us give all the particles some random velocities🚀.
We need to add two properties for the particle object “x velocity” and “y velocity“:

var particle = function(x,y,vx,vy,radius){
this.x = x;
this.y = y;
this.vx = vx;              //x vel
this.vy = vy;              //y vel
this.radius = radius;
}

Now since we have added new properties for this object, we must also define its values for all the defined instances.

Wait, did I just go too hard on you?😝

Ok let me reframe that:
Since we added two new properties to the particle object, we also need to give the value of these properties for all the particles that are stored in the array.
So inside the for loop in which we are defining and adding particles to the array :

{
    ...
    ...
    var xvel = Math.random()*6 - 3;
    var yvel = Math.random()*6 - 3;
    ...
    var tempParticle = new particle(xcoord,ycoord,xvel,yvel,rad);
    ...
    ...
}

Try figuring out the range of (xvel, yvel).

Now we are ready with particles and their velocities. Lets start drawing them on the canvas. This time we will use requestAnimationFrame():

c.fillStyle = 'aqua';        //define fillStyle
function draw(){
    //Clears the entire canvas
    c.clearRect(0,0,window.innerWidth,window.innerHeight);
    //Update the value of the coordinates (according to velocity)
    for(i = 0 ; i < totalParticles ; i++ ){
        particleArray[i].x += particleArray[i].vx;
        particleArray[i].y += particleArray[i].vy;
    }
    //Drawing the particles
    for(i = 0 ; i < totalParticles ; i++ ){
        c.beginPath();
        c.arc(particleArray[i].x,particleArray[i].y,particleArray[i].radius,0, Math.PI*2,false);
        c.closePath();
        c.fill();
    }
    requestAnimationFrame(draw);
}
draw();

Result :

HTML Canvas Games from Scratch #2

Here’s the source code : Code link

Location in repository : \Phase 2\ParticleArrayMoving

It must be noted that the particles will soon disappear leaving a black screen. The reason being that the canvas extends infinitely, we just get to see a part which our window can capture.
To confine the particles to our window, we must make the window act as a box 🔳. Particles must collide and bounce back inside like this:

HTML Canvas Games from Scratch #2

These conditions are to be taken care of every time before drawing the particles. Let us code them:

//Checking for collison with walls
for(i = 0 ; i < totalParticles ; i++ ){
        if(particleArray[i].x > window.innerWidth || particleArray[i].x < 0)
            particleArray[i].vx*=-1;
        if(particleArray[i].y > window.innerHeight || particleArray[i].y < 0)
            particleArray[i].vy*=-1;
    }

Result :

HTML Canvas Games from Scratch #2

Here’s the source code : Code link
Location in repository : \Phase 2\ParticleArrayMovingCollisions

Notice the particles bouncing off the edges.

Practice Sesh💻 : You can try giving a different color to all the particles. You can also try to making all the particles twinkle/shimmer✨, by changing its opacity (the ‘a‘ in rgba).

Solutions to these : Link to code

Location in repository : \Phase 2\Practice Sesh

Interacting with the canvas:

Yes, chill❄️. It is possible. Obviously. Who would call it a game otherwise?
Let us talk about the addEventListener() method. As the name suggests, it simple listens to events. Events in this case are keyboard inputs, mouse clicks , changes in mouse movements etc.

Syntax:

window.addEventListener(Event,Function,useCapture);

Event : An event is nothing but a trigger. It is used to execute a coded response. Eg : click , onmousedown , onkeypress , onkeyup etc. (Know more..)
Function: This is the function that is to be called when that specific event occurs. It is defined somewhere in the code.
useCapture : This is either true or false. It is optional. It is used to define whether the event should be executed in the Bubbling or Capturing phase (it is not important right now, though you can read more here). By default it is false.

Lets start with the most basic event and response :
For this you will need the javascript code where we had just 1 static particle.(try to write this code yourself once)
Source code : Code link
Location in repository : \Phase 1\Atom Particle
Just remove the line of code used to increment the speed. Thus getting us a static particle.
Now let us add a simple mouse click event : (append this snippet at the end of the code.js file)

window.addEventListener("click", move , false); //define event listener
function move(e)            //response function                                              
{
    atom.x = e.x;            //update x coordinate of atom        
    atom.y = e.y;            //update y coordinate of atom
}

What is ‘e’ ?
e here represents the event, and the event here is click. It must be passed as a parameter to the function.
Every event has specific properties. For this click event, we have properties x and y which represent the coordinates of the cursor on clicking.

Coming back to the code, the function replaces coordinates of atom with the coordinates of the cursor. Thus moving it to the click position.
Check it out yourself.
Source code : Code link
Location in repository : \Phase 2\ParticleCanvasInteraction

Similarly, let us make atom move left , right, up and down with the arrow keys.
So this is what we need :

  • On pushing down an arrow key the particle should move.
  • On releasing the key the particle should stop its movement.

We will use the keydown and keyup events.
This even has a specific property called keyCode. Every key on the keyboard has a different keyCode. The keyCode values of arrow keys are :

  • Left : 37
  • Up : 38
  • Right : 39
  • Down : 40

Let us define a boolean array called “keys” which will hold true for all those keyCodes which are pressed.
Also we will need two event listeners, one that will check for keys pressed and the other that will check for keys released.

var keys = [];
window.addEventListener("keydown",keyPressed,false); //keydown listener
window.addEventListener("keyup",keyReleased,false);      //keyup listener
function keyPressed(e){             //sets value true when key pressed 
    keys[e.keyCode] = true;
}
function keyReleased(e){            //sets value false when key released
    keys[e.keyCode] = false;
}

Its not done yet. We need to make required adjustments in the draw() function, the effect of key presses on the coordinates :

function draw(){
..
..
    if(keys[37])                //if left is true
        atom.x-=xspeed;         //move left by xspeed
    else if(keys[39])         //else if right is true
        atom.x+=xspeed;         //move right by xspeed
    if(keys[38])                //if up is true
        atom.y-=yspeed;         //move up by yspeed
    else if(keys[40])         //else if down is true
        atom.y+=yspeed;         //move down by yspeed
..
..
}

Note : These are grouped this way because Up and Down cannot function together, and Left and Right cannot function together.


Also don’t forget to define xspeed and yspeed outside the draw function.

Result :
HTML Canvas Games from Scratch #2
Source code : Code link
Location in repository : \Phase2\ParticleCanvasInteractionKeyboard

Now its your turn to play around with a few more such events.

Other things you can try :

  • Bound the motion of this particle to the box
  • Comment out the clearRect() function and see the output
  • Use the fillRect() function with black colour but opacity less than 1, instead of clearRect(). (Will give a nice trail effect)

This is all for this post. Till here I have covered everything it takes to create the game that I made. Now all we have to do is combine all this logic in one file ❗
In my opinion you may also start creating the game yourself, or try making some other game maybe ping-pong, flappy bird, snakes etc.

Do leave comments/suggestions (if any).
Cheers!🍭

Written by : Jay Rathod💻
Links : Portfolio | Github | Codepen | Linkedin | Instagram

HTML Canvas Games from Scratch #1

Reading Time: 7 minutes

Hey there! This is my first blog about HTML Canvas Game Dev video_game.
There are a lot of other tools and libraries available for game dev which are easier to use, but canvas remains my favorite as it takes us to the root of how to code game physics. It is also a great way for beginners to get a good grip on Javascript (speaking from experience).
Thanks to my friend Ronik Gandhi <@rawnix> for introducing me with canvas.

At the end of this series you will be able to build a basic 2D game on your own.

In this series I will walk you through the steps to build a classic Space Invaderspace_invader game which I named SPACE-X.

It will look like this.

Do star star my repo (https://github.com/jrathod9/Space-X) if you liked the game.

Let's get started rocket

[Note: We will be creating games for pc only. They won't be responsive.]

Basic Files and Boilerplate

📦Space-X
┣ 📂assets
┃ ┣ 📂Images
┃ ┗ 📂audio
┣ 📜index.html
┗ 📜code.js

Get these folders and files ready. As of now we won't be using any assets, we will instead use javascript functions to create shapes.

This game without any images can be played [here] https://codepen.io/jrathod9/full/jXwMWQ

The index.html file will look something like :

<!DOCTYPE html>
<html>
<head>
<title>Space-X</title>
</head>
<body>
<canvas id="canvas" style="background-color: black"></canvas>
</body>
<script type="text/javascript" src="code.js"></script>
</html>  

This index.html file consists of a canvas tag which is present inside the body tag.
There will be no more changes to this. Rest of the coding will be done in the code.js file.
The code.js file is linked after the closing body tag.

The code.js file will look something like:

var canvas = document.querySelector('#canvas');
var c = canvas.getContext('2d');
canvas.width = window.innerWidth;
canvas.height = window.innerHeight;  
  • The querySelector() method returns the first element that matches a specified CSS selector(s) in the document.
  • The getContext() method returns an object that provides methods and properties to draw on the canvas. In this case since '2d' is mentioned, we can draw text, lines, rectangles, circles etc.
  • Next we set the height and width of the canvas equal to the device window's height and width device (this can be changed according to your preference).

Now we are all set to begin coding the game!

Clone/Download this repository before beginning for all the source code.

Phase 1

In this phase we will be working with particles and particle physics.
It is important to keep this in mind that the coordinate system of the canvas is laid down such that the origin is at top left corner of the screen :

https://processing.org/tutorials/drawing/imgs/drawing-05.svg

Before getting your hands dirty, these are some important methods you should be familiar with to draw on a canvas:

c.clearRect(x1,y1,x2,y2); //clears the canvas inside this rectangular area  
c.beginPath(); //Used to begin drawing a shape  
c.closePath(); //Used to finish drawing a shape  
c.fillStyle = 'red'; //Defines color to be filled in the shapes  
c.fillStyle = '#ffffff'; //rgb,rgba and hex formats are also allowed  
c.fillStyle = 'rgb(12,243,32)';
c.fillStyle = 'rgba(233,12,32,0.4)';//'a' is used to define opacity  
c.fill(); //Fills color  
c.strokeStyle = 'red'; ` //Defines stroke color (rgb,rgba,hex)  
c.stroke(); //Strokes the boundary or the figure  
c.font = "50px Calibri"; //Defines font properties of text  
c.fillText("text" , x, y); //Writes text,top left of text is at (x,y)  
c.arc(centerx,centery,radius, //Creates an arc with given properties  
start angle in radian ,
ending angle in rad ,
counterclockwise true or false);
c.moveTo(x,y); //Moves context cursor to (x,y)  
c.lineTo(x,y); //Draws line from current context cursor coordinate to (x,y)  

NOTE : It is better to use beginPath() and closePath() separately for each connected figure.

A few sample code snippets: Code Link

Location in repository: \Phase 1\Sample Code

https://github.com/jrathod9/Making-of-Space-X-/blob/master/Phase%201/Sample%20Code/codesnippetexamples.png?raw=true)

Try playing around with the code a little to get a better understanding of the working.
Also it takes time to get used to the syntax of these functions, so hands-on practice is the only solution.

Now let us try to code a particle in canvas.
Consider a particle object in a two dimensional plane. It will have properties:

  • X Coordinate
  • Y Coordinate
  • Radius

It is considered that the particle is a circle.
This is how we can represent the same in javascript :

var particle = function(x,y,radius){
this.x = x;
this.y = y;
this.radius = radius;
//'this' refers to the owner object, i.e. an instance of particle  
}  

The above code defines an object type which is like a datatype , specifically it is a user-defined datatype. That means, now we can create variables of this type.
Lets create one named "atom".

var atom = new particle(100,100,30);  

This line creates a particle which can be referred with the variable "atom". It has the coordinates (100,100) and its radius is 50, but we still cannot see it on the canvas.

Note : All quantities are to be considered in 'pixels'.

Let us bring it to life by drawing it.

c.beginPath();
c.fillStyle = 'aqua';
c.arc(atom.x,atom.y,atom.radius,0, Math.PI*2,false);
c.closePath();
c.fill();  

It is now drawn on the canvas. But now what if you want to set it in motion let us say to the right ?
You need a continuous loop in which:

  • Canvas is cleared
  • X coordinate of atom is incremented
  • Atom is re-rendered on the canvas

The continuous loop is generated using the requestAnimationFrame() method.
The requestAnimationFrame() method calls the function, which is passed as a parameter, 60 times in one second. So now, we need a function for repetitive calling. Let us call this function 'draw' :

var xspeed = 1; //Define x direction speed  
function draw(){
//Clears the entire canvas  
c.clearRect(0,0,window.innerWidth,window.innerHeight);
//Update x coordinate  
atom.x += speed;
//Drawing the particle  
c.beginPath();
c.fillStyle = 'aqua';
c.arc(atom.x,atom.y,atom.radius,0, Math.PI*2,false);
c.closePath();
c.fill();
requestAnimationFrame(draw); //Called inside the function  
}
draw(); //Initial function call  

Result :
https://github.com/jrathod9/Making-of-Space-X-/blob/master/Phase%201/Atom%20Particle/MovingAtom.gif?raw=true In every consecutive function call, x coordinate of atom is incremented by the value of xspeed variable. To increase the speed, increase the value of xspeed.
Here is the source code : Code link

Location in repository : \Phase 1\Atom Particle

Similarly if you introduce a variable yspeed, which updates the y coordinate of atom, it will lead to a uniform straight line motion in the 2d plane.

...
...
var yspeed = 2;
function draw(){
atom.y += yspeed;
...
...
}
draw();  

Result:

https://github.com/jrathod9/Making-of-Space-X-/blob/master/Phase%201/Atom%20Particle/MovingAtom2d.gif?raw=true

Javascript Math.random() function :

This deserves a separate section as it is very important to understand the working of the random function and how to control it. This function will be used very often in games for example:

  • To spawn new enemies at random locations
  • To spawn random powerups at random locations
  • To give random moving directions to objects etc.

Syntax:

var x = Math.random();  

x gets assigned a random float value between 0 and 1 .

Note: value is inclusive of 0 but not 1.

Few outputs of the random function:

  • 0.1882848343757757
  • 0.3605824495503056
  • 0.04217502958085739

How to get a random number between 0 and 1000?

var x = Math.random()*1000;  

This still gives a float value. For integer values:

var x = Math.ceil(Math.random()*1000);
//Output: integer between 0 to 1000 both inclusive  

Math.ceil() function rounds a number up to the next largest whole number or integer.
There is another function called Math.floor() which returns the largest integer less than or equal to a given number.

Note : Lower bound is still 0.

How to get a random number between 500 and 1000?

var x = Math.ceil(Math.random()*500) + 500;  

Here initially Math.ceil(Math.random()*500) function returns values between {0,500} , thus on adding 500 to this range we get the new range {500,1000}.

How to get a negative range lets say -250 to 350?

var x = Math.ceil(Math.random()*500) - 250;  

If you aren't able to figure out how, try finding individual outputs of all the functions in the code one at a time.

This is all for this blog, in the next blog we shall see:

  • How to handle multiple particles
  • Random function in action
  • Collisions
  • Controlling the objects through user input

Written by : Jay Rathodcomputer
Links : Portfolio | GitHub | Codepen | LinkedIn | Instagram

Recent Advances in Structural and Geotechnical Engineering

Reading Time: 8 minutes

The second slot of Day 1 of Lumieres’ Professors’ Talk was taken up by Dr. AK Desai, with excerpts from his talk delivered at Ambuja Knowledge Centre  City. It was an enthralling and scintillating monologue that had the audience enraptured and asking for more when it ended. Dr. Desai mentioned several enterprises he is on the advisory board of, such as Birla, Tata, etc. He also talked about several projects that he has been associated with including the likes of Surat Airport revamp, the Bullet Train and the Delhi Swami Narayan Temple among several others. The Swami Narayan Temple, designed under the supervision of the late Dr. MD Desai with Dr. AK Desai himself, in particular, is a structural marvel with a geotextile mesh, hand-made and designed to resist an earthquake load of 0.4g and inaugurated by the esteemed Dr. APJ Abdul Kalam.

Recent Advances in Structural and Geotechnical Engineering                              Delhi Swami Narayan Temple

Recent Advances in Structural and Geotechnical Engineering                                             Ring of Fire

This conversation on earthquake was further extended upon by the mentions of places like the Ring of Fire – a 40,000 km horseshoe shaped area in the basin of the Pacific Ocean where many earthquakes and volcanic eruptions occur- several fracture zones and local earthquake zones like the Kim and Surat Fault line in the Arabian Sea, amongst others. He introduced us to the term PGA which stands for Peak Ground Acceleration and is equal to the largest recorded value of the acceleration at a location, observed on an accelerogram. The massive earthquake that shook Gujarat and most severely Bhuj on 26/1/2001 was caused due to the presence of epicenters around the northern part of the state along the active fault-lines. This, he stressed, wasn’t surprising considering the increment in the number of earthquakes in India with recent studies from 2016 showing that we have an average of 3.5 – 4 earthquakes per day in India, in some capacity. Professor Desai, therefore, also talked about the importance of testing the land before any form of construction. This is because the bearing capacity variations are specific to the site. He also talked about how the tectonic shift in the Indian subcontinent is causing it to move about 50 mm annually to the north-eastern direction, a phenomena directly responsible for giving us the Himalayas due to the Eurasian Plate shift.

Recent Advances in Structural and Geotechnical Engineering                                Akashi Bridge, Kobe, Japan

Recent Advances in Structural and Geotechnical Engineering                       Milau Viaduct Paris – Barcelona Bridge

Recent Advances in Structural and Geotechnical Engineering                              Wadi Abdoun Bridge, Thailand

Recent Advances in Structural and Geotechnical Engineering                                    Russky Bridge, Russia

Recent Advances in Structural and Geotechnical Engineering                                       Rion – Antirion Bridge

Recent Advances in Structural and Geotechnical Engineering                              Bixby Creek  Bridge, California

Recent Advances in Structural and Geotechnical Engineering                  Dagu Bridge (Sun and Moon Bridge), Tiajin

Recent Advances in Structural and Geotechnical Engineering                          Cobweb Bridge, Sheffield, England

Recent Advances in Structural and Geotechnical Engineering                                    Sardar Bridge, Bharuch

Recent Advances in Structural and Geotechnical Engineering                                   Mumbai – Worli Sea Link

Recent Advances in Structural and Geotechnical Engineering                             Confederation Bridge, Canada

Then the conversation drifted to modern engineering marvels. And the first topic to be introduced to the discussion was “Bridges”. He mentioned several types of bridges and their breathtaking examples. The Akashi Bridge in Kobe, Japan, for example, is a Suspension Bridge. Its clearance is about 65.7 m, equivalent to a 20 storeyed building placed below its surface. Dr. Desai mentioned how the initial plan to construct this architectural marvel with a 2000 m central span got foiled when an earthquake reduced it to about 1991 m. The Millau Viaduct Paris-Barcelona bridge, another crowning jewel in the bridge portfolio is a flexible, Cable-Stayed Bridge provided with wind screening and FRP wiring and is the tallest bridge in the world, about 343 m from the ground, which is 19 m taller than the Eiffel Tower. He mentioned several other bridges like the Wadi Abdoun Bridge, a bridge in Thailand which is constructed outside water making it cost-efficient, the Russky Bridge of Russia with its beautiful lighting making it a hot tourist destination spot, the Rion-Antirion cable-stayed bridge in Greece, one of the longest bridges in its category, the Bixby Creek Bridge, a reinforced concrete open-spandrel arch bridge is one of the tallest single-span concrete bridges in the world and is earthquake resistant, owning to its structure, in addition to looking aesthetically beautiful. A cantilever spar cable-stayed bridge is a modern variation of the cable-stayed bridge, some of which have a curved backward pylon back-stayed to concrete counterweights. The famous Sun and Moon Bridge is designed to resist both earthquakes and cyclones. Dr. Desai suggested thinking of shapes that have advanced resistivity to these life-endangering natural phenomenas by thinking outside the box, but staying within the realms of achievable and economically feasible science. The design of the famous Cobweb Bridge, also known as Spider Bridge, located in the city centre of Sheffield, South Yorkshire, England, solves a difficult problem: passing the riverside cycle- and footpath. It counters the issue of traffic constraints often noticed on bridges. Professor Desai then came back home to the famous and beautiful Sardar Bridge in Bharuch, which is shaped like multiple tuning forks supporting the cables running through and its design is Extradosed Cable Stayed Bridge wherein the height of the pylon is smaller than in the case of regular Cable Stayed Bridge. He also talked about how modern day engineering has adopted the various available designs to create a hybrid, which offers more stability and can help construct large span bridges. The combination of Cable Stayed Bridge and Suspension Bridge is one such example. These days India has also adopted the famous Precast Segmental Construction technique in which bridges are constructed at manufacturing sites and then brought along to the place over the river and hung on launching girders and slid across to create the whole bridge step by step and with minimal effort. The famous Mumbai-Worli Sea Link is one such example. Canada solves its bridge construction woes caused due to expansion of ice using modern engineering methods, too. Since, major loading through ice gives tremendous pressure to bridges, there, they have adopted the Cantilever construction in bridges such as the Confederation Bridge.

Recent Advances in Structural and Geotechnical Engineering                               Fieranilano, Milan, Italy

Scientific advancement has made it possible for us to create deployable structures that can change shape so as to significantly change its size such as in the cases of umbrellas, some tensegrity structures, bistable structures, some Origami shapes and scissor-like structures. Dr. Desai recommends reading books and referring to the works of Dr. Devdas Menon, Professor of Structural Engineering at IIT Madras who has several patents to his credit, some even in the field of Biomedical Engineering. Post that Professsor Desai talked about other engineering marvels such as the Fieramilano which is the largest civil engineering project built in Europe in recent years with a gross floor area of 530,000 square meters, a land area of 2,000,000 square meters, and a 5-kilometer perimeter. It is a trade fair and exhibition organizer headquartered in Milan, Italy. It is the most important trade fair organizer in Italy and one of the largest in the world. The World Trade Center, another engineering innovation had an innovative “tube” design, with a perimeter support structure joined to a central core structure with horizontal floor trusses, a construction methodology hitherto unknown. The Petronas Tower in Malaysia used bridges and dampers to create their architectural beauty. It has a bridge connecting the two towers on the 41st and 42nd floor making it the world’s tallest 2 story skybridge, providing structural support to the towers and also acting as a potential escape route in case of an emergency from one tower to other. Back home, in Mumbai, the Lodha group has constructed the famous World One Tower which, upon completion is expected to be the world’s 2nd highest residential skyscraper in the world after 432 Park Avenue in New York.

Recent Advances in Structural and Geotechnical Engineering                                Petronas Tower, Malaysia

Recent Advances in Structural and Geotechnical Engineering                                World One Tower, Mumbai

Recent Advances in Structural and Geotechnical Engineering                                   Park Avenue, New York

Dr. Desai stated that the most important thing to be considered while constructing anything is safety and to that end dampers must be used to provide structural integrity. Additionally, the material used is also extremely important. For example, using Stainless Steel over Carbon Steel has several advantages. It doesn’t stain, corrode or rust as normal carbon steel. Close home, polypropylene construction fibre has been used for construction of the road in front of the SVNIT campus instead of steel, to delay and control the tensile cracking of the composite material. In Japan, fibre is used to reduce deadload and transportation cost, in addition to providing strength. This was also put to test by Professor Desai and the team that tested fibre enforced roads in Kargil, realizing that it doesn’t crack as readily and is, therefore, durable and more reliable for the harsh climate of Kargil. This innovation is not just limited to creating more efficient and reliable techniques. They also help enhance the safety of places prone to dangerous phenomena such as the mountains with recurring cases of landslide and boulder tumbles, endangering the lives of people and disrupting the roads built along these mountains. So, in places like Saputara, they have built rock fall protection fences. In high altitude places where snow causes accidents, they have created snow fences that could stop the snow from sliding from the mountains onto the roads, thus, making preventing them from getting slippery. The India-Pakistan border is being fitted with Gabions to prevent salt from Pakistan to wash up to Gujarat and Rajasthan during heavy rainfalls that deposit as white salt. These days the R&D teams across the globe are also working at creating solution to our environmental woes by looking for substitute technology and materials that reduce pollution and harmful emissions. Cement manufacturing is one such area where CO2 and CO emissions increase, therefore, alternative materials and substances are being developed to offer a greener alternative. Additionally, plastic waste disposed off in green ways can be utilized for various purposes with the right kind of economically viable method.

REFERENCES-
-wikipedia.org
-theconstructor.org
-reddit.com
-india.com
-google.com
-tripadvisor.in
– structurae.ne
-designingbuildings.co.uk
-britannica.com
-dronestagr.am
-heidelbergcement.com
-jandp-group.com
-pinterest.com
-sbp.de
-timesofindia.indiatimes.com
-flickr.com
-youtube.com
-tylin.com
CEV - Handout