Hey folks!🎮
So in the previous post I tried to lay a foundation to start understanding canvas. I hope that by now you are a bit comfortable with it. So in the previous post we saw:
- File structure and boilerplate📁
- Some important javascript functions for drawing✏️
- Defining a particle and drawing it on the canvas (hope you remember atom😉)
- requestAnimationFrame()🔄
- One and two dimensional uniform motion of the particle🏃
- Gaining control over the Math.random() function🎲
Phase 2
Till now we were have worked with one particle, but that’s not how games are right? At least most of them. Handling multiple particles is not as tough as you might think. Let’s see how its done!
First of all, will the object definition of the particle change?
Well, it depends on the properties of these particles.
(We will see this later on)
Let us continue with the same particle definition that we previously used:
var particle = function(x,y,radius){
   this.x = x;
   this.y = y;
   this.radius = radius;
}
Now instead of defining one particle, let us define an array of particles:
var particleArray = new Array();
Let us now define 50 particles with random positions on the screen. But what are the dimensions of the screen?
We already have :
- window.innerWidth
- window.innerHeight
So the coordinates of the screen will be in the range:
- X : 0 – window.innerWidth
- Y : 0 – window.innerHeight
So the code goes like this :
var totalParticles = 50;         //number of particles
var maxRadius = 30;               //maximum value of radius

var particle = function(x,y,radius){
    this.x = x;
    this.y = y;
    this.radius = radius;
}

var particleArray = new Array(); //array of particles
var i;                          //loop variable

for(i = 0 ; i < totalParticles ; i++) {
    //Defining properties of the particle
    var xcoord = Math.random()*window.innerWidth;
    var ycoord = Math.random()*window.innerHeight;
    var rad = Math.random()*maxRadius;

    //New particle with above properties
    var tempParticle = new particle(xcoord,ycoord,rad);

    //Push tempParticle into the array
    particleArray.push(tempParticle);
}
I’ve tried to keep the code readable and obvious. Just read it and you should understand what is happening.
What’s left? Let us draw these particles on the canvas!
Just add the following code :
c.fillStyle = 'aqua';
//Drawing the particles
for(i = 0 ; i < totalParticles ; i++ ){
    c.beginPath();
    c.arc(particleArray[i].x,particleArray[i].y,particleArray[i].radius,0, Math.PI*2,false);
    c.closePath();
    c.fill();
}
Result:

Here’s the source code : Code link
Location in repository : \Phase 2\ParticleArray
Note : On refreshing the page you will find a new configuration everytime.
Also we haven’t used the requestAnimationFrame() function as we just wanted static particles as of now.
What next? Let us give all the particles some random velocities🚀.
We need to add two properties for the particle object “x velocity” and “y velocity“:
var particle = function(x,y,vx,vy,radius){
this.x = x;
this.y = y;
this.vx = vx;              //x vel
this.vy = vy;              //y vel
this.radius = radius;
}
Now since we have added new properties for this object, we must also define its values for all the defined instances.
Wait, did I just go too hard on you?😝
Ok let me reframe that:
Since we added two new properties to the particle object, we also need to give the value of these properties for all the particles that are stored in the array.
So inside the for loop in which we are defining and adding particles to the array :
{
    ...
    ...
    var xvel = Math.random()*6 - 3;
    var yvel = Math.random()*6 - 3;
    ...
    var tempParticle = new particle(xcoord,ycoord,xvel,yvel,rad);
    ...
    ...
}
Try figuring out the range of (xvel, yvel).
Now we are ready with particles and their velocities. Lets start drawing them on the canvas. This time we will use requestAnimationFrame():
c.fillStyle = 'aqua';        //define fillStyle
function draw(){
    //Clears the entire canvas
    c.clearRect(0,0,window.innerWidth,window.innerHeight);

    //Update the value of the coordinates (according to velocity)
    for(i = 0 ; i < totalParticles ; i++ ){
        particleArray[i].x += particleArray[i].vx;
        particleArray[i].y += particleArray[i].vy;
    }

    //Drawing the particles
    for(i = 0 ; i < totalParticles ; i++ ){
        c.beginPath();
        c.arc(particleArray[i].x,particleArray[i].y,particleArray[i].radius,0, Math.PI*2,false);
        c.closePath();
        c.fill();
    }

    requestAnimationFrame(draw);
}
draw();
Result :

Here’s the source code : Code link
Location in repository : \Phase 2\ParticleArrayMoving
It must be noted that the particles will soon disappear leaving a black screen. The reason being that the canvas extends infinitely, we just get to see a part which our window can capture.
To confine the particles to our window, we must make the window act as a box 🔳. Particles must collide and bounce back inside like this:
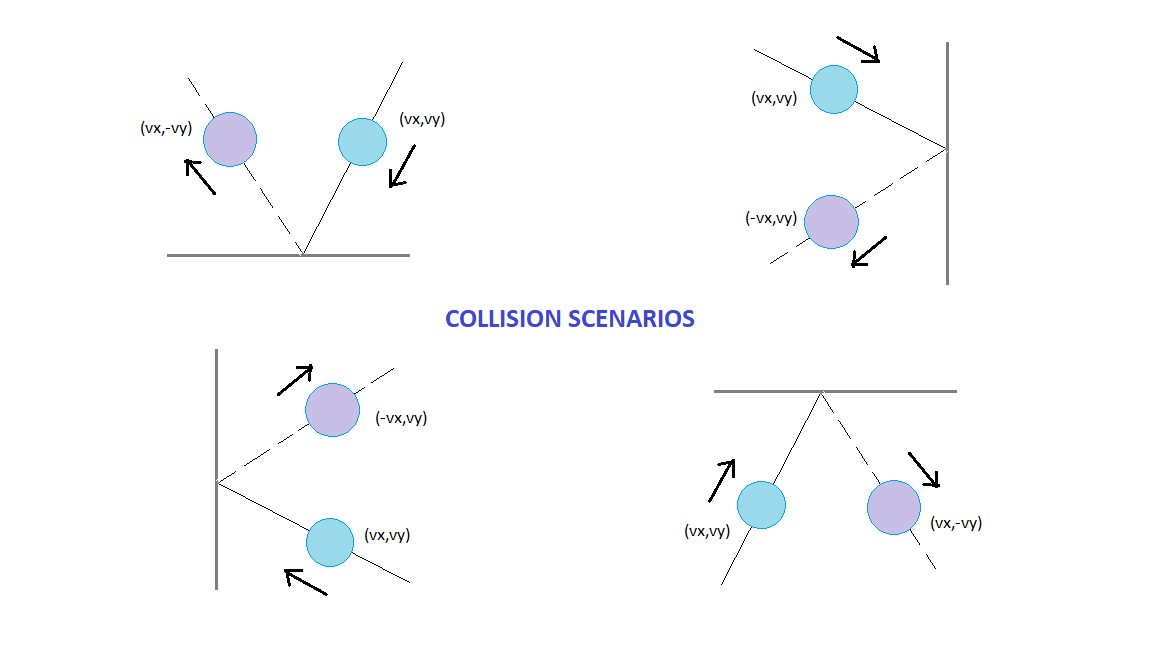
These conditions are to be taken care of every time before drawing the particles. Let us code them:
//Checking for collison with walls
for(i = 0 ; i < totalParticles ; i++ ){

        if(particleArray[i].x > window.innerWidth || particleArray[i].x < 0)
            particleArray[i].vx*=-1;

        if(particleArray[i].y > window.innerHeight || particleArray[i].y < 0)
            particleArray[i].vy*=-1;
    }
Result :

Here’s the source code : Code link
Location in repository : \Phase 2\ParticleArrayMovingCollisions
Notice the particles bouncing off the edges.
Practice Sesh💻 : You can try giving a different color to all the particles. You can also try to making all the particles twinkle/shimmer✨, by changing its opacity (the ‘a‘ in rgba).
Solutions to these : Link to code
Location in repository : \Phase 2\Practice Sesh
Interacting with the canvas:
Yes, chill❄️. It is possible. Obviously. Who would call it a game otherwise?
Let us talk about the addEventListener() method. As the name suggests, it simple listens to events. Events in this case are keyboard inputs, mouse clicks , changes in mouse movements etc.
Syntax:
window.addEventListener(Event,Function,useCapture);
Event : An event is nothing but a trigger. It is used to execute a coded response. Eg : click , onmousedown , onkeypress , onkeyup etc. (Know more..)
Function: This is the function that is to be called when that specific event occurs. It is defined somewhere in the code.
useCapture : This is either true or false. It is optional. It is used to define whether the event should be executed in the Bubbling or Capturing phase (it is not important right now, though you can read more here). By default it is false.
Lets start with the most basic event and response :
For this you will need the javascript code where we had just 1 static particle.(try to write this code yourself once)
Source code : Code link
Location in repository : \Phase 1\Atom Particle
Just remove the line of code used to increment the speed. Thus getting us a static particle.
Now let us add a simple mouse click event : (append this snippet at the end of the code.js file)
window.addEventListener("click", move , false); //define event listener

function move(e)            //response function
{
    atom.x = e.x;            //update x coordinate of atom
    atom.y = e.y;            //update y coordinate of atom
}
What is ‘e’ ?
e here represents the event, and the event here is click. It must be passed as a parameter to the function.
Every event has specific properties. For this click event, we have properties x and y which represent the coordinates of the cursor on clicking.
Coming back to the code, the function replaces coordinates of atom with the coordinates of the cursor. Thus moving it to the click position.
Check it out yourself.
Source code : Code link
Location in repository : \Phase 2\ParticleCanvasInteraction
Similarly, let us make atom move left , right, up and down with the arrow keys.
So this is what we need :
- On pushing down an arrow key the particle should move.
- On releasing the key the particle should stop its movement.
We will use the keydown and keyup events.
This even has a specific property called keyCode. Every key on the keyboard has a different keyCode. The keyCode values of arrow keys are :
- Left : 37
- Up : 38
- Right : 39
- Down : 40
Let us define a boolean array called “keys” which will hold true for all those keyCodes which are pressed.
Also we will need two event listeners, one that will check for keys pressed and the other that will check for keys released.
var keys = [];
window.addEventListener("keydown",keyPressed,false); //keydown listener
window.addEventListener("keyup",keyReleased,false);      //keyup listener

function keyPressed(e){             //sets value true when key pressed
    keys[e.keyCode] = true;
}
function keyReleased(e){            //sets value false when key released
    keys[e.keyCode] = false;
}
Its not done yet. We need to make required adjustments in the draw() function, the effect of key presses on the coordinates :
function draw(){
..
..
    if(keys[37])                //if left is true
        atom.x-=xspeed;         //move left by xspeed
    else if(keys[39])         //else if right is true
        atom.x+=xspeed;         //move right by xspeed

    if(keys[38])                //if up is true
        atom.y-=yspeed;         //move up by yspeed
    else if(keys[40])         //else if down is true
        atom.y+=yspeed;         //move down by yspeed
..
..
}
Note : These are grouped this way because Up and Down cannot function together, and Left and Right cannot function together.
Also don’t forget to define xspeed and yspeed outside the draw function.
Result :

Source code : Code link
Location in repository : \Phase2\ParticleCanvasInteractionKeyboard
Now its your turn to play around with a few more such events.
Other things you can try :
- Bound the motion of this particle to the box
- Comment out the clearRect() function and see the output
- Use the fillRect() function with black colour but opacity less than 1, instead of clearRect(). (Will give a nice trail effect)
This is all for this post. Till here I have covered everything it takes to create the game that I made. Now all we have to do is combine all this logic in one file ❗
In my opinion you may also start creating the game yourself, or try making some other game maybe ping-pong, flappy bird, snakes etc.
Do leave comments/suggestions (if any).
Cheers!🍭
Written by : Jay Rathod💻
Links : Portfolio | Github | Codepen | Linkedin | Instagram