Competitive sports are played mainly on a five-and-a-half-inch court, the space between your ears
In some aspects, competitive programming resembles sports since it demands a high level of ability, strategy, and competition. Participants in competitive programming work through algorithmic issues under time limitations in an effort to come up with the most effective and precise solution.
Competitive programming demands rigorous training and skill development, just like traditional sports. Participants must put in countless hours of practice and hone their problem-solving abilities, algorithmic understanding, and programming competence to be at the top of the competitive programming field. Competitors are always looking for fresh approaches to hone their abilities and strategies in order to outperform their rivals.
COMPETITIVE PROGRAMMING AS A SPORT:
Sports involving programming have their own leagues, winners, and rankings. The community is fiercely competitive, with members competing to advance in ability and position. Additionally, there are student-focused programming sports contests like the International Collegiate Programming Contest (ICPC), where top programmers from institutions across the globe compete against one another.
Most intense programming competitions have awards. These prizes can take the shape of money, goods like software or hardware, or even free services. Some programmers for sports teams have even made a career out of competing in coding competitions due to their success.
The use of programming competitions to assess and display competitors’ programming abilities is growing in popularity. These are frequently conducted online, allowing competitors to participate from any location. Moreover, live programming competitions are held at conferences, universities, and other occasions.
The issues grew more complicated as the popularity of sports programmes increased. Several contenders even began to focus on different areas, like geometry or text algorithms. They began to find a variety of intriguing data structures and algorithms with some practical applications that had their roots in competitive programming.
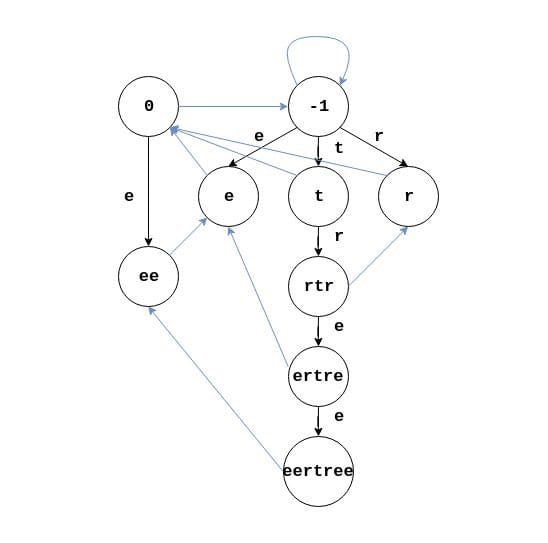
Two examples come to mind quickly. Originally, two pupils in one of the Soviet training camps ran into a situation where they had to identify every individual palindrome in a given word. They developed a data structure known as the “palindromic tree” or “eertree” in order to solve this issue.
The palindromic Tree’s actual structure is close to the directed graph. It is actually a merged structure of two Trees that share some common nodes.
In addition to this issue being resolved, this method led to the usage of this data format to address a variety of other issues, including those that in the past were believed to be impractical to handle quickly. China provides one such instance. Students in high school who are interested in competing in the International Olympiad in Informatics are required to prepare a straightforward research paper on a particular algorithm or data structure. One of these individuals found a solution to a problem that had been troubling programmers for a while. He developed the “Segment tree beats” data structure, which enables quick operations on integer sequences such as adding a value to a continuous subsequence or finding the minimum value over other continuous sequences.
Competitive coding focuses on speedy problem-solving to deconstruct the issue in the best way possible and then implement it in a computer language. Many people are drawn to competitive coding for its inherent thrills, including the surge of adrenaline and the sense of accomplishment that comes from having your answer accepted. There is a very extensive and diversified online community for competitive programming, which includes professionals from huge tech businesses as well as high school and college students.
Ultimately, it is evident that competitive programming shares many parallels with traditional sports in terms of talent, competition, and community, despite the fact that there may be disagreements about whether it should be regarded as a sport.
Digital transformation will create trillions of dollars of value. While estimates vary, the World Economic Forum in 2016 estimated an increase in $100 trillion in global business and social value by 2030. Due to AI, PwC has estimated an increase of $15.7 trillion and McKinsey has estimated an increase of $13 trillion in annual global GDP by 2030. We are currently in the middle of an AI renaissance, driven by big data and breakthroughs in machine learning and deep learning. These breakthroughs offer opportunities and challenges to companies depending on the speed at which they adapt to these changes.
Modern enterprises face 5 key challenges in today’s era of big data
1. Handling a multiplicity of enterprise source systems
The average Fortune 500 enterprise has a few hundred enterprise IT systems, all with their different data formats, mismatched references across data sources, and duplication
2. Incorporating and contextualising high frequency data
The challenge gets significantly harder with increase in sensoring, resulting inflows of real time data. For example, readings of the gas exhaust temperature for an offshore low-pressure compressor are only of limited value in of itself. But combined with ambient temperature, wind speed, compressor pump speed, history of previous maintenance actions, and maintenance logs, this real-time data can create a valuable alarm system for offshore rig operators.
3. Working with data lakes
Today, storing large amounts of disparate data by putting it all in one infrastructure location does not reduce data complexity any more than letting data sit in siloed enterprise systems.
4. Ensuring data consistency, referential integrity, and continuous downstream use
A fourth big data challenge is representing all existing data as a unified image, keeping this image updated in real-time and updating all downstream analytics that use these data. Data arrival rates vary by system, data formats from source systems change, and data arrive out of order due to networking delays.
5. Enabling new tools and skills for new needs
Enterprise IT and analytics teams need to provide tools that enable employees with different levels of data science proficiency to work with large data sets and perform predictive analytics using a unified data image.
Let’s look at what’s involved in developing and deploying AI applications at scale
Data assembly and preparation
The first step is to identify the required and relevant data sets and assemble them. There are often issues with data duplication, gaps in data, unavailable data and data out of sequence.
Feature engineering
This involves going through the data and crafting individual signals that the data scientists and domain experts think will be relevant to the problem being solved. In the case of AI-based predictive maintenance, signals could include the count of specific fault alarms over the trailing 7 days,14 days and 21 days, the sum of the specific alarms over the same trailing periods; and the maximum value of certain sensor signals over those trailing periods.
Labelling the outcomes
This step involves labeling the outcomes the model tries to predict. For example, in AI-based predictive maintenance applications, source data sets rarely identify actual failure labels, and practitioners have to infer failure points based on a combination of factors such as fault codes and technician work orders.
Setting up the training data
For classification tasks, data scientists need to ensure that labels are appropriately balanced with positive and negative examples to provide the classifier algorithm enough balanced data. Data scientists also need to ensure the classifier is not biased with artificial patterns in the data.
Choosing and training the algorithm
Numerous algorithm libraries are available to data scientists today, created by companies, universities, research organizations, government agencies and individual contributors.
Deploying the algorithm into production
Machine learning algorithms, once deployed, need to receive new data, generate outputs, and have some actions or decisions be made based on those outputs. This may mean embedding the algorithm within an enterprise application used by humans to make decisions – for example, a predictive maintenance application that identifies and prioritizes equipment requiring maintenance to provide guidance for maintenance crews. This is where the real value is created – by reducing equipment downtime and servicing costs through more accurate failure prediction that enables proactive maintenance before the equipment actually fails. In order for the machine learning algorithms to operate in production, the underlying compute infrastructure needs to be set up and managed.
Close-loop continuous improvement
Algorithms typically require frequent retraining by data science teams. As market conditions change, business objects and processes evolve, and new data sources are identified. Organizations need to rapidly develop, retrain, and deploy new models as circumstances change.
Therefore, problems that have to be addressed to solve AI computing problems are nontrivial. Massively parallel elastic computing and storage capacity are prerequisites. In addition to the cloud, there is a multiplicity of data services necessary to develop, provision, and operate applications of this nature. However, the price of missing a transformational strategic shift is steep. The corporate graveyard is littered with once-great companies that failed to change.
This blog is about creating an app called Log Eagle that monitors different kinds of web services and catches errors in production.
There are already several monitoring services. But the goal of this app is to create a highly scalable and flexible service that is easy to deploy. The backend is written in Go, which is a powerful tool for these types of applications. And the frontend is written in React.
To get started, there needs to be at least one service. A service can be anything like an Express server, a mobile app, or your frontend. All such services belong to an organization. Admins of that organization can invite and remove additional users to their organization. There are also adapters, that can be installed on the service to automatically catch and report errors. It also gives you the flexibility to write your own adapter and error reporting logic in whatever language you prefer.
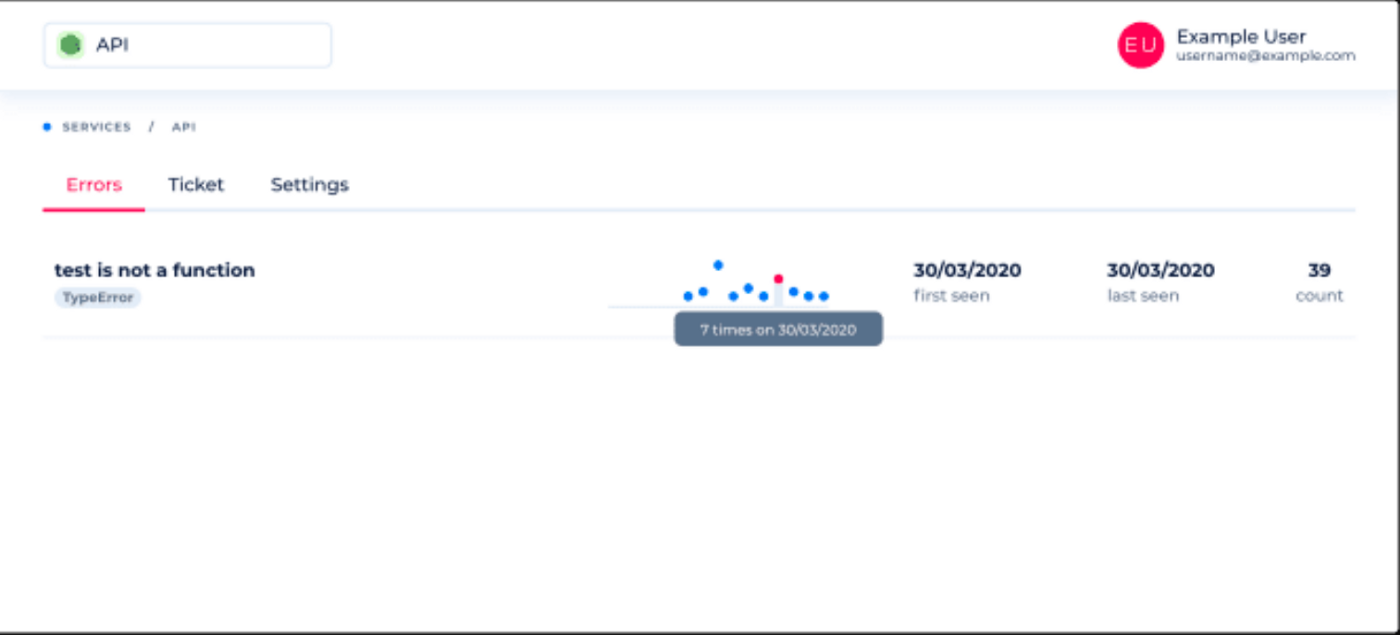
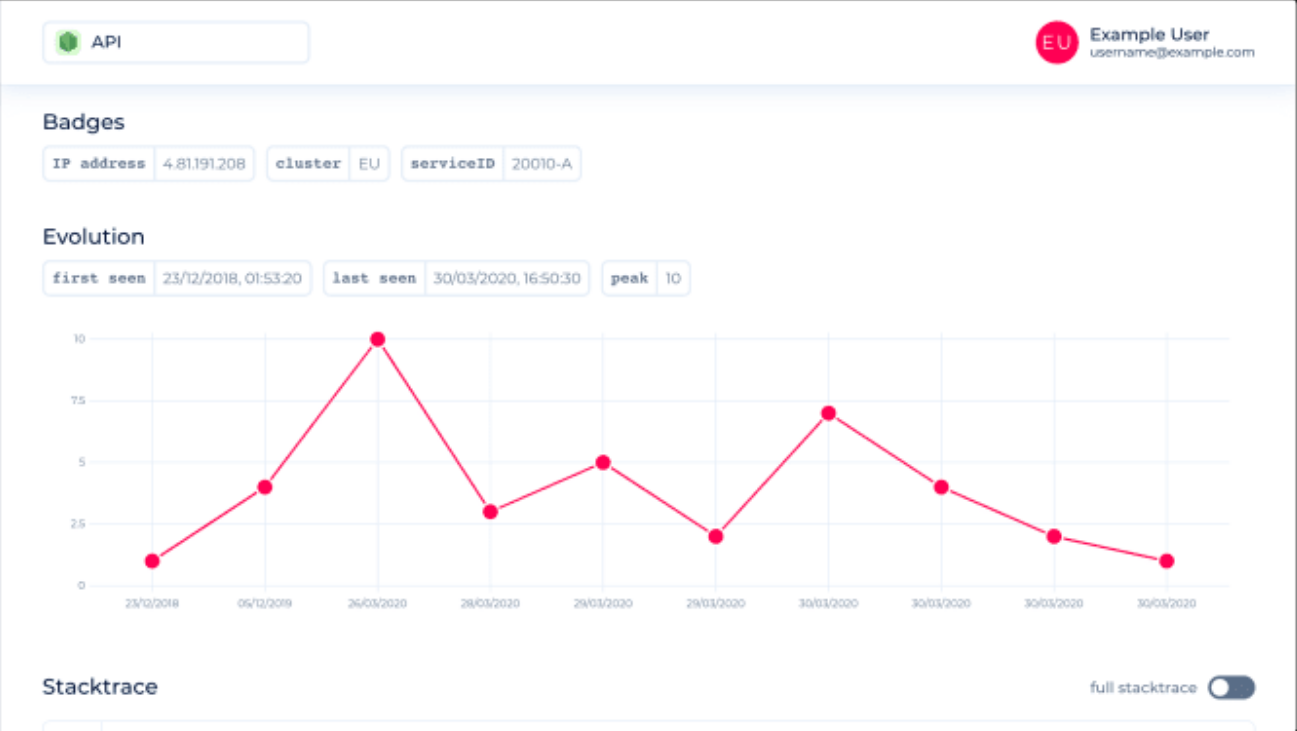
When selecting a service, it shows all the errors that were reported by that particular service with a couple of details. Each service has a so-called ticket, which is used to assign the reported event to the service.
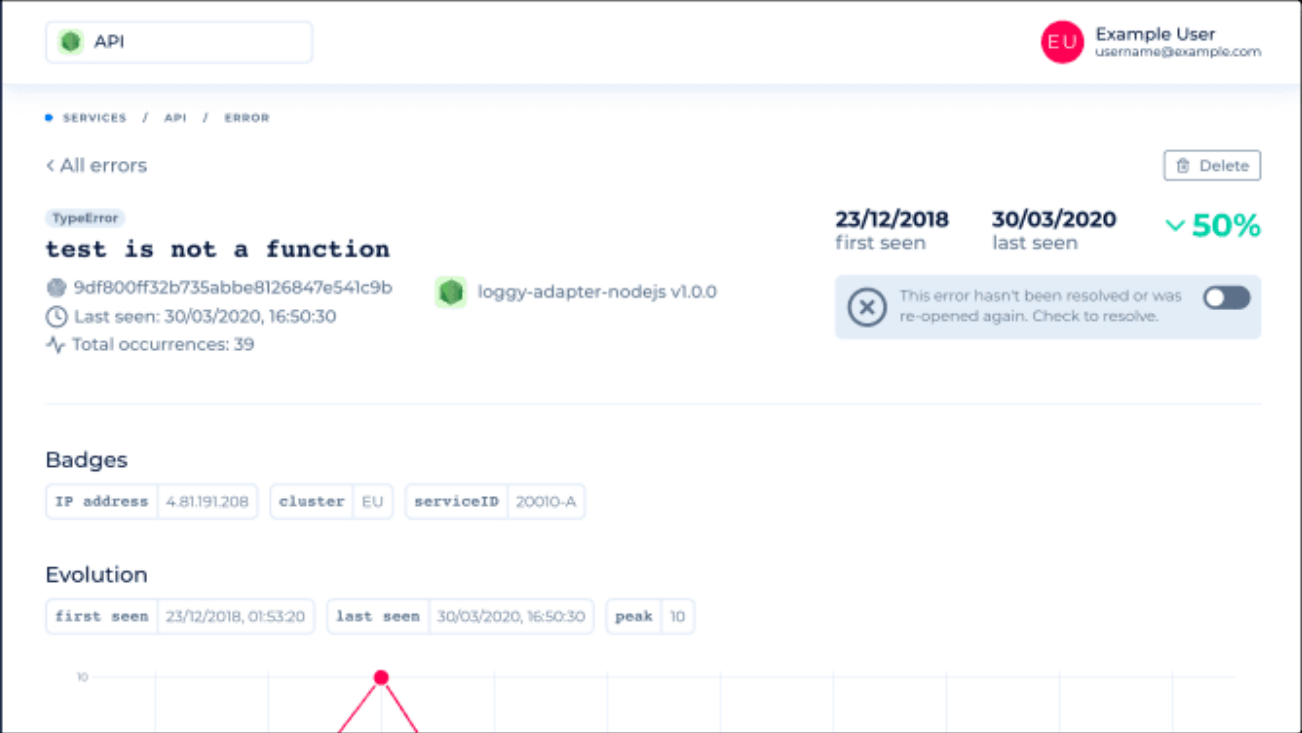
You can click on an error for further insights. It is also possible to add custom information to the event, which can be handy if you, for example, run your service in different clusters and want to add the name of the cluster to the event.
It will also give you detailed information when and how often the error was reported.
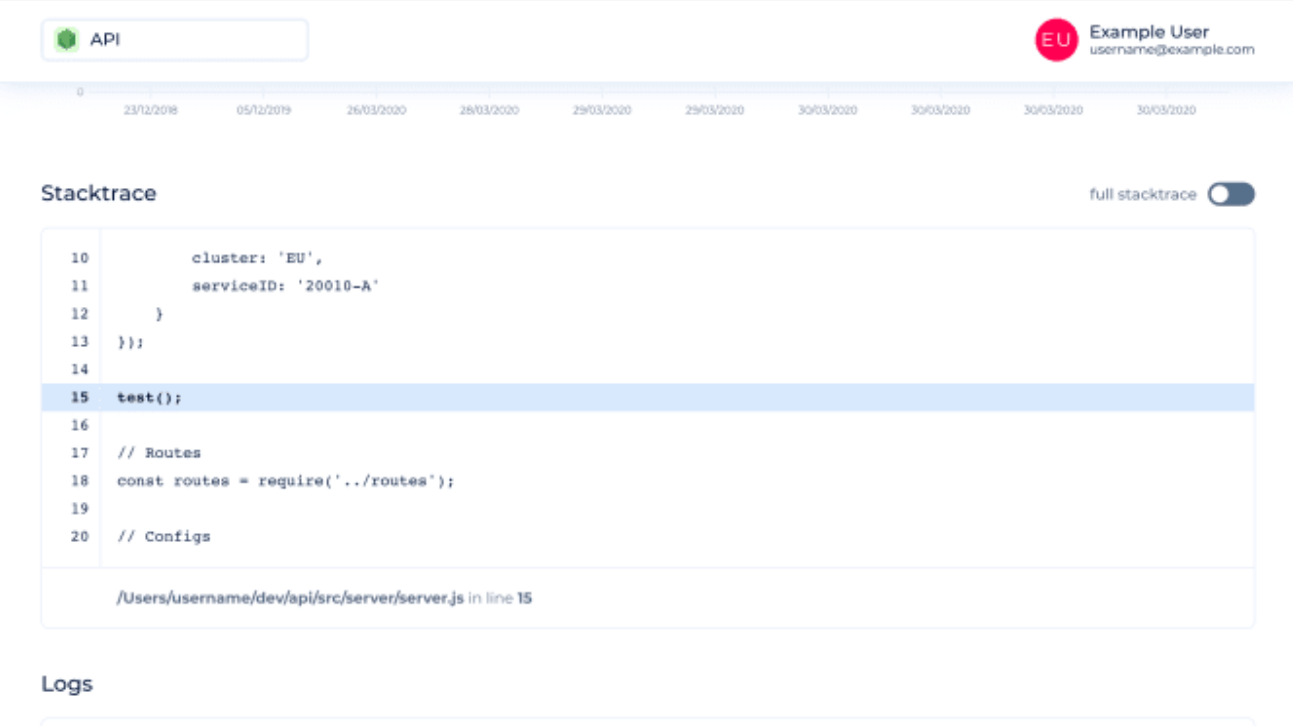
Besides the raw stack trace, it will show clearly where the error occurred. Furthermore, you will be able to see previous console logs and information about the adapter.
If you want to check it out, you can create your own organization on a demo instance deployed here and give it a try. Currently, there is a NodeJS adapter available. In the repositories, you will find information on how to create an adapter in any other language or host the service yourself.
We all have witnessed this technology for downloading our favorite movie which wasn’t available elsewhere. It is one of the most impeccable techs in the world of data sharing ever thought and brought to reality by a human.
Definition
“BitTorrent is a communication protocol for peer-to-peer file sharing (P2P) which is used to distribute data and electronic files over the Internet in a decentralized manner.”
The protocol came into existence in 2001(thanks to Bram Cohen) and is an alternative to the older single source, multiple mirrors (user) sources technique for distributing data.
A Few terms
BitTorrent or Torrent: Well, BitTorrent is the protocol as per its definition, whereas Torrent is the initiating file which has the metadata(source) of the file.
BitTorrent clients: A computer program that implements the BitTorrent Popular clients include μTorrent, Xunlei Thunder, Transmission, qBittorrent, Vuze, Deluge, BitComet, and Tixati.
Seed: To “seed” the file denotes to “download” the file.
Seeding: Uploading the file by a peer after their downloading is finished.
Peer: (The downloader) Peer can refer either to any client in the swarm or specifically to a downloader, a client that has only parts of the file.
Leecher: Similar to peer, but these guys have poor share ratio i.e. they doesn’t contribute much in uploading but only download the files.
Swarm: The group of peers.
Endgame: an applied algorithm for downloading the last pieces of any file. (Not the Taylor swift’s Endgame).
Distributed Hash Tables(DHTs): A decentralized distributed system. In layman language, hash tables are used to provide encryption using something similar to lock and key model.
Working
Let’s have the gist of what happens while torrenting.
The following GIF explains this smoothly.
First, the server sends the pieces(colored dots) of the files to a few users(peers). After a successful download of a piece of the file, they are ready to act as a seeder to upload the file to other users who are in need of that file.
As each peer receives a new piece of the file, it becomes a source (of that piece) for other peers i.e., the user becomes seeder, giving a sigh of relief to the original seed from having to send that piece to every computer or user wishing a copy.
In this way, the server load is massively reduced and the whole network is boosted as well.
Once a peer is down with downloading the complete file, it could in turn function as a seed i.e. start acting as a source of file for other peers.
Speed comparison: Regular download vs BitTorrent Download
Download speed for BitTorrent increases with an increase in peers joining to form the swarm. It may take time to establish connections, and for a node to receive sufficient data to become an effective uploader. This approach is particularly useful in the transfer of larger files.
Regular download starts promptly and is preferred for smaller files. Max speed is achieved promptly too.
Benefits over regular download
Torrent networking doesn’t depend on the server being distributed among the peers. Data is downloaded from peers which eventually become seeds.
Torrent files are open source and ad-free. An engrossing fact about the same is that TamilRockers use torrent to act as the Robin hood for pirated movies and songs, which is apparently an offensive act.
Torrent judiciously uses the upload bandwidth to speed up the network: after downloading, the peers’ upload bandwidth is used for sending the file to other peers. This reduces the load on the main server.
A File is broken into pieces that helps in resuming the download without any kind of data loss, which in turn makes BitTorrent certainly useful in the transfer of larger files.
Torrenting or infringing?
Using BitTorrent is legal. Though, Downloading copyrighted material isn’t. So torrenting isn’t infringing.
Most BitTorrent clients DO NOT support anonymity; the IP address of all peers is visible in the firewall program. No need to worry though, Indian govt. has clarified that streaming a pirated movie is not illegal.
Talking about the security concerns, each piece is protected by a cryptographic hash contained in the torrent descriptor. This ensures that modification of any piece can be reliably detected, and thus prevents both accidental and malicious modifications of any of the pieces received at other nodes. If a node starts with an authentic copy of the torrent descriptor, it can verify the authenticity of the entire file it receives.
Further Reading:
IPFS is not entirely new but is still not widely used. Read it here on medium.
It is predicted that 80% of emerging technologies will have AI foundation by 2021
AI has its applications everywhere. Auto driving, face recognition, language translation, market prediction, chatbots, text to speech, ads and movies suggestion, application in medical science, game bots, and many more.
Do you want to know how these applications work?
Do you want to make these yourself?
Then this article can help you !
Artificial intelligence is a continuously growing field.
Till now, AI can already :
Read : and summarize a long text for you. Like it does in google search engine.
Write : Can make jokes and write a poem. Even a novel has been generated by AI that was short-listed for an award.
See : Auto driving cars, facial recognition.
Hear and understand : Virtual assistants. In some applications, even it can alert you if it hears a gunshot.
Play Games : DeepMind’s AlphaZero has already beat the World Chess Champion. And do you know how much time it took to learn chess completely from scratch ? Just 4 hours.
It can Speak, Smell, touch, Move, Create, debate and …..
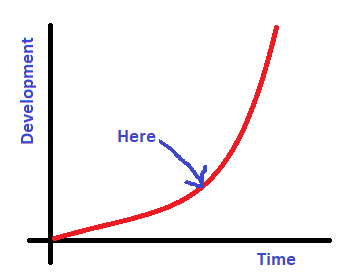
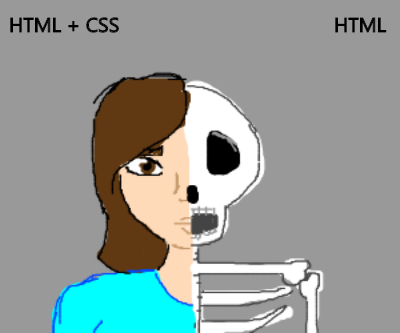
Despite all these, we can say that we are at the beginning of the development of AI. Like here, shown in the picture.
In this article, my purpose is to grow a spark inside you towards artificial intelligence and machine learning. So that if you like, you can get your hands on to this amazing growing field !
By the end of this article, you will :
know what is AI and ML
know similarity between AI and human brain
Make a simple model to predict house prices, using a simple but widely used model.
And at last, find some courses that you can take to learn Machine Learning from beginner to advance.
Note : The model is implemented in python. But if you don’t know python, you need not to worry. You can just learn the model for a start and implement later.
So, are you excited ?
Let’s get started !
What is Artificial Intelligence ?
In one sentence, it is “An ability of a computer to mimic human”. It’s that simple.
An ability of a computer to mimic human
And Machine Learning is an application used in AI, which uses models to help computers learn itself from the data. Computer takes data, recognizes patterns from it and learns from the data.
This can be well understood by the example below :
Human Brain and AI
Suppose you are a kid and your parents shows you something which you don’t know what is. And they say, “It is X”. And some days later, they show you that again, and they say, “Hey dear, it’s X”.
Soon after a certain number of times your parents show you the thing with the label X, you can classify that as X, even if the thing X is of slighly different in kind.
In the above example, your brain got some data, it recognized patterns from it, attached a label X to it and now it knows what it is. That is how human brain works. But its not common for computers. Computer can’t know what it is, if that is something it has never seen.
But with the Machine Learning model, if you show similar objects with the label, for many times, it can recognize the similar new object next time it sees it. Like if, you show your face telling it that it is “you”, then the next time it will see you, it will recognize you, even if you are wearing glasses or are different
The reason for high rise in Machine Learning ?
Machine Learning has been used since the 1950s or before. But the 2 reasons why it has gain much development are the following :
Internet and Data : The rate at which we are producing data everyday is the highest till now.
Computational Power : The computational power is increasing every year. This increase allowed us to train bigger data faster.
So that was some info regarding AI and ML. Now you will learn to make a simple but effective ML model.
Your First ML model
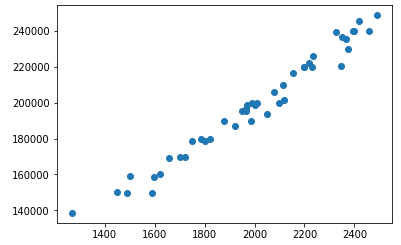
We will make a model which predicts house price. The data used here has house sq. foot area and their orginal price. After training the model, it will be able to predict price for new houses.
Sq. Foor Area
Price
1500
158900
1700
169850
1750
178950
…
…
1900
?? to predict
1850
?? to predict
The data on graph looks like below. If we can draw an approximate line that fits the data, we can predict price of any house.
Now we will discuss the model to get that approximate line that fits the data.
Model
So, how can you draw this line?
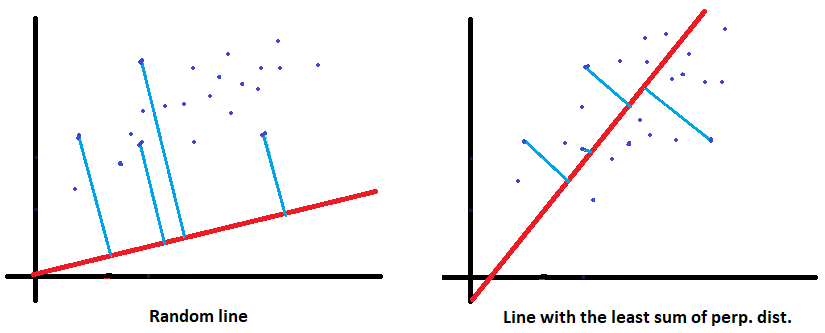
The line which will fit our data, will have the least sum of perpendicular distance from all the points to the line.
Thus the approximate line can be drawn by taking the sum of all the perpendicular distances from all the points to a random line and making that sum least possible
In machine learning terms, we call this sum as cost.
To get the line, we need first parameters for the line.
Let say it is represented by a Theta array.
theta = [ [a], [b] ]
And thus the line will be Y = aX + b, with X as sq.ft area and Y as price.
and our data is :
data = [ [X1, Y1], [X2, Y2], […, …] ]
We will seperate data X and predictions Y. And then add column vector of 1’s to X.
X = [ [X1, 1], [X2, 1], […, …] ]
Y = [ [Y1], [Y2], […] ]
So that, now matrix multiplication of Theta and X will give us Y
Now,
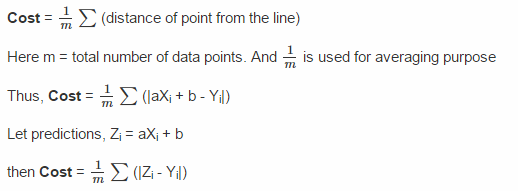
Step 1 : Cost
Step 2 : Minimize Cost
The value of cost depend on the parameter vector Theta.
We will initialize Theta with [[0], [0]], which will make the cost value largest.
How do you think we can minimize cost ?
How about finding local minima ?
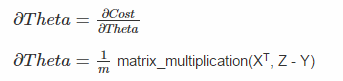
To find the local minima, we will differentiate cost w.r.t theta. This will provide us with slope.
How did the above equation came ? Find differentiation of Cost wrt Theta. Hint : First differentiate cost with theta, then multiply the differentiation of (Z – Y) with theta. The transpose of X is taken to match the matrix multiplication
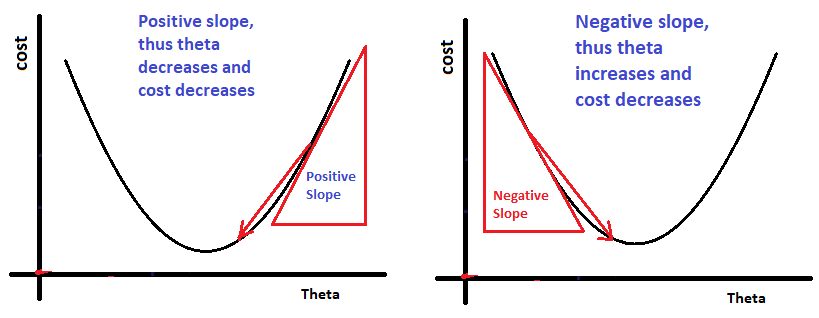
Update Theta as : Theta = Theta – alpha x dTheta
Here, alpha is some costant number.
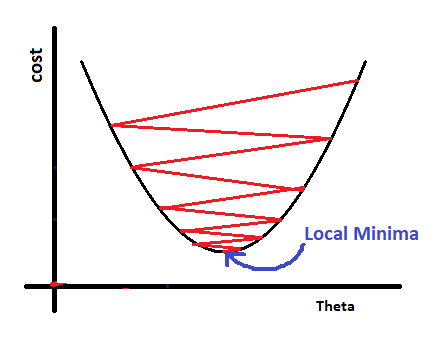
By performing the above 2 steps from many number of time, we will reach the local minima of cost.
How ?
Suppose the slope i.e, d_theta is positive, then theta value will decrease and thus the value of cost with decrease.
Suppose the slope is negative, then theta value will increase and cost value will decreases, and thus leading the cost closer to local minima.
If we perform the above 2 steps for many times, let say ‘iteration’ number of times, we will reach the local minima.
The implementation is like this :
loopfrom1toiterationstimes:
# This will give us predictionsZ=matrix_mulitplication(X, Theta)
Cost= (1/m)*sum( abs(Z-Y) )
# This update will take us closer to its local minmad_Theta= (1/m)*matrix_multiplication(X.T, Z-Y)
Theta=Theta-alpha*d_theta
If you find the above two steps a bit difficult to understand, don’t worry, as you will implement it yourself, you will get more clear. I recommend you to think thoroughly while implementing.
So, you have seen how our model looks like and how to build it.
Let us now code our model.
You will see how short it is, but does some great things.
Full Implementation in Python :
I have used ‘ipython jupyter notebook’ to write the code, and I recommend you the same for every machin learning models
The dataset I have used to train the model, is available here : Dataset
# Visualization of Dataset
plt.scatter(X[:, 0], Y)
plt.show()
defmodel(X, Y, alpha, iterations):
cost_list= []
m=Y.shape[0]
theta=np.zeros((X.shape[1],1))
foriinrange(iterations+1):
A=np.dot(X, theta)
cost= (1/m)*np.sum(np.abs(A-Y))
d_theta= (1/m)*np.dot(X.T, A-Y)
theta=theta-alpha*d_thetaif(i% (iterations/10) ==0):
print("cost after", i, "iterations is :", cost)
cost_list.append(cost)
returntheta, np.array(cost_list)
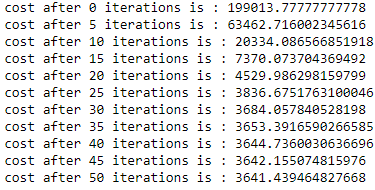
theta, cost_list=model(X, Y, alpha=0.00000005, iterations=50)
Do you see, how the value of cost is decreasing and then almost remains cost. This shows that it has reached local minima.
Our mode is trained ! Lets us see, how it is predicting !
new_houses=np.array([[1547, 1], [1896, 1], [1934, 1], [2800, 1], [3400, 1], [5000, 1]])
forhouseinnew_houses :
print("Our model predicts the price of house with", house[0], "sq. ft. area as : $", round(np.dot(house, theta)[0], 2))
Congratulations, you have implemented your first Machine Learning model!
This was a good implementation as beginner. You did very nice!
Here we used only 1 feature of data as just our house sq.ft. area. The real-world application uses many more number of features. And that can be, garage area, bathroom area, total number of rooms, locality, furniture quality, etc.
If the number of features increases, the only thing you need to change is parameter Theta. If the total number of features are N, then take the size of theta as (N+1, 1) vector, and everything else remains the same. In our case, N was 1 i.e, house sq. ft. area.
The model you just implemented is very famous model, which machine learning engineers uses all the time. And its name is SVM (Support Vector Machine). When you will take an actual machine learning course, then you will be more familiar with the terms.
There are many other models as well in Machine Learning, and the implementation of different models depends on the application we are trying to build and on dataset.
The most famous of them are Neural Networks.
Courses you can take to become a Machine Learning expert :
Deep Learning Specialization on Coursera – by Andrew Ng. This specialization teaches you Neural Networks. The projects in it are very awesome like, image recognition, language translation(Spanish to English), Emojifying the text. I am sure you will love doing it yourself.This is more suitable if you are interested in making AI applications yourself.
You can Audit the course and learn everything for free.
Machine Learning A-Z, udemy course. This course teaches your different machine learning models and data pre-processing. The implementation is done using sklearn-library of python, which has build in models. It is like you can access the whole model in one line of code.This is more suitable if you want to step into competitive projects.
Landed here surfing through various amazing websites, wondering how they are designed? Interested in front-end development, but just a beginner? You are at the right place! It’s never too late to start. So let’s get started.
1 Introduction to HTML, CSS and BOOTSTRAP
1.1 HTML
Hyper Text Markup Language was created by Tim Berners-Lee in 1991, is a markup language used for structuring and presenting content on Web.
Created to build the structure of the website.
Consists of several elements represented by tags.
These elements are rendered on the browsers in form of viewable content.
1.2 CSS
Cascading Style Sheets (CSS) is a simple language created to style the HTML elements.
Styling can be done using tag names, class names and id’s assigned to various elements in our HTML document.
1.3 BOOTSTRAP
Bootstrap is a very popular and useful framework of HTML, CSS and JS for creating responsive website designs.
It has inbuilt HTML, CSS based designs for different elements like button, divisions, images, lists, tables and many more; which can be directly used to create a responsive design very fast.
2 BOOTSTRAP basics
2.1 Bootstrap GRID
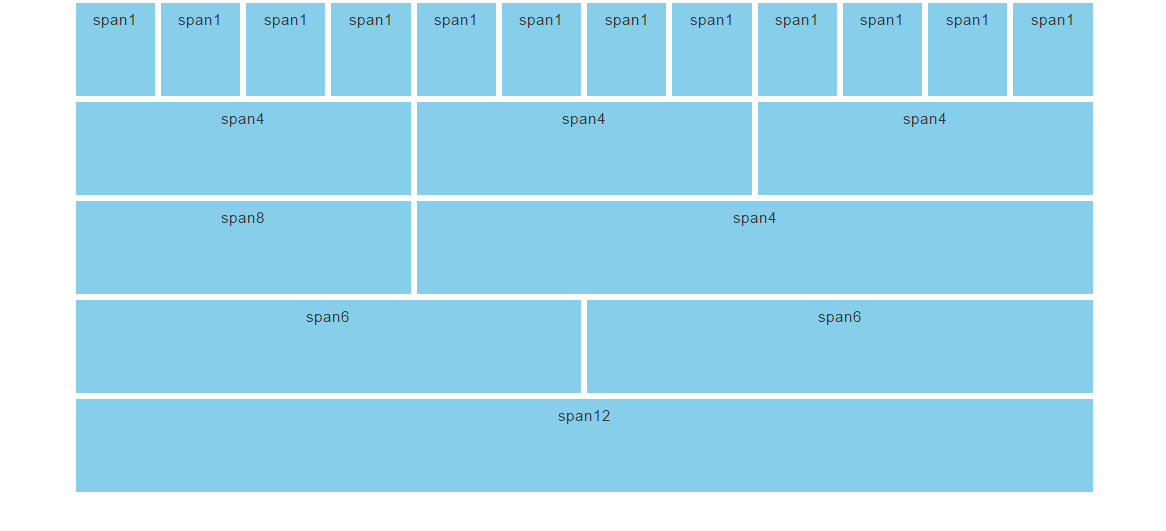
Bootstrap gridding system divides the page into 12 identical columns and multiple rows, which you can use to place HTML elements. More than 1 column(s) can be combined to achieve more width.
The gridding system consists of 4 classes: xs – for screens less than 768px width sm – for screens equal to or greater than 768px width md – for screens equal to or greater than 992px width lg – for screens equal to or greater than 1200px width
example:
<divclass="row"><divclass="col-sm-4">...</div><divclass="col-sm-8">...</div></div>
here you can verify there are two columns having a
span on 4 and 8 columns of the bootstrap grid system adding up to 12
2.2 Bootstrap classes
Contextual inbuilt classes can be used on different HTML elements to style them without having to write CSS code ourselves(you can assume that CSS is already written for the classes we are using). In this section we will discuss some important contextual classes provided by bootstrap.
Classes for div containers .container and .container-fluid are the bootstrap classes which can be assigned to a container div .container sets the division width less than screen width by rendering left and right margins. .container-fluid sets the division width= screen width.
Classes for background color .bg-primary, .bg-success, .bg-info, .bg-warning, .bg-danger background color will automatically appear for the particular element when you assign any of these classes for it.
Classes for text color .text-muted, .text-primary, .text-success, .text-info, .text-warning, .text-danger text color will automatically appear for the particular element when you assign any of these classes for it.
Classes for button .btn,.btn-default,.btn-primary,.btn-success,.btn-info,.btn-warning,.btn-danger,.btn-link button color will automatically appear for the particular button, when you assign any of these classes for it..btn-lg, .btn-sm, .btn-xs any of these classes when assigned to a button, resizes the button.
These are some of the important classes we discussed. Bootstrap provides many more classes for many other elements. We will be using these classes and introduce other classes further.
2.3 Modifying style using CSS
After use of contextual classes that bootstrap provides, you might be feeling limited in no. of options. For example; for text coloring using class, the range of colors that bootstrap provides is very less (red(danger) ,yellow(warning) ,green(success) … etc). also, the other styling is very particular, like the button border, border-radius, font etc. The question is, do we have to work with these restrictions? This way, all the websites made using bootstrap will look identical with just changes in the content. Fortunately this doesn’t happen. We can do all types of styling changes using CSS. We just have to assign a different class(not bootstrap classes) to the target element and set/update any CSS property of our choice. The CSS will be rendered on the target element.
example:
<divclass="container"><p>we are modifying CSS of a button.</p><buttonclass="btn btn-lg btn-danger colorchange"></button></div><style>
.colorchange{
background-color: #000000;
border-radius: 20px;
}
.colorchange:hover{
background-color: green;
transition:0.7s;
}
</style>
After a brief intro to the languages and frameworks we will be using further and learning bootstrap basics, lets get our hands on and start making a beautiful static responsive website.
3 Let’s start building 😉
Prerequisites
Basics of HTML and CSS
Some theory about bootstrap that we discussed above
3.1 Setting up environment to start off
Directory structure will be like-
Project folder
index.html
style.css
assets folder (containing images to be used)
To start off, all you need is a text editor. I prefer Brackets text editor because it comes along with autocomplete feature, which saves time and I’ll be using Brackets throughout. There are several alternatives to brackets like sublime text editor, atom etc.
<html><head><metacharset="utf-8"><metaname="viewport" content="width=device-width, initial-scale=1"><linkrel="stylesheet" href="https://maxcdn.bootstrapcdn.com/bootstrap/3.4.1/css/bootstrap.min.css"><scriptsrc="https://ajax.googleapis.com/ajax/libs/jquery/3.4.1/jquery.min.js"></script><scriptsrc="https://maxcdn.bootstrapcdn.com/bootstrap/3.4.1/js/bootstrap.min.js"></script><linkrel="stylesheet" href="https://cdnjs.cloudflare.com/ajax/libs/font-awesome/4.7.0/css/font-awesome.min.css"><linkrel="stylesheet" href="./style.css"><title>
My first Bootstrap Template.
</title></head><body></body></html>
meta tag is used for proper zooming and rendering during the first load of the page on browser. Test run index.html once. Now we have set up the environment required for making our website. Don’t forget to link your CSS file to this in head tag.
3.2 Making different sections
The sections we will be building will be:
HOME
GALLERY
TEAM
CONTACT
Now, I’ll provide you the source code used. Notice the Bootstrap classes being used. Also watch the styling changes that I’m making in the CSS file to change the designs of the target elements. All sections here, are child elements of body tag. You can use my source code given below. Feel free to work around with your own ideas and tweaking.
HOME
This section will contain the page which first loads on user’s screen. This will contain Logo, Menu, Text in middle, Background image.
index.html:
<divclass="container-fluid home" id="home"><navclass="navbar"><divclass="container"><divclass="navbar-header"><aclass="navbar-brand" href="#">LOGO</a></div><ulclass="nav navbar-nav navigation" ><li><ahref="#home">HOME</a></li><li><ahref="#gallery">GALLERY</a></li><li><ahref="#team">TEAM</a></li><li><ahref="#contact">CONTACT</a></li></ul></div></nav><divclass="row"><divclass="col-sm-3"></div><divclass="col-sm-6"><h1>QUOTE:</h1><H3>"Dreams of great dreamners are always transcended,<br><br> - A.Kalam"</H3></div><divclass="col-sm-3"></div></div></div>
This section in our page will contain an image carousel with left and right swipe controls to view different images of gallery.
index.html
<divclass="container-fluid gallery" id="gallery"><divclass="container-fluid"><h1>Gallery</h1><center><p>Galleries are pages which contain large numbers of media content—almost always, images—with little or no supporting
text. Large numbers of galleries have been deleted from Wikipedia per WP:NOT. This is usually cited in this context as
WP:NOT an image gallery, which is a paraphrase of the official policy that Wikipedia articles are not mere collections
of photographs or media files. There are, therefore, very few gallery-articles left on Wikipedia in the main article
namespace (see [1]). This page defines how, when, and where gallery-articles should and should not be used. It is not
concerned with the use of the gallery feature within pages that are predominantly text-based articles</p></center><divid="myCarousel" class="carousel slide" data-ride="carousel"><!-- Indicators --><olclass="carousel-indicators"><lidata-target="#myCarousel" data-slide-to="0" class="active"></li><lidata-target="#myCarousel" data-slide-to="1"></li><lidata-target="#myCarousel" data-slide-to="2"></li></ol><!-- Wrapper for slides --><divclass="carousel-inner"><divclass="item active"><center><imgsrc="https://hrexecutive.com/wp-content/uploads/2018/10/GettyImages-869538734broken700-700x450.jpg"></center></div><divclass="item"><center><imgsrc="https://kubesystems.com/wp-content/uploads/2016/05/bg-dark-3-700x450.jpg"></center></div><divclass="item"><center><imgsrc=""></center></div></div><!-- Left and right controls --><aclass="left carousel-control" href="#myCarousel" data-slide="prev"><spanclass="glyphicon glyphicon-chevron-left""></span></a><aclass="right carousel-control" href="#myCarousel" data-slide="next"><spanclass="glyphicon glyphicon-chevron-right""></span></a></div></div></div>
This section of our page will display 3 team members in form of cards. The cards will contain personal information about each member.
index.html
<divclass="container-fluid team" id="team"><divclass="container"><h1>Our Team</h1><divclass="row"><divclass="col-sm-4"><center><divclass="shift s1"><imgsrc="https://biobaseddelta.com/wp-content/uploads/2018/08/person-450x340.jpeg" />
<h3>Member 1</h6><span>Designation</span><br><br><iclass="fa fa-facebook"></i><iclass="fa fa-twitter"></i><iclass="fa fa-google-plus"></i><iclass="fa fa-instagram"></i><center><p>
A team is a group of individuals (human or non-human) working together to achieve their goal.
As defined by Professor Leigh Thompson of the Kellogg School of Management, "[a] team is a group of people who are
interdependent with respect to information, resources, knowledge and skills and who seek to combine their efforts to
achieve a common goal".[1]
Team members need to learn how to help one another, help other team members realize their true potential, and create an
environment that allows everyone to go beyond their limitations.[4]
</p></center></div></center></div><divclass="col-sm-4"><center><divclass="shift s1"><imgsrc="https://biobaseddelta.com/wp-content/uploads/2018/08/person-450x340.jpeg" />
<h3>Member 1</h6><span>Designation</span><br><br><iclass="fa fa-facebook"></i><iclass="fa fa-twitter"></i><iclass="fa fa-google-plus"></i><iclass="fa fa-instagram"></i><center><p>
A team is a group of individuals (human or non-human) working together to achieve their goal.
As defined by Professor Leigh Thompson of the Kellogg School of Management, "[a] team is a group
of people who are
interdependent with respect to information, resources, knowledge and skills and who seek to
combine their efforts to
achieve a common goal".[1]
Team members need to learn how to help one another, help other team members realize their true
potential, and create an
environment that allows everyone to go beyond their limitations.[4]
</p></center></div></center></div></div></div></div>
And our first bootstrap website design is ready! Hope you enjoyed it. You can now create more such designs using even more variety of elements and classes provided by bootstrap. Try experimenting different combinations of styling and make your design attractive to the viewer. Thank you! keep learning, keep growing.
I assume you already know about the key concepts of DLTs before you start reading this blog. If this is the case, let’s know more about Hyperledger Fabric.
What is Hyperledger Fabric and does it suits your use-case or application?
Hyperledger Fabric is a private and permissioned 🔐 DLT or a Blockchain to be precise, which comes under the umbrella of Linux Foundation.
As it is permissioned, one can not join or leave the network at any time. The members 👨 of a Hyperledger Fabric network enrol through a trusted Membership Service Provider (MSP), which we will discuss later.
The reason why it gains a mass adoption in Blockchain Marketplace is its modularity & flexibility. It allows to plug in different consensus algorithms, different database to save the data in ledger, and even allow to use different MSP to enrol users.
Hence, if you are looking for a Modular Permissioned-Blockchain Enterprise solution, Fabric can be the choice which you will definitely like.
Architectural Components of Fabric:
Like any permissioned blockchain network, Hyperledger Fabric has various actors & components like orders, peers, client applications, MSPs, CAs, etc. Let’s discuss them one by one.
1. Membership Service Provider:
Any of the actor 👨 in Fabric has an identity & according to the identity, the exact permissions and role of the actor are decided. So, from where do these identities come from and who decide the permissions? Yes, the MSP is the entity that defines rules, permissions and roles of different actors, whose identities have been issued by a valid CA(Certificate Authority). The documentation says:
MSPs turn verifiable identities issued by CAs into the members of a blockchain network.
Summing up, an MSP abstracts away the protocols behind issuing certificates, validating certificates, and user authentication with all the cryptographic mechanisms, handled by CAs.
Note: Fabric comes with a built-in CA component, called Fabric-CA to allow you to create CA on the blockchain network. However, this component is pluggable and you still have to options to choose from other available CAs.
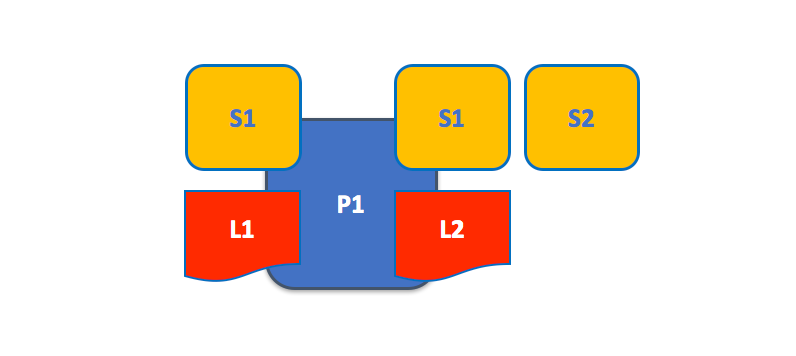
2. Peers A peer is a node that hosts instances of the ledger and chaincode in the blockchain network. So, if an application or an admin wants to query the ledger or update the ledger then a connection with a peer is required.
A peer in the fabric network can hold more than one ledgers, which can be governed by one or more chaincodes.
A peer hosting multiple ledgers. Peers host one or more ledgers, and each ledger has zero or more chaincodes that apply to them. In this example, we can see that the peer P1 hosts ledgers L1 and L2. Ledger L1 is accessed using chaincode S1. Ledger L2 on the other hand can be accessed using chaincodes S1 and S2.
3. Orderer
An orderer node packages the transactions into a block 📦, which is then sent to peers, and after verification ✔️ appended to the ledger.
In a fabric network, there are various provisions for the configuration of orderer nodes. We can use a single orderer node (SOLO, deprecated from v2.0) or also a group of orderer nodes can be used to order the transaction and form a block, and this forms an ordering service.
As Fabric is a permissioned blockchain, and real message passing can take place between the nodes, so it doesn’t depend on probabilistic consensus algorithm for ordering of transactions like in the case of Bitcoin and Ethereum. So, all you have to do is to use the consensus algorithm provided by fabric, or you can plug in your own implementation.
4. Channel
Channel provides a mechanism for the peer to communicate & transact privately. Conceptually, each of the ledger in the network is associated with a channel and the peers which have joined the channel can view and transact on that ledger only.
In the above case, three channels C1, C2 &C3 exists, conceptually shown by black, blue, & orange rectangle. Peer P1 & P3 have joined blue channel(C2) and black channel(C1) and P2 & P4 have joined the orange channel(C3) and black channel(C1). So, the Blue ledger is maintained by P1 and P3, whereas Orange Ledger is maintained by P2 and P4, but black ledger is maintained by P1, P2, P3 and P4.
Here is another reference from Fabric’s Documentation:
P1 & P2 have joined channel C1 and thus can access the ledger L1. P2 & P3 have joined channel C2, thus can access ledger L2. The interesting part is peer P2 have joined both the channels, thus can access both the ledgers.
5. Ledger
Fabric’s Ledger 📒 is a distributed database with two components –
World State — the state of the ledger at a given point in time. So, world state stores the most recent value of assets in the form of key-value pairs. Transaction Log — records all transactions which have resulted in the current value of the world state; it’s the update history for the world state.
A Ledger L comprises blockchain B and world state W, where blockchain B determines world state W. We can also say that world state W is derived from blockchain B.
A Simple Transaction:
Whenever a transaction is performed, it modifies the world state and the record of the transaction is made in the log of the ledger.
Note:
In Fabric, the database associated with the world state is pluggable and comes with two choices LevelDB & CouchDB.
Transaction log doesn’t need to be pluggable.
6.Smart Contract & Chaincode
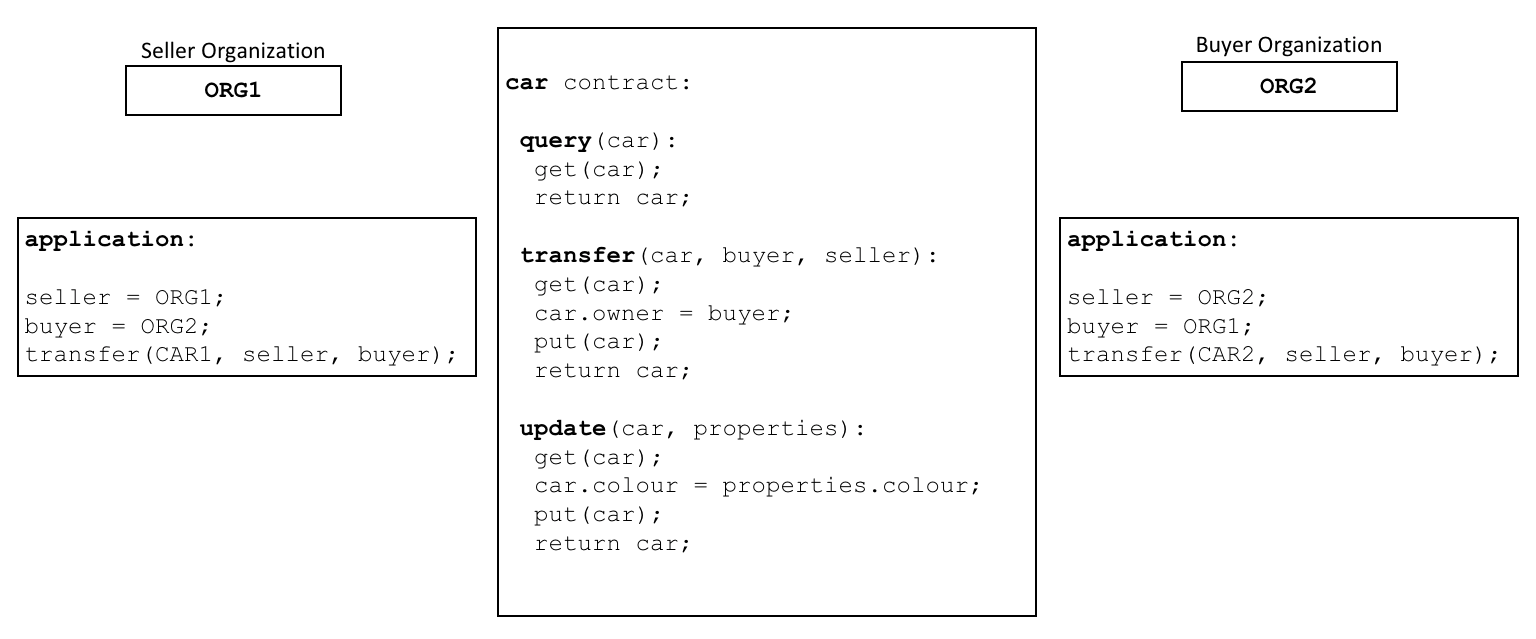
Smart Contracts are the codes that contain the business logic in the fabric-network. It defines the business cycle of an asset in the world state. So the business logic inside the smart contracts governs all the transactions.
Here is a pseudo-code smart contract from the documentation:
Smart Contract ‘Car’ 🚗 defines the business logic to query, transfer and update the ownership of the car, agreed upon by Org1 & Org2
Smart Contracts are packaged into the Chaincode for deployment on the blockchain-network.
Think of smart contracts as governing transactions, whereas chaincode governs how smart contracts are packaged for deployment.
There are also some chaincodes which work on lower-level, to perform the necessary tasks in the blockchain-network, and they are called system chaincodes.
It is better to cover the chaincodes & transaction life-cycle in a different blog, later on 😺.
In the complete series the main focus was to get the undergrads of my college to a kind of "ROAD" that is not taken "usually". This was something out of the world of Competitive Coding and Machine Learning. Since the Internet is Changing, and Blockchains are the one who is the Lead Changer of this internet revolution. I guess, transformation would be the right word.
We have discussed about a lot of things, let's put them together.
In this micro-blog
Connecting the Dots
Connecting the Dots
So, we've talked about a lot of things in the series of the Blogs. However, I must say that I couldn't cover everything I knew in detail, but here I'll try to connect the dots for you.
Let me list the blogs with the topics they covered. (You are free to skip through the list, just come back if you want to grab a look at what has been already done.)
We talked about various sotware attacks, attacks on Blockchains, how terminologies(soundness, completeness) could mean so much, vulnerabilities, specs/invariants, bugs in few of the most trusted spaces. We also had 2 guest lectures in the series. Let me now end up with a complex case in case of Bitcoin.
The case leaves a possibility for an attacker to Partiotion the Bitcoin network into multiple parts, creating a possibility to fork bitcoin into 2 parallel chains. Let's see how it works:
BGP Highjacking attack on Bitcoin
The Bitcoin network is highly centralised, even after known to be a decentralised network. And even if the Blockchain is completely encrypted the routing of messages is still very much open. The routes are easily deductible to the adversaries.
To explain it more, the complete Bitcoin network is spread to multiple ISPs (Internet Service Providers), which are again built up of multiple network clusters, called as Autonomous Systems(ASes). To communicate some messages between these ASes uses a protocol called the Border Gateway Protocol(BGP). This complete complete procedure is termed as Internet Routing.
~13 ASes host about 30% of the entire network, while 50 ASes host the 50% of the Bitcoin Network
Any attacker with accesss to the routing infra, can Highjack the BTC network. As a result of attacking mentality they can partition the BTC network in several parts. Probably bringing a major network towards their side.
Now they can add as many blocks in their side, and broadcast the chain in the network. By the general rule of Bitcoin network, "the longest chain is considered to be the final chain", the malicious one gets updated in the real etwork.
"hese attacks, commonly referred to as BGP hijacks, involve getting a router to falsely announce that it has a better route to some IP prefix."
"50% of Bitcoin mining power is hosted in only 39 prefixes (i.e., in 0.007% of all Internet prefixes). This allows an attacker to isolate ~50% of the mining power by hijacking only these 39 prefixes. Much larger BGP hijacks (involving orders of magnitude more IP prefixes) are routinely seen in the Internet today."
You see this is a big thing. The Internet Routing has a developing history of more than 35 years, and the BGPs are still considered to be stable. It is said that, Bitcoin has already gone through hundreds of BGP routing attacks, and the attacks are still not deductible.
So turning back and seeing the dots to be connected, we find,
a 100% secure system isn't possible
not a lot of people are aroung the security of these systems
the higher institutes are still hustling to create an environment of secure information exchange
developing techniques to check a system for its security is extremely difficult, and this is the place where actual computer science comes in
the attack surfaces are open in Hardware devices as well,
the Finance field is already being exploited for its vulnerabilities and application for the Blockchain tech
One thing to notice is that, even if the Blockchain tech fails, there will be a definite transformation in the internet we will be using tomorrow.
The security is everything. For a world running on Data, User's privacy, access to the systems comes in first.
So, that should be a lot of motivation I guess. I don't have any pre compiled list of the things, one can work on in the future, but BLOCKCHAIN + SECURITY, is surely the most citable area of work.
I'll try to cover more in details sometime. And yeap, I never read the Blogs twice, so pardon for the errors.
This article will take you to the easy steps for setting up Hyperledger Fabric v 2.1. It will be in reference to the Hyperledger Fabric Official Documentation, with short explanations at each & every step to save your time. I have seen, there are small-small things which people usually miss while setting up a fabric-network and face a lot of difficulties because of choosing the wrong version of dependencies, exporting wrong paths and many more things. So, my main motive to write this blog is to see you running the test-network, without missing anything.
* I will be using a Ubuntu 18.04 VM, on GCP for setting up the test-network.
Aye Aye Captain!! 🚢, let’s sail…
Installing the Pre-requisites & Getting the fabric binaries:
Don’t install golang using apt, because ubuntu generally maintains an older version of golang 😕. Use official website of golang to download it, and follow me:
a)Use curl or wget to download the current binary for Go from the official download page:
e) Load the file commands into the current shell instance
source ~/.bashrc
Note: Always check the minimum-version of any of the pre-requisites to avoid hustle.
3. Enable docker to run on
sudo systemctl enable docker
4. Add you, user, to the docker group
sudo usermod -a -G docker <username>
5. Install Fabric binaries
curl -sSL https://bit.ly/2ysbOFE | bash -s
6. Export path to your download location of fabric samples
export PATH=<path to download location>/bin:$PATH
You can see the following docker images pulled in your system now, by using
docker images
Okay, after all this you are now in stage to test the first-network example provided by hyperledger fabric.
Playing with the Fabric test-network bed:
To begin, change the current directory to the test-network folder and let’s move on.
Make sure there is no container related to Hyperledger Fabric is running before proceeding. Use these commands to stop them:
./network.sh down
or
docker rm $(docker ps -aq)
Architecture of test-network:
The test-network which comes with Fabric v2.1 contains 2 Organizations with 1 Peer each and an Orderer organization with 1 peer.
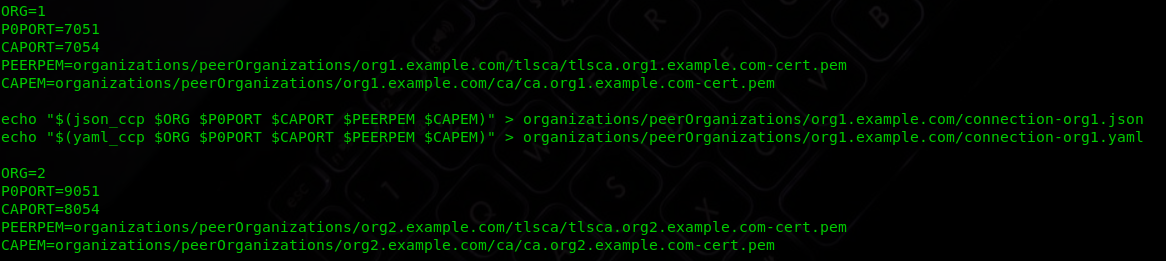
You can see the ccp-generate.sh for knowing configurations related to orgs.
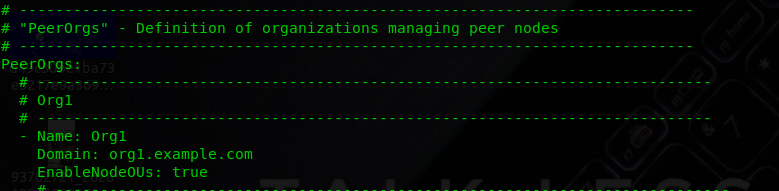
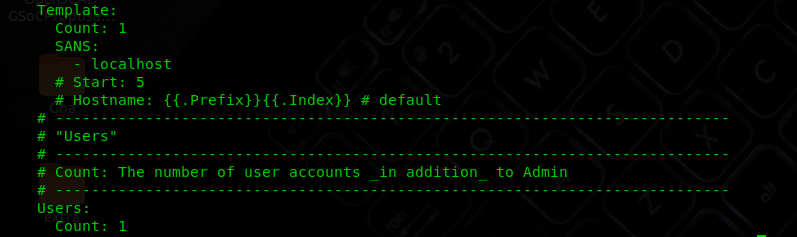
Also, configuration required to generate the crypto materials for peers and orders is present in yaml files in cryptogen folder.
Check out some snaps 📷 from crypto-config-org1.yaml file from the cryptogen folder:
You can see the Template Count set to 1. It corresponds to the fact that only one peer will be created for the org, and crypto material is generated for that only.
Let’s move to the demo in just three steps:
Step 1: Bringing up the test-network
./network.sh up
If everything completes smoothly, then you will be able to see the following three containers- two peers & one orderer.
So what actually happened in the previous command, the answer lies in the network.sh.
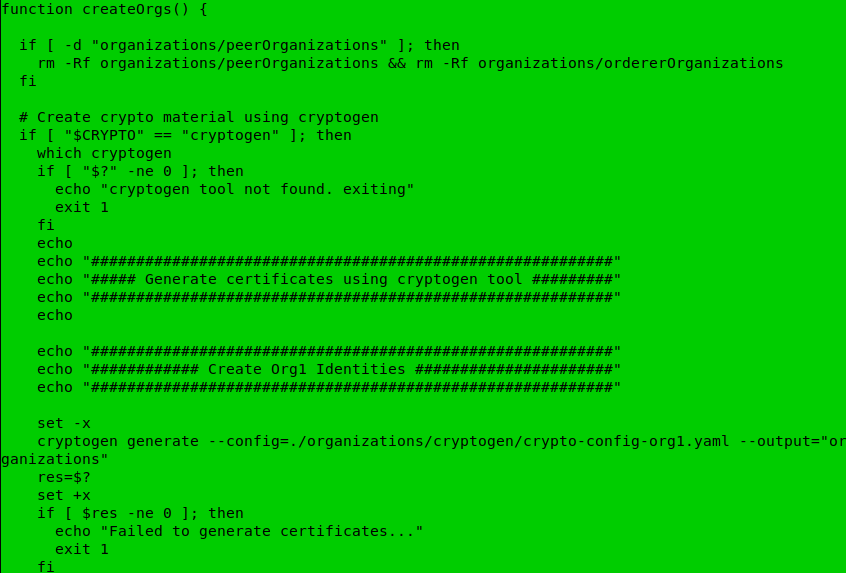
The command ./network.sh up itself calls two functions to create orgs and create consortium.
You can see that cryptogen is using the config files residing in organisations folder.
Note: One good enhancement in the test-network in v2.1 is that it also has an option to create identities using fabric-ca. Earlier version created the identities and crypto materials using cryptogen tool. So now it’s on you to choose the fabric-ca or cryptogen to generate the cryptographic materials for orgs. And, as matter fact Fabric doesn’t care at all about from where does the identities/certificates came. It just use them form verification and signing.
Similarly, the code to create org2 and orderer using config files from organisation folder is also present in the same function.
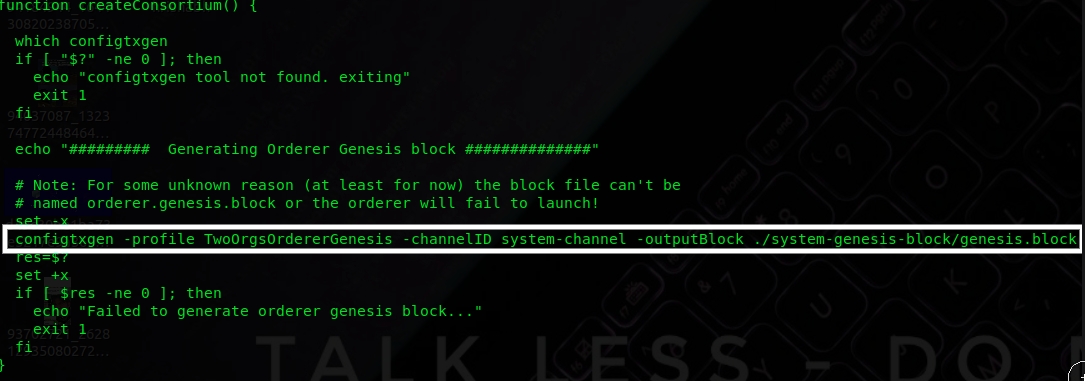
On the very next step, the createConsortium function will create a genesis block in the orderer system channel.
That’s all you have all the necessary containers up at this stage and we can move on the next step to create a channel for transactions between Org1 and Org2.
Step2: Creating a channel
The createChannel() function in network.sh will use createChannel.sh script residing in the scripts folder.
Take a look at the script and you will find, it performs the necessary tasks like updating the anchor peers, creating channel and making the peers to join the channel.
So let’s fire the function using:
./network.sh createChannel
Whoops, you are one step closer to test the network.
Okay, so the last step is to deploy the chaincode on the peers corresponding to the channel which you have just created.
Step3: Deploying the ChainCode
./network.sh deployCC
Check out the script deployCC.sh. It packages, install and instantiate the chaincode on peers.
We will discuss the chaincode structure in a separate blog. Hope I will write it soon 👯 .
Now you are free to interact with chaincodes. But…
From Fabric v2.0, Docker daemon dependency has been eliminated. So, now you can directly use the peer CLI to interact with your network.
To interact first with the peer CLI make sure:
You have exported the path to fabric binaries, which I think we have already covered in Pre-requisites steps.
Export the path to config folder in fabric-samples.
Similarly, you can invoke other methods of chaincode.
You can also use some other chaincode residing in the chaincode folder of fabric-samples by modifying the deployCC script, or even you can test your own chaincode on the test-network.
Celebrate, you are now aware of managing a Hyperledger Fabric simple network and taking the reference of this test-network, you can design your own network and feel like a Blockchain Architect.
Feel free to discuss some of the errors you may encounter while setting up the network, in the comments.
I’m leaving my bash.rc important exports in case you missed something:
Hello devs!🎮 Let us continue with the game👾 Now we need to implement these functionalities to complete the game:
Collide bullets with aliens
Healthbar for the player
Respawning of aliens
Background
Score calculation and game over
Let’s do it! 🚀
Phase 4
So we will begin with the code we left last time. If you don’t already have it, you can download it from : HERE So we will follow the order of functionalities given above.
Bullet alien collision💥:
So the alien should die if the bullet touches the alien’s body. To do this we will implement a distance() function which will take the coordinates of the alien and the bullet in consideration and check if any collisions occur. We will be iterating through the array Aliens and the array Bullets to check for each pair of {alien , bullet} to check for a collision. Let’s code!
We are traversing through both the arrays and checking for 4 conditions :
Absolute distance between bullet and alien in x axis is less than or equal to 18 (as the aliens are almost 36px in width).
The y coordinate of the bullet is less than the y coordinate of the alien.
The y coordinate of the bullet is greater than ( alien.y - 20 ).(as the aliens are almost 40px in height)
The y coordinate of the space shuttle (center) is at least 38px below the aliens center.(this ensures that the alien and space shuttle are not )
If these conditions are satisfied, we :
Update number of kills (variable kills++)
Send the bullet out of the screen (y = -10)
Add a new alien in place of the dead alien.
Source Code : Code Link Location in repository : \Phase 4\BulletCollisions
Try and run this code yourself to see the output.
Healthbar❤️:
For this we define a new variable called healthBarHeight. So out health bar height will depend on the health variable, which is initially valued 90. As the aliens touch the shuttle, or the aliens *pass beyond the screen *, the shuttle’s health is reduced. Turning it into code :
//Drawing the health bar
c.beginPath();if(health ==90){
c.fillStyle ="green";
healthbarHeight =90*6;}elseif(health ==60){
c.fillStyle ="orange";
healthbarHeight =60*6;}elseif(health ==30){
c.fillStyle ="red";
healthbarHeight =30*6;}else{
healthbarHeight =0;}
c.fillRect(20,20,20, healthbarHeight );
c.closePath();
c.fill();
Note : All this is written inside the draw() function.
Well we also need to handle the cases where the player loses health. Write this inside the draw() function :
Note : As soon as any of the conditions are satisfied, we have also killed the alien. Try removing the last 2 lines inside the if statement and then run the code and see the outcome.
The healthbar would looks something like this :
Source Code : Code Link Location in repository : \Phase 4\Health
Note : We still need to add the “Game Over” condition. We will do that at the end.
Before moving forward, let us code to increase the difficulty with score. I.e. as kills increase, so will the speed of the aliens and the number of aliens:
var level =0;//Declare this at the top //Increase difficulty with kills //Add this inside "Checking for bullet kill" after Aliens[j] = addAlien; if(kills %10==0){
alienSpeed +=0.1;}if(kills %20==0){
level++;var levelupAlien =newalien(Math.random()*(window.innerWidth-100)+60, Math.random()*(window.innerHeight/2-300),Math.floor(Math.random()*2));
Aliens.push(levelupAlien);
maxAliens++;}
At every 15 kills we add a new alien, and at every 10 kills we increase the speed. Source Code : Code Link Location in repository : \Phase 4\LevelUp
Background✴️:
The game is set in outer space, so whats missing? Right! Stars! Lets code this separately first:
var maxStars =150;//Stars on the screen var starSpeed =5;//Star object varstar=function(x,y ,rad){this.x = x;this.y = y;this.rad = rad;}
Stars =newArray();//Array of stars //Filling the array for(a =0; a<maxStars ; a++){var temp =newstar(Math.random()*(window.innerWidth-20), Math.random()*(window.innerHeight-20),Math.random()*3);
Stars.push(temp);}
Now we will be drawing these stars, but every time a star leaves the screen we will place it back on the top. Hence it will be like a single screen just repeating itself. This is how most of the infinite runner games like temple run and subway surfers take up just a few MB of space. So here goes the draw function :
functiondraw(){//Clear window
c.clearRect(0,0,window.innerWidth, window.innerHeight);//Draw stars for(j =0;j<maxStars ; j++){
c.beginPath();
c.fillStyle ='rgba(255,255,255,0.7)';
c.arc(Stars[j].x,Stars[j].y,Stars[j].rad ,0, Math.PI *2,false);
Stars[j].y += starSpeed;//This part send the star back to the top if(Stars[j].y >= window.innerHeight-20){
Stars[j].y =0;}
c.closePath();
c.fill();}requestAnimationFrame(draw);}draw();
Result:
Source Code : Code Link Location in repository : \Phase 4\Background
Now we need to add this to the game . The background will be drawn regardless of what’s going on in the game so let us straightaway merge the code in the game code, resulting in :
Source Code : Code Link Location in repository : \Phase 4\BackgroundMerged
Its time to wrap it up by calculating the score and handling the game over condition.
Game 0ver🎌:
To calculate the score there may be different ways. It totally depends on you how do you want to calculate the score. I personally feel it is best to check the Accuracy and Level Reached:
var alive =1;//1 alive 0 dead ....functiondraw(){//Enter code to draw Stars ....if(alive){//Rest of the game ....//Check if alien touches shuttle or crosses screen to reduce health ....if(health ==0)//Check if health is 0
alive =0;....}else{//Score screen
c.beginPath();
c.fillStyle ='rgba(255,255,255,0.5)';
c.font ="30px Calibri";
c.fillText("GAME OVER!",(window.innerWidth-20)/2-55,(window.innerHeight-20)/2-30);
c.fillText("Kills : "+ kills ,(window.innerWidth-20)/2-15,(window.innerHeight-20)/2);
c.fillText("Accuracy : "+(kills*100/totalBullets).toFixed(2),(window.innerWidth-20)/2-55,(window.innerHeight-20)/2+30);}requestAnimationFrame();}draw();....
This is how the game over screen will look:
So we are now ready with the final game: Source Code : FINAL GAME Location in repository : \Phase 4\Final
I’ve added a flickering effect to the alien as it looks cool. 😉 Enjoy playing and share it with your friends too! You can now experiment with the code to add your own effects, functionalities, audio, video and much more.