Squashing the Key Concepts related to Hyperledger Fabric

Reading Time: 6 minutes

Squashing the Key Concepts related to Hyperledger Fabric

Indeed you are at the right place 💖

I assume you already know about the key concepts of DLTs before you start reading this blog. If this is the case, let’s know more about Hyperledger Fabric.

What is Hyperledger Fabric and does it suits your use-case or application?

Hyperledger Fabric is a private and permissioned 🔐 DLT or a Blockchain to be precise, which comes under the umbrella of Linux Foundation.

As it is permissioned, one can not join or leave the network at any time. The members 👨 of a Hyperledger Fabric network enrol through a trusted Membership Service Provider (MSP), which we will discuss later.

The reason why it gains a mass adoption in Blockchain Marketplace is its modularity & flexibility. It allows to plug in different consensus algorithms, different database to save the data in ledger, and even allow to use different MSP to enrol users.

Hence, if you are looking for a Modular Permissioned-Blockchain Enterprise solution, Fabric can be the choice which you will definitely like.


Architectural Components of Fabric:

Like any permissioned blockchain network, Hyperledger Fabric has various actors & components like orders, peers, client applications, MSPs, CAs, etc. Let’s discuss them one by one.

1. Membership Service Provider:

Any of the actor 👨 in Fabric has an identity & according to the identity, the exact permissions and role of the actor are decided. So, from where do these identities come from and who decide the permissions? Yes, the MSP is the entity that defines rules, permissions and roles of different actors, whose identities have been issued by a valid CA(Certificate Authority).
The documentation says:

MSPs turn verifiable identities issued by CAs into the members of a blockchain network.

Summing up, an MSP abstracts away the protocols behind issuing certificates, validating certificates, and user authentication with all the cryptographic mechanisms, handled by CAs.

Note: Fabric comes with a built-in CA component, called Fabric-CA to allow you to create CA on the blockchain network. However, this component is pluggable and you still have to options to choose from other available CAs.

2. Peers
A peer is a node that hosts instances of the ledger and chaincode in the blockchain network. So, if an application or an admin wants to query the ledger or update the ledger then a connection with a peer is required.

A peer in the fabric network can hold more than one ledgers, which can be governed by one or more chaincodes.

https://hyperledger-fabric.readthedocs.io/en/release-2.1/peers/peers.html

https://hyperledger-fabric.readthedocs.io/en/release-2.1/peers/peers.html

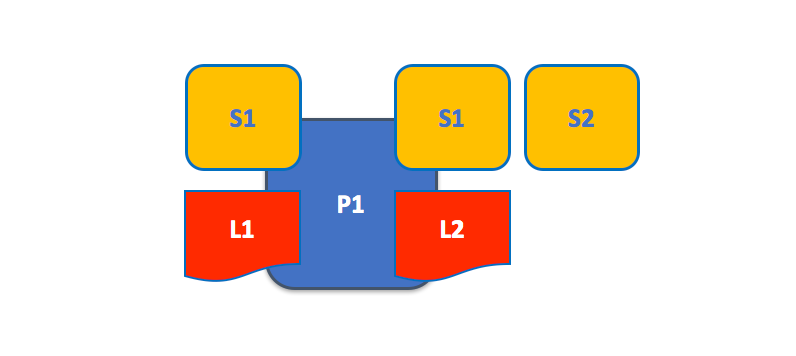
A peer hosting multiple ledgers. Peers host one or more ledgers, and each ledger has zero or more chaincodes that apply to them. In this example, we can see that the peer P1 hosts ledgers L1 and L2. Ledger L1 is accessed using chaincode S1. Ledger L2 on the other hand can be accessed using chaincodes S1 and S2.

3. Orderer

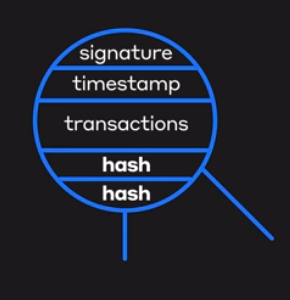
An orderer node packages the transactions into a block 📦, which is then sent to peers, and after verification ✔️ appended to the ledger.

In a fabric network, there are various provisions for the configuration of orderer nodes. We can use a single orderer node (SOLO, deprecated from v2.0) or also a group of orderer nodes can be used to order the transaction and form a block, and this forms an ordering service.

As Fabric is a permissioned blockchain, and real message passing can take place between the nodes, so it doesn’t depend on probabilistic consensus algorithm for ordering of transactions like in the case of Bitcoin and Ethereum. So, all you have to do is to use the consensus algorithm provided by fabric, or you can plug in your own implementation.

4. Channel

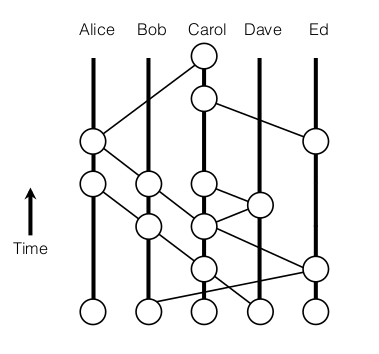
Channel provides a mechanism for the peer to communicate & transact privately. Conceptually, each of the ledger in the network is associated with a channel and the peers which have joined the channel can view and transact on that ledger only.

Squashing the Key Concepts related to Hyperledger Fabric

In the above case, three channels C1, C2 &C3 exists, conceptually shown by black, blue, & orange rectangle. Peer P1 & P3 have joined blue channel(C2) and black channel(C1) and P2 & P4 have joined the orange channel(C3) and black channel(C1). So, the Blue ledger is maintained by P1 and P3, whereas Orange Ledger is maintained by P2 and P4, but black ledger is maintained by P1, P2, P3 and P4.

Here is another reference from Fabric’s Documentation:

Squashing the Key Concepts related to Hyperledger Fabric

P1 & P2 have joined channel C1 and thus can access the ledger L1. P2 & P3 have joined channel C2, thus can access ledger L2. The interesting part is peer P2 have joined both the channels, thus can access both the ledgers.

5. Ledger

Fabric’s Ledger 📒 is a distributed database with two components –

World State — the state of the ledger at a given point in time. So, world state stores the most recent value of assets in the form of key-value pairs.
Transaction Log — records all transactions which have resulted in the current value of the world state; it’s the update history for the world state.

A Ledger L comprises blockchain B and world state W, where blockchain B determines world state W. We can also say that world state W is derived from blockchain B.

A Simple Transaction:

Whenever a transaction is performed, it modifies the world state and the record of the transaction is made in the log of the ledger.

Squashing the Key Concepts related to Hyperledger Fabric

Note:

  • In Fabric, the database associated with the world state is pluggable and comes with two choices LevelDB & CouchDB.
  • Transaction log doesn’t need to be pluggable.

6.Smart Contract & Chaincode

Smart Contracts are the codes that contain the business logic in the fabric-network. It defines the business cycle of an asset in the world state. So the business logic inside the smart contracts governs all the transactions.

Here is a pseudo-code smart contract from the documentation:

Squashing the Key Concepts related to Hyperledger Fabric

Smart Contract ‘Car’ 🚗 defines the business logic to query, transfer and update the ownership of the car, agreed upon by Org1 & Org2

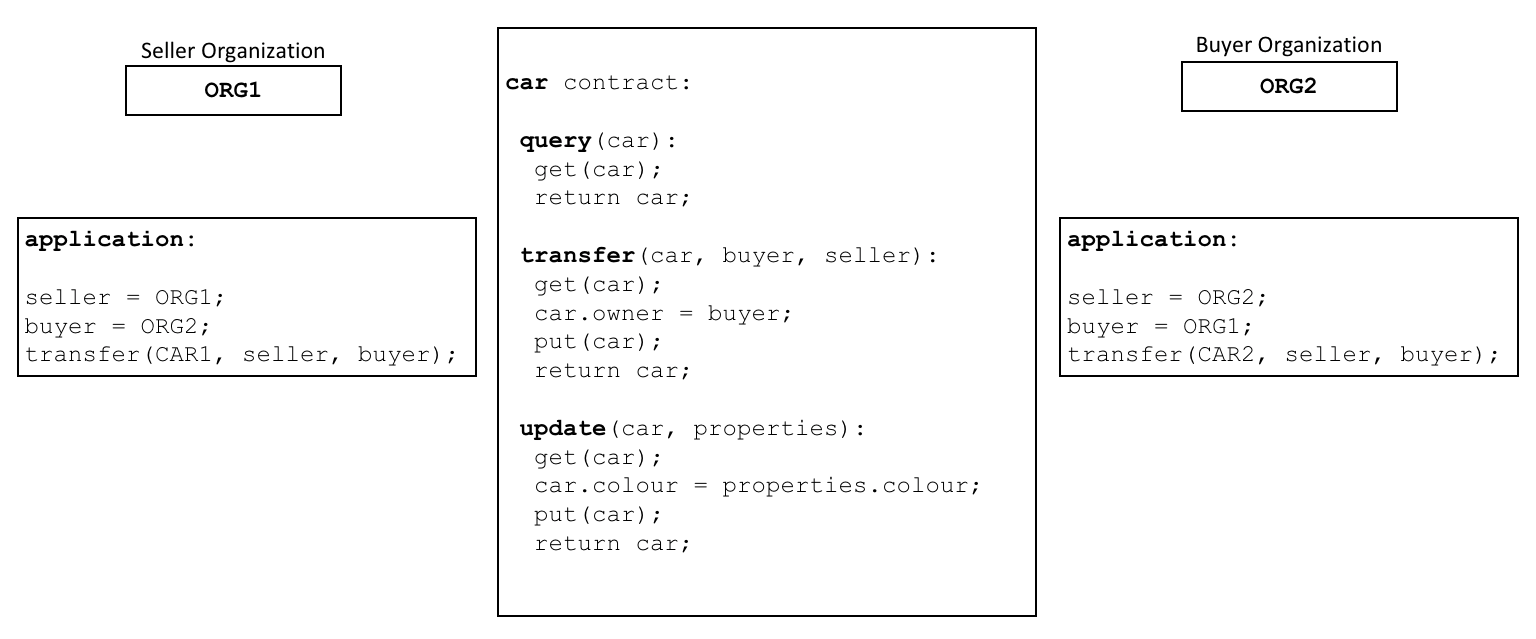
Smart Contracts are packaged into the Chaincode for deployment on the blockchain-network.

Think of smart contracts as governing transactions, whereas chaincode governs how smart contracts are packaged for deployment.

There are also some chaincodes which work on lower-level, to perform the necessary tasks in the blockchain-network, and they are called system chaincodes.

It is better to cover the chaincodes & transaction life-cycle in a different blog, later on 😺.

Squashing the Key Concepts related to Hyperledger Fabric

So that’s it. Thanks for reading.

Official Docs: https://hyperledger-fabric.readthedocs.io/en/release-2.1/

If you are facing difficulties in setting up Hyperledger Fabric, refer:

Hyperledger Fabric v2.1: Setting Things Up


Hyperledger Fabric v2.1: Setting Things Up

Reading Time: 6 minutes

This article will take you to the easy steps for setting up Hyperledger Fabric v 2.1. It will be in reference to the Hyperledger Fabric Official Documentation, with short explanations at each & every step to save your time. I have seen, there are small-small things which people usually miss while setting up a fabric-network and face a lot of difficulties because of choosing the wrong version of dependencies, exporting wrong paths and many more things. So, my main motive to write this blog is to see you running the test-network, without missing anything.


* I will be using a Ubuntu 18.04 VM, on GCP for setting up the test-network.

Aye Aye Captain!! 🚢, let’s sail…

Installing the Pre-requisites & Getting the fabric binaries:

Just keep following the steps with me 😉:

  • Install curl, docker, docker-compose, nodejs & npm.
sudo apt install curl docker docker-compose nodejs npm

2. Install golang

Don’t install golang using apt, because ubuntu generally maintains an older version of golang 😕. Use official website of golang to download it, and follow me:

a)Use curl or wget to download the current binary for Go from the official download page:

wget https://dl.google.com/go/go1.14.2.linux-amd64.tar.gz

b)Extract the tarball

tar -xvf go1.14.2.linux-amd64.tar.gz

c)Adjust the permissions and move the go directory to /usr/local:

sudo chown -R root:root ./go
sudo mv go /usr/local

d)Adjust the Path Variables in .bashrc

export GOPATH=$HOME/go
export PATH=$PATH:/usr/local/go/bin:$GOPATH/bin

e) Load the file commands into the current shell instance

source ~/.bashrc

Note: Always check the minimum-version of any of the pre-requisites to avoid hustle.

3. Enable docker to run on

sudo systemctl enable docker

4. Add you, user, to the docker group

sudo usermod -a -G docker <username>

5. Install Fabric binaries

curl -sSL https://bit.ly/2ysbOFE | bash -s

6. Export path to your download location of fabric samples

export PATH=<path to download location>/bin:$PATH

You can see the following docker images pulled in your system now, by using

docker images

Hyperledger Fabric v2.1: Setting Things Up

Okay, after all this you are now in stage to test the first-network example provided by hyperledger fabric.

Hyperledger Fabric v2.1: Setting Things Up

Playing with the Fabric test-network bed:

To begin, change the current directory to the test-network folder and let’s move on.

Make sure there is no container related to Hyperledger Fabric is running before proceeding. Use these commands to stop them:

./network.sh down

            or

docker rm $(docker ps -aq)

Architecture of test-network:

The test-network which comes with Fabric v2.1 contains 2 Organizations with 1 Peer each and an Orderer organization with 1 peer.

You can see the ccp-generate.sh for knowing configurations related to orgs.

Hyperledger Fabric v2.1: Setting Things Up

Also, configuration required to generate the crypto materials for peers and orders is present in yaml files in cryptogen folder.

Check out some snaps 📷 from crypto-config-org1.yaml file from the cryptogen folder:

Hyperledger Fabric v2.1: Setting Things Up

Hyperledger Fabric v2.1: Setting Things Up

You can see the Template Count set to 1. It corresponds to the fact that only one peer will be created for the org, and crypto material is generated for that only.

Let’s move to the demo in just three steps:

Step 1: Bringing up the test-network

./network.sh up

If everything completes smoothly, then you will be able to see the following three containers- two peers & one orderer.

Hyperledger Fabric v2.1: Setting Things Up

So what actually happened in the previous command, the answer lies in the network.sh.

Hyperledger Fabric v2.1: Setting Things Up

The command ./network.sh up itself calls two functions to create orgs and create consortium.

Hyperledger Fabric v2.1: Setting Things Up


You can see that cryptogen is using the config files residing in organisations folder.

Note: One good enhancement in the test-network in v2.1 is that it also has an option to create identities using fabric-ca. Earlier version created the identities and crypto materials using cryptogen tool. So now it’s on you to choose the fabric-ca or cryptogen to generate the cryptographic materials for orgs. And, as matter fact Fabric doesn’t care at all about from where does the identities/certificates came. It just use them form verification and signing.

Similarly, the code to create org2 and orderer using config files from organisation folder is also present in the same function.

On the very next step, the createConsortium function will create a genesis block in the orderer system channel.

Hyperledger Fabric v2.1: Setting Things Up

That’s all you have all the necessary containers up at this stage and we can move on the next step to create a channel for transactions between Org1 and Org2.

Step2: Creating a channel

The createChannel() function in network.sh will use createChannel.sh script residing in the scripts folder.

Take a look at the script and you will find, it performs the necessary tasks like updating the anchor peers, creating channel and making the peers to join the channel.

So let’s fire the function using:

./network.sh createChannel

Whoops, you are one step closer to test the network.

Okay, so the last step is to deploy the chaincode on the peers corresponding to the channel which you have just created.

Step3: Deploying the ChainCode

./network.sh deployCC

Check out the script deployCC.sh. It packages, install and instantiate the chaincode on peers.

We will discuss the chaincode structure in a separate blog. Hope I will write it soon 👯 .

Now you are free to interact with chaincodes. But…

Hyperledger Fabric v2.1: Setting Things Up

From Fabric v2.0, Docker daemon dependency has been eliminated. So, now you can directly use the peer CLI to interact with your network.

To interact first with the peer CLI make sure:

  • You have exported the path to fabric binaries, which I think we have already covered in Pre-requisites steps.
  • Export the path to config folder in fabric-samples.
export FABRIC_CFG_PATH=$HOME/fabric-samples/config/

After that you are ready to go, you just need to export environment variables for Org1, if you want to use that.

export CORE_PEER_TLS_ENABLED=true
export CORE_PEER_LOCALMSPID=”Org1MSP”
export CORE_PEER_TLS_ROOTCERT_FILE=${PWD}/organizations/peerOrganizations/org1.example.com/peers/peer0.org1.example.com/tls/ca.crt
export CORE_PEER_MSPCONFIGPATH=${PWD}/organizations/peerOrganizations/org1.example.com/users/Admin@org1.example.com/msp
export CORE_PEER_ADDRESS=localhost:7051

After that, you are ready to go to interact with the chaincode installed on the peer.

So, let’s try the query command:

peer chaincode query -C mychannel -n fabcar -c ‘{“Args”:[“queryAllCars”]}’

Similarly, you can invoke other methods of chaincode.

You can also use some other chaincode residing in the chaincode folder of fabric-samples by modifying the deployCC script, or even you can test your own chaincode on the test-network.

Celebrate, you are now aware of managing a Hyperledger Fabric simple network and taking the reference of this test-network, you can design your own network and feel like a Blockchain Architect.

Feel free to discuss some of the errors you may encounter while setting up the network, in the comments.

I’m leaving my bash.rc important exports in case you missed something:

export GOPATH=$HOME/go
export PATH=$PATH:/usr/local/go/bin:$GOPATH/bin
export PATH=$HOME/fabric-samples/bin:$PATH
export PATH=$PATH:$GOPATH/bin
export FABRIC_CFG_PATH=$HOME/fabric-samples/config/

Don’t forget to clap, if this blog saved your time 👏 👏 👏

Hyperledger Fabric v2.1: Setting Things Up

References:

Getting Familiar with Some Cool Git Commands- git bisect & git blame

Reading Time: 5 minutes

So, this article will move around:

  1. git bisect
  2. git blame

So let’s discuss them one by one, with the situations in which they can be used.

Finding Regression Error using ‘git bisect’:

‘git bisect’ will work as a life-saver spell if you need to find a regression bug introduced in your software accidentally. Such type of errors are common in group projects or open-source, in which some contributor unintentionally changes certain important piece of code, which breaks some other functionality, and it remains unnoticed for a long period of time. So, when such bug comes under notice, the main task of the maintainer is to track when this bug/breakage is introduced or to say before which commit, all things were working correctly.

So, the general approach to this problem would be to find a commit at which things were working correctly, and perform a binary search between the good commit and the latest commit to find the commit at which things were broken. This will narrow down the consideration window with few rounds of compiling.

Of course, it is a perfect approach, but doing it manually and keeping an eye on the good and bad commit makes the process cumbersome. So here comes the ‘git bisect’ for rescue.

To find the bug, firstly checkout to master and handover the git the responsibility to find the regression bug by firing:

git bisect start

By the above command, before the git starts the process you need to give a reference to a bad-commit and a good commit.

Assuming things are bad at the current HEAD, for giving reference to a bad commit use:

git bisect bad HEAD

After that, to perform a binary search, a reference to a commit, where things were working as expected, is needed. So, just take the hash of good-commit and use:

git bisect good <git-hash>

After this stage, git will start the process to find the breakage point. It will automatically checkout to the intermediate commits. All you need to do is to mark the checked-out commit as good or bad by:

git bisect good
git bisect bad


Let’s see this with example. Consider the file:

In this file, at line-4 the correct word was ‘Blockchain’, but accidentally it has been changed. So let’s find out the commit, before which everything was good.

Here is the git-log for reference:

Let’s start the git bisect and as things were good at ‘add Blockchain’ commit. So let’s take it as a good commit and take the latest commit as bad commit.

You can see that git take over the task of divide and conquer, and also displays the rough steps remaining in finding the regression point. So, all you have to do now is to mark the current checked out commit as good or bad.

After seeing the file at ‘add compiler design’ commit, we can conclude it as a good commit, as the spelling is correct there. So, let’s mark it as good commit.

The next bisect point is a bad commit, so let’s mark it.

Again, it’s a bad commit.

Whoops, we just found the commit at which things the word was misspelt. It is the commit with the message ‘add MP’.

In the same way, you can find regression bugs very easily in big projects :).

It saved me many hours, so will also save yours.


Finding the culprit for breaking the code by ‘git blame’:

The official documentation says, git blame-

Annotates each line in the given file with information from the revision which last modified the line. Optionally, start annotating from the given revision.

So in short, it is used to find the person in a group project, who changed the line and responsible for breaking the project.

So, git blame command will give you the information about the latest commit that changed the line, for all the lines accompanied by the author of the commit.

Command:

So let’s try this out by :

git blame <path-to-file>

Clearly, you can see the latest commit hash which changed the Line-4. Although the author in these commits are same. But if it is a team project, you can also judge which person broke the code, so that you can blame him, to have a coffee :).

You can also use GitHub to find the git blame for a line:


Similarly, GitLab also has the option to view blames:

That’s all for this article and Don’t forget to ‘Clap’, if you have found it useful.

References:

https://git-scm.com/docs/git-blame

https://git-scm.com/docs/git-bisect

You can find some more good-stuff at:

GIT and GITHUB: A Layman’s Guide[Part-1]

GIT and GITHUB: A Layman’s Guide [Part-2]

Hashgraph-a better DLT?

Reading Time: 6 minutes

The article guides you to Hashgraph, a patented Distributed Ledger Technology(DLT) in the form of a Directed Acyclic Graph(DAG) and its unique underlying consensus algorithm.

Why I am writing on it, and what brings me to know about Hashgraph?

While working on some project, I had been assigned a sub-task to plug in a consensus algorithm to ensure fair ordering of transactions during my intern. The use-case was critical and it was very important to ensure proper ordering of transactions.

You can find, many use-cases, where the fair ordering of transactions is a critical requirement. As an example, consider an online decentralized auction platform. Different users are bidding on something. Say one person bids on a certain value and hearing his value another person bids higher than his value. If the fair ordering of transaction is not ensured then the second person may win the auction, which should not happen.

Similarly, the project in which I was involved, dealt with a fair allocation of computing resources to the requestors along with good throughput and this indeed requires fair ordering of requests(transactions).

After a lot of literature survey and searching for some new ideas, I came across the Hedera Hashgraph project and it solved my problem.

Hashgraph ensures fair ordering of transactions.

Another characteristic or we can say feature because of which ‘Hashgraph’ is getting buzz is its high throughput of transactions and a very short delay in transaction’s confirmation.

Hashgraph ensures high thoughput of transactions.

The scalability problem is common in Blockchain Networks. The bitcoin’s theoretical transaction throughput is 27 transactions/sec. There are always some limitations in various already proposed consensus algorithms which limits the transaction throughput.

Check out this video by Dr Leemon Baird[founder of Hashgraph] explaining the drawbacks of Proof of Work:

Try to watch other videos of the playlist, it explains why different consensus algorithms involving leader election, voting etc can’t achieve a great performance.

So, he (Dr Leemon Baird) came with the idea of hashgraph, which solves much of the issues and ensure fair ordering with high throughput.

Hashgraph-a better DLT?


How Hashgraph achieves a better performance?

The reason for good performance the hashgraph, when compared to other DLTs, depends on these ‘Infinity Stones’:

  1. Hashgraph-a directed acyclic graph data structure that records who gossiped to whom, and in what order.
  2. Gossip about Gossip-the hashgraph is spread through the gossip protocol. The information being gossiped is the history of the gossip itself, so it is “gossip about gossip”. This uses very little bandwidth overhead beyond simply gossiping the transactions alone.
  3. Virtual Voting– every member has a copy of the hashgraph, so Alice can
    calculate what vote Bob would have sent her if they had been running
    a traditional Byzantine agreement protocol that involved sending votes.
    So Bob doesn’t need to actually hear the vote.

Check out this video for more clarity on Virtual Voting-

Hashgraph Consensus

The idea to achieve consensus in the hashgraph consensus algorithm is based upon the ‘Gossip’ protocol, which isn’t a new thing. ‘Gossip’ protocols call other participants repeatedly and pass them all the events they don’t know about. The ‘gossip’ method is being used in many traditional message passing algorithms. So what makes ‘Hashgraph’ different? Let’s catch it up.

Hashgraph-a better DLT?
Gossip history as a directed graph. The history of any gossip protocol can be represented by a graph where each member is one column of vertices. When Alice receives gossip from Bob, telling her everything he knows, that gossip event is represented by a vertex in the Alice column, with two edges going downward to the immediately-preceding gossip events by Alice and Bob.
In hashgraph, rather than normal gossip protocols, the whole hashgraph is gossiped. It is said the information is being communicated through ‘gossip about gossip’.

If one participant doesn’t know about some event, then some other node will gossip the missing information to him. All these events can be represented by a Directed Acyclic Graph(DAG).

If a new transaction is placed in the payload of an event, it will quickly spread to all members, until every member knows it. e.g. Alice will learn of the transaction. And she will know exactly when Bob learned of the transaction. And she will know exactly when Carol learned of the fact that Bob had learned of that transaction.

What’s inside the event?

Hashgraph-a better DLT?

Consider the case, Alice, Bob, Carol and Dave are members. Bob calls Dave. So Dave creates a new event to record this.

Hashgraph-a better DLT?

the structure of an event in hashgraph

So the new event holds the Signature of Dave and the two hashes of the events prior to sync i.e self-parent(parent directly below) and other-parent(the event though which gossip is being done). Along with this event holds the list of transactions and timestamp which acts as a proof/vote of when did this event occur?

As the time pass, this event keeps passing along with the other events. So the whole network knows, when did this event occur and Dave created this.

It gives rise to an immutable, distributed data-structure which doesn’t contain linear blocks chained together for cryptographic immutability, instead, a directed acyclic graph(DAG).

The hashgraph at every node stores the entire history about ‘who gossip to whom and when’. So without the actual transfer of votes, the consensus algorithm moves toward the concept of virtual-voting for reaching consensus on the ordering of transactions.

Hashgraph-a better DLT?

Each node holding different messages with their timestamps

The whole idea for fair-ordering revolves around the fact that each node knows all the event. So when a transaction is spread throughout the network, the hashgraph records the event containing the transaction. So, if we consider a transaction, it would have reached different nodes at different times. We can represent the consensus timestamp of this transaction with mean of all the event timestamps or the median of the event timestamp. Parallelly, if another transaction is spread, then the graph also holds the consensus timestamp of the other transaction indirectly. This consensus timestamp can be used to order the transaction.

Hashgraph-a better DLT?

Message/Event Timestamps

Using these timestamps, the mean or median timestamp is obtained which represents the consensus timestamp and is used for fair ordering.

Hashgraph-a better DLT?

Fair-Ordering though Hashgraph

That’s all if you want to know more about visit hashgraph check out the references.

For more details and mathematical theorems behind the consensus, refer the original paper.

References:

  1. Hashgraph Consensus Algorithm Explained | Dr Leemon Baird-
  2. Swirds’ Leemon Baird Talks Hashgraph-

Proof of ‘What?’ Series-Proof of Work(PoW)

Reading Time: 5 minutes

This series covers some of the popular methods of consensus being used in current public blockchain networks.

Before diving deep into the stream. To make things more clear, let’s understand which type of consensus protocol can be used in case of public blockchain networks.

In the case of permissioned blockchain, actual message passing (gossiping) takes place between the participating nodes. So nodes are known to each other in such networks.
Contrary to this, in public blockchain networks, any node can join or leave the network anytime. So nodes are anonymous to each other and to reach a decision, leader election will always take place in reaching the consensus.

The leader will decide what will be the next block and other nodes can easily validate the new proposed block.

At the end of the article, if you feel confident to explain the term to others, then don’t forget to leave claps behind.

Proof of Work(PoW)

This consensus algorithm is quite popular and used in many blockchain networks like Bitcoin and Ethereum.

To understand PoW in a better way, let’s discuss a few more terms:

  1. Mining: It is the term given to the event of adding a new block of transactions to the blockchain. In public blockchains, a leader is elected who will decide what will be the next block. The elected leader is called “Miner” and the process of adding the block is called “Mining”.

  2. Hash: A hash function is any function that can be used to map data of arbitrary size to fixed-size values — Wikipedia

  3. Nonce: A nonce is a random number in cryptography which is used only once. In the context of Blockchain, the miners hash the block data and nonce to reach a target in a brute-force manner.

Let’s know more about Transaction Life-Cycle in Bitcoin Network-

  1. Each transaction is added to the transaction-pool first.
  2. From transaction-pool, different participating nodes take input the transactions and compete with each other to mine the next block.
  3. The node which solves the problem first wins and decides what will be the next block.

So, the first question you might be thinking must be- How does the leader gets elected? Who will decide what will be the next block since different miners who are competing will have different transaction list due to the network delays? Don’t worry, Let’s catch it up together after reading a few more things.

During the consensus process of PoW, the complex mathematical problem selected is such that it is very hard to solve but very easy to verify.
For example- in the case of the Bitcoin Network, the problem is – the generated block hash should have the fixed number of zeroes in the beginning. e.g the target Block-Hash should have 12 zeroes in the beginning.

So in the transaction life-cycle, different miners collect transactions and generate a new block and try to solve the complex mathematical problem. The miner who solves the problem first gets the chance to broadcast his block to the rest of the network, where it can be verified easily.

Proof of ‘What?’ Series-Proof of Work(PoW)

Moving forward, we are talking about ‘complex’ mathematical problem. So what exactly it is?
Before this, we need to understand how the block hash is actually generated. Let’s see the case of Bitcoin:

As already mentioned, different miners collect transactions from the pool. After that, they generate the Merkle root hash from the list of transactions. This is done by hashing the transactions in a pair-wise manner repetitively.

Proof of ‘What?’ Series-Proof of Work(PoW)

Merkle Root

This ‘Merkle Root Hash’ along with the ‘previous block hash’ and ‘nonce’ constitute the ‘Block Header’ of the block. The ‘Block Header’ is then hashed with few more fields present in the block to generate a unique identifier of the block, called ‘Block Hash’.

Proof of ‘What?’ Series-Proof of Work(PoW)

Say, the target problem is- to generate the block hash to have initial 4 number of zeroes. Then to solve this problem, each miner will vary the nonce, so that generated block hash meets the target.

Hash(Blockheader[Nonce+Previous Block Hash] + OtherData) = BlockHash

The solution to this problem is complex as it can only be achieved through a brute-force approach by varying the nonce. A huge amount of computational power is spent in finding the right solution which meets the target.

Another amazing point is that, the difficulty of the complex problem(how much initial zeroes), is set according to network demands and transaction throughput of the bitcoin network.

So, now you can imagine just to add a valid block, a huge amount of computation is done. The tamper-proof characteristic of blockchain is somewhat supported by PoW. If someone tries to intrude any transaction data in the block, then its Block Hash becomes invalid and since in blockchain each block holds the hash of the previous block too, so hypothetically we say the chain breaks, and to restore the things the attacker needs to recompute the Block Hash of all the subsequent blocks from the block in which he changed the data till the most recent block, or we can say the attacker has to do the work again. All this will require a huge amount of computational resources which may worth very less than the value of data.

Proof of ‘What?’ Series-Proof of Work(PoW)

Source-blog.qtum.org

Surfing through the resources to understand PoW in a better way, I came across this amazing demo on Github. Do check this out: https://andersbrownworth.com/blockchain/blockchain

Motivation for Miners:

Proof of ‘What?’ Series-Proof of Work(PoW)

Source: Unknown

The only motivation for the miners to participate in Bitcoin mining is rewards. The miner gets reward for proposing a valid block and this reward is in the form of newly generated/mined bitcoins in the network.

That’s it, this is the short explanation of PoW from my side. Keep hustling to understand it till you are not satisfied.

Suggestions to explore stuff related to  PoW-

Next in the series are more consensus algorithms explanations. Stay Tuned!!

The Byzantine Fault Tolerance

Reading Time: 5 minutes

This short-article focusses on one of the most popular consensus problems in distributed computing known as “Byzantine’s General Problem” and when a distributed system is said to be Byzantine Fault Tolerant.
Various Byzantine Fault Tolerant algorithms are being used in Permissioned Blockchain Networks e.g Hyperledger Sawtooth is using Practical Byzantine Fault Tolerant(PBFT) to achieve consensus. So, if you want to understand how the consensus is actually achieved in such systems. This article is surely for you.

So let’s begin this journey.

First of let’s focus on the term ‘Byzantine Fault Tolerant’ and when a distributed system is said to be Byzantine Fault Tolerant?
The answer lies within the different types of failures that can occur in a distributed system-

1.Crash-Fail: In this type of failure, the component stop working without any warning. So you need to restart the node or replace it. We can say it is a ‘Fail-Stop’ failure.

2.Omission Failure: In this, component transmits a message but that message is not received by other nodes or we can say it is omitted.

3.Byzantine Failures: It is a ‘no-stop failure’.It occurs when there is a malicious or traitor node in the network which sends conflicting messages or block the messages by not sending them to the other nodes in the network, which may lead to faulty results.

Now I think it is self-explanatory that a distributed system is said to be Byzantine Fault Tolerant if it can cope-up with the Byzantine Failures.

The applications of BFT can be found in various domain like Blockchain and even in Boeing 777 and 787 flight controls.

Let’s move on to a specific problem which forms a base for understanding BFT-

The Byzantine General’s Problem :

Situation: Suppose there are several generals and they have to attack army camp C and they are surrounding the army camp such that they can’t communicate with each other directly. The only way communication can happen in between them is through a carrier and he needs to pass the enemy camp for transferring every message.
So they need proper protocols to reach a final decision whether to “attack ” on C, the next morning or “retreat”.
If they all agree to attack, and they do attack then they will surely win or if they agree to “retreat” then they can fight on another day. But if one of the general attack and other decides to retreat then they are surely gonna lose.

Problems:

  • Malicious Generals create variation in the decision to the others
  • Message Carriers may not reach
  • Reach a single solution, considering the downsides of a few Generals

Keeping in mind the situation, let’s discuss this problem with three generals.

Three Generals Problem:

Suppose, there are one commander and two lieutenants surrounding the army camp C and they have to collectively reach a decision to ‘attack’ or ‘retreat’.

If neither of the generals is faulty then all will work good and they will surely reach a decision.

The Byzantine Fault Tolerance

 Let’s see the case if one of the generals starts behaving maliciously:

The Byzantine Fault Tolerance

Let’s break up the whole communication process in two phases.

Phase-1: Commander sends the messages correctly to lieutenants.

Phase-2: Lieutenant-1 correctly forwards the message to Lieutenant-2.
As Lieutenant-2 is malicious, so he forwards the message to Lieutenant-1 incorrectly.

Clearly, Lieutenant-1 is receiving differing messages.

Let’s take a look at another possibility before jumping onto the conclusion.

What will be the case if ‘Commander’ is faulty?

The Byzantine Fault Tolerance

Phase-1: Lieutenant-1 and Lieutenant-2 recieves different messages.

Phase-2: They both exchange the messages correctly as they are loyal.

As per the protocols, both Lieutenants have to follow the Commander’s message. This is in the contradiction of the agreement condition.

Conclusion: There is no solution possible for ‘Three Generals Problem’ if one of the generals is faulty.

Four Generals Problem

Suppose, there are one commander and three lieutenants surrounding the army camp C and they have to collectively reach a decision to ‘attack’ or ‘retreat’.

When one of the Lieutenant is faulty?

The Byzantine Fault Tolerance

Phase-1: Commander correctly sends the message to other lieutenants.

Phase-2: Lieutenant-1 & Lieutenant-3 correctly forwards the message to others.
Lieutenant-2 behaves in a byzantine manner and incorrectly transmits the message.

By Majority Voting, the non-malicious lieutenants can reach the decision.

Decision of Lieutenant-1:
Majority(Retreat,Attack,Retreat)=Retreat

Decision of Lieutenant-2:
Majority(Retreat,Retreat,Attack)= Retreat

So, they have reached the consensus i.e “To Retreat”.

When the Commander is faulty?

The Byzantine Fault Tolerance

I think you can deduce what will happen in the two phases now.
Jumping directly to the decisions:-

Decision of Lieutenant-1:
Majority(Retreat,Attack,Retreat)=Retreat

Decision of Lieutenant-2:
Majority(Attack,Retreat,Retreat)= Retreat

Decision of Lieutenant-3:
Majority(Retreat,Retreat,Attack)=Retreat

So, the consensus has been achieved with the decision “To Retreat”.

One more special thing to observe here is that the final agreement will be the one which is in the majority of the decisions in Phase-1 e.g Retreat is in majority in Phase-1. So final agreement is on “Retreat‘’.

Conclusion: If out of 4 generals, only one is faulty or behaving in a byzantine way, then we can reach the agreement and consensus is achieved.

By the above two scenarios, we can now generalise the Byzantine Model of Distributed Systems.

Generalization

A System having ‘f’ number of faulty nodes(generals) should have at least, in total 3f+1 nodes(generals) in the network to reach the consensus.

Thanks for showing patience and reading until the end.

Next in the series is ‘PBFT & RBFT Consensus’ and ‘Consensus in Public Blockchain Networks’.

References:
https://people.eecs.berkeley.edu/~luca/cs174/byzantine.pdf

GIT and GITHUB: A Layman’s Guide [Part-2]

Reading Time: 5 minutes

Hello peeps!!
If you haven’t read Part-1 of the series, then take a look over it for better understanding.

In the Part-1, most of the jargons related to Git and Github and basic commands have already been discussed. Still, there is much more to learn like how to revert back the changes, what is branching, merging, etc.


GIT and GITHUB: A Layman’s Guide [Part-2]

Giphy GIFs


So hold your coffee and let’s begin & try to understand them one by one in simplest form and don’t worry we are not going to deal with any PPT, Lol!!

We have used the term master branch in the previous article several times.
So Let’s discuss it first..

Branching :

We will try to relate this with a real-life scenario at first and then we will move on to the technical explanation.
Imagine you are working on a team project. In such a project, there are often bugs to be fixed and sometimes a new feature has to be added. In a small project, it is easy to work directly on the main version, technically ‘master branch’ but in case of big projects, if you do so there is a high probability that you and other teammates may make changes which are conflicting. So the solution for this is ‘branching’ in git.

For proper understanding, you can think of the main git chain as a tree trunk which is technically called ‘master branch’.So whenever you want to work on a new feature, you can make a separate branch from the main tree trunk or master branch and start committing changes in your new branch and once you think that your feature is ready you can again merge that branch in the master branch.

Let’s understand this in a more robust way and also discuss the basic commands related to branching.

GIT and GITHUB: A Layman’s Guide [Part-2]

Branch in git is a special pointer to one of the commit. Every time you make a commit, it moves forward to the latest commit.

GIT and GITHUB: A Layman’s Guide [Part-2]

Another important point to mention is that git has a special pointer called
HEAD to keep track of the branch you are currently working on.

Let’s create a new branch with the name ‘new-feature’.

git branch new-feature

This will create a new branch(a pointer) on the same commit you were working on.

GIT and GITHUB: A Layman’s Guide [Part-2]


Note that HEAD is still on the master branch. You need to checkout to switch to the new branch.


git checkout new-feature


GIT and GITHUB: A Layman’s Guide [Part-2]


NOTE-You can create a new branch and immediately checkout to the new branch by:

git checkout -b new-feature

Let’s start working on the new feature and make a new commit.


GIT and GITHUB: A Layman’s Guide [Part-2]


Now if we check out to the main branch again and make a new commit, the new-feature branch will not be affected at all. Let’s do this:

git checkout master

After some changes, and commiting the new changes:


GIT and GITHUB: A Layman’s Guide [Part-2]


So, you can see how you can work on a new-feature without disturbing the master branch and once you complete your task on the new-feature you can “merge” that branch into the main branch.
Isn’t it amazing that you and your team can work on different features by creating multiple branches and later  merging them into master? Hell Yeah!!!

Now Let’s discuss a little bit about merging and basic commands related to it.

Merging :

Whenever you make a separate branch for working on a feature, you can commit your changes in that branch. But when you task related to the feature for which you make a branch completes, you need to merge that branch into the main codebase/master branch and this process is called ‘Merging’.

Suppose your task on a new-feature branch is now complete and you want to merge that branch into the master branch. Then firstly checkout to the master branch.

git checkout master

And use the following command:

git merge branchname

*Here in our case branch name is new-feature.


This command merge the changes you made in new-feature branch with the master branch by squashing them into a new commit that has information related to the two parent commits.See the picture…


GIT and GITHUB: A Layman’s Guide [Part-2]
And here comes the bad part….
Source:pando.com

Merge Conflicts :

When you merge a branch with the master branch, then there are chances you run into
‘Merge -conflicts’.
Basically, ‘merge-conflicts’ arise when you changed the line of code that someone
else also changed.

In such a situation, you manually have to decide which version of the code you want to keep that is you need to resolve the merge conflicts.

That’s All!!! Thanks for reading the article.
The next blog in the series will focus more on using GitHub.
Stay Tuned.

Happy Learning 🙂

TEAM CEV

References: https://git-scm.com/

GIT and GITHUB: A Layman’s Guide[Part-1]

Reading Time: 5 minutes

If you are new to Git and Github, and even if you are not from any technical background, this article will clear all your myths related to it.

GIT and GITHUB: A Layman's Guide[Part-1]

 Photo by Yancy Min on Unsplash


Git :

Git is just a software which tracks the changes in the files of your project.
It keeps the different versions of your files, hence it belongs to a category of software called Version Control System (VCS) so that different Versions of Software is in your Control
So if you are a developer, it can help you in handling situations like:

  • Reverting back to an older version of your code
  • Collaborate with the team effectively while working on the same project.

Repository :

The sole purpose of git is to track the changes in the project and collection of files and keep different versions of it.
So, the question is where does the git store these changes made in your project files. Here comes the concept of a repository, it is just a sub-directory in the root directory of your project you are working upon, which stores all the information related to changes in your files and much more useful information like who made the changes and when these were made.

Remote :

Suppose a situation where you are working on a team project consisting of different members. So the situation can’t be handled easily. A great hard-work will be required to merge the changes made by all into a single final project. And there can also be situations like there will be merge conflicts due to differences in a file which are stored on a single member’s machine. So we can say in this way, we can’t really collaborate on a team project.

Git solves this problem through ‘remote’.A git remote is a common repository residing on another central machine, which can be used by the whole team for collaboration on a team project.

Till now you know what is git, a repository and a remote. Another thing which we are going to discuss is “Github”.First of all, there is always confusion between Git and Github. Are they same thing or different?. So for more clarification-

— Git is a version control system, a tool to manage versions of your code
— GitHub is a hosting service for git repositories.

Now another question which can come into your mind is “How Git is gonna track and stage all the changes?”.The answer lies behind the distinct Git States, let’s tackle them first before proceeding-

Git States

The basic workflow of git includes the following three stages :

->Modified

It is the state when you make changes in a file, but it is untracked by the git.

->Staging

When you have modified a file or files, then you have to inform the git to look over and track the file if it is untracked till now, by taking a snapshot and this snapshot will go into the next commit. So we can say it is just the marking of a file to go into the next commit.

->Committed

It is the state when all the staged changes are stored in the local git repository or we can say the database.

GIT and GITHUB: A Layman's Guide[Part-1]


After this much, we can continue creating a git repository on your local machine and then pointing it to Github. All you need is git installed on your system and a GitHub account.
We will be using Ubuntu for the tutorial but most of the commands are same for Windows also. Let’s Go!!

Step 1: Configuring Git

git --version

*To check the version of git and for making sure git is installed or not.

git config --global user.name "github username"
git config — global user.email “github email”

*Replace username and email with your GitHub username and email.

Step 2: Initialising a git repository

git init

Fire this command in your project directory and this will initialize a git repository and you will see a .git folder in your project directory.

Step 3: Connecting to a repository

a)Create a repository on GitHub for your project

GIT and GITHUB: A Layman's Guide[Part-1]
b)Add a Remote
GIT and GITHUB: A Layman's Guide[Part-1]
git remote add origin url

Replace url with the https link of your repository.

*In the above command origin is just a remote name, you can also use other names for your remote.

Hola!!All set up.

In case you want to use an existing project hosted on GitHub skip all the above steps and clone the GitHub repository in your preferred directory.

git clone url

Let’s move on to 4 more essential git commands-

git add filename

This command will add the file into the staging area.

*Replace filename with the name of the file you want to add into the staging area.
*To add all the files of the directory replace filename with .[dot]

git commit -m “commit_message”

This will commit all the changes which are currently in the staging area. So this command is a bridge between the staging area and committed area.


git push origin master

This command will push all the files of the local repository of the ‘master’ branch to the Github/Central repository with remote name ‘origin’.

*Ignore the word branch here. We will take a look at it later. So just use master in the above command.

git pull origin master

This will pull all the contents of the master branch stored on GitHub/Central Repository to your local repository.

Other useful commands-

git status

This shows the state of your working directory and helps you see all the files which are untracked by Git, staged or unstaged.

git log

It is used to check the history of commits.


Thanks for Reading!!

This blog was focused mainly on the basics of Git And GitHub. All the concepts like branching, merging, resolving merge conflicts will be covered in detail in Part-2. Stay Tuned 🙂

Keep Reading, Keep Learning.

TEAM CEV!!!

Blockchain-The Internet’s New Magnum Opus

Reading Time: 9 minutes

The workshop was intended to excite and inspire some of the minds to set into brain-storming that might help the audience to come up with innovation with 21 st century internet Magnus, BLOCKCHAIN, to solve the real-world problems.

The prerequisite was null and void but an audience with a little bit of patience and curiosity, which certainly the audience was!

The workshop was segmented into two halves. It started with non-technical points to get launched into the topic and later shifted to tech-based. Key points of the talk were:

  1. Intuitive questions like why blockchain, what are the daily life problems that are needed to be addressed through blockchains, how blockchains can solve the crisis of current internet like data tampering and data breaching was answered to create the vacuum in audience minds for the talk.
  2. The talk then moved to introduce the audience with basic key terminologies like cryptography, hashing, mining, genesis block, ledger, nodes, consensus, etc.
  3. Very carefully the backbones of the blockchain were introduced. The network design concept that gives this technology the key power were: a) Distributed system and b) Decentralized systems. How the Blockchain provides architectural and political decentralization and logical centralization was deeply discussed.
  4. All of these gives the blockchain major characteristic system advantages of attack and collusion resistance, fault tolerance, good scalability, etc.
  5. Finally, the real world application of the blockchain was explained and vividly demonstrated. The successful digital currency of Bitcoin, how it solved the major two unsolved problems of its time- malicious activity prevention and the double spending, how it works and some of its basic underlining stories were discussed.
  6. The workshop ended with the display of a few of the projects that instructors made to participate in various hackathons.

Here is the ppt used in the actual workshop. All the references and important links would be uploaded soon, stay tuned!!!!

PPT

Many thanks to the speakers and the CEV Members, Aman Pandey, Hrishabh Sharma and Ujjwal Kumar.

– TEAM CEV

Resources

What is the Ethereum Developer Portal?

It’s a place to get started and find the tools you need to develop and build applications on Ethereum.

Table of Contents


Are You a New Developer to the Ethereum Ecosystem?

Below is a mix of the main infrastructure tools and knowledge centres that will teach you how to build software on Ethereum. We recommend taking a look through the portal and reading about all the developer tools and options before getting started.


infura

Infura

A scalable, standards-based, globally distributed cluster and API endpoint for Ethereum, IPFS, and other infrastructures.

truffle

Truffle

A development environment, testing framework, and asset pipeline for blockchains using the Ethereum Virtual Machine (EVM).


consensys-logo

ConsenSys Academy

Academy provides an end-to-end Ethereum developer course that is self-paced and open year-round.  Sign up now!


kauri

Kauri

Learn to build on Ethereum by reading all the latest articles, tutorials, documentation and best practices.


ethhub.io Logo

EthHub

Crowdsourced resources for individuals seeking to learn, listen, or read about Ethereum.


metamask-png-transparent-logo

MetaMask

The most used chrome extension wallet and Web 3 provider that allows users to interact with decentralized applications.

Smart Contract Languages

If you’re developing on Ethereum, you’re going to need to know how to write smart contracts. Luckily there are not too many different languages that you need to know. Solidity the main smart contract language is easier to learn if you already possess a good understanding of Javascript.


solidity

Solidity

An object-oriented, high-level language for implementing smart contracts.


ezgif.com-gif-maker

Vyper

A pythonic programming language for implementing smart contracts. Vyper is also currently beta software.

IDEs/Editors

IDE stands for Integrated Development Environment. IDEs and Editors are what you need to write and test software. They are software suites that consolidate basic tools that are required to start writing on Ethereum. Below are the most popular IDEs and Editors.


Atom_editor_logo

Atom 

An open source and usable text editor.


remix

Remix 

A suite of tools to interact with the Ethereum blockchain in order to debug transactions.


ETHEREUM-ICON_Black_small

Visual Studio Code

Visual Studio Code extension that adds support for Solidity.


Public Testnets

Public Testnets on Ethereum offer a way for developers to test what they build without putting their creations on the main Ethereum network. Developers are able to obtain as much ETH as you want on testnets because testnet ETH doesn’t carry any monetary value. Below are the most used testnets to start testing on and the links for where you can request testnet ETH.


Ropsten

Ropsten

A proof-of-work blockchain that most closely resembles Ethereum and allows you to easily mine faux-Ether.

Görli

Görli 

Proof-of-authority cross-client testnet, synching Parity Ethereum, Geth, Nethermind, Pantheon, and EthereumJS. This testnet is a community-based project, completely open-source.


kovan

Kovan

A proof-of-authority blockchain started by the Parity team. Test ether must be requested.


Rinkeby

Rinkeby 

A proof-of-authority blockchain started by the Geth team. Test ether must be requested.


Local Testnets

Similar to Public Testnets, Local Testnets are a place for you to test your software without pushing it public. Unlike Public Testnets, the Local Testnet software will only run on your computer/node and other users won’t be able to see it or interact with it.


G Truffle

Ganache 

Ganache is a personal blockchain for Ethereum development that developers can use to deploy contracts, develop applications, and run tests.


ganache-cli-128x128

Ganache CLI 

Fast Ethereum RPC client for testing and development. The command line version of Ganache, your personal blockchain for Ethereum development.


Front–End Interfaces

If you want to start developing dapps, you’ll need front-end development skills. Below are the most popular front-end interfaces that will help you turn your dapp from an idea to a live Ethereum mainnet application.


web3js

Web3.js 

An Ethereum JavaScript API which connects to the Generic JSON RPC specification. A local or remote Ethereum node must be run to use this library.


ethers(dot)js

 Ethers.js

Ethereum wallet implementation and utilities in JavaScript.


drizzle truffle

Drizzle

A collection of front-end libraries that make writing decentralized application  frontends easier and more predictable. Drizzle provides a Redux library to connect a frontend to a blockchain.


Backend Interfaces

If you want to graduate from just building dapps, you’ll need to start learning and using the backend interfaces listed below. If you’re interested in doing backend/protocol work on Ethereum, you should have significant experience with Go, Rust, Java, .NET, Ruby, or Python. Explore some of the most frequently used backend interfaces below.


python logo

Web3.py

A Python implementation of Web3.js.


Nethereum Logo-1

Nethereum

A .NET integration library for Ethereum allowing users to interact with Ethereum clients like Geth or Parity using RPC.


web3j logo

Web3j 

A lightweight Java and Android library for integration with Ethereum clients.


Smart Contract Library

You’ve probably used programming libraries before, and these are no different. A smart contract library is the reusable piece of code for a smart contract which is deployed once and shared many times. Below are the most used smart contract libraries.


open zepplin

OpenZeppelin

A library that provides implementations of standards like ERC20 and ERC721 as well as Solidity components to build custom contracts.


dapphub

Dappsys

A collection of building blocks for building smart contract systems written in Solidity.

Smart Contract Testing and Deployment

If you are creating a tool, product, or application on Ethereum, you’ll want to make sure your smart contract is in working order before deploying to the mainnet. These tools will help you build, test, and ship your code.


truffle

Truffle Suite

The most popular smart contract development, testing, and deployment framework. The Truffle suite includes Truffle, Ganache, and Drizzle. Read a deep dive on Truffle.


waffle-1

Waffle

Waffle is a library for writing and testing smart contracts. Waffle is based on ethers.js.


embark best

Embark

A framework that allows you to easily develop and deploy decentralized applications. Currently integrates with EVM blockchains (Ethereum), IPFS, Swarm, Whisper, and Orbit.


Ethereum Clients

An Ethereum client refers to any node that is able to parse and verify the blockchain, its smart contracts, and everything in between. An Ethereum client also provides interfaces to create transactions and mine blocks which is the key for any Ethereum transaction. Below are the most popular Ethereum clients.


pegasys logo-2

PegaSys Pantheon

Pantheon is an open-source Ethereum client developed under the Apache 2.0 license and written in Java.


parity

Parity

An Ethereum client developed by Parity Technologies using the Rust programming language.


gopher logo

Geth

A command line interface for running a full Ethereum node implemented in Go.


Storage

Ethereum allows you to save variables or data in permanent storage. The storage platforms below are where all of the smart contract data lives. IPFS is the most commonly used storage system on Ethereum. Explore the platforms below to learn more about how storage on Ethereum works.


IPFS

IPFS

InterPlanetary File System is a decentralized storage and file referencing system for Ethereum.


swarm logo

Swarm

A distributed storage platform and content distribution service for the Ethereum web3 stack.


Orbit

OrbitDB

A decentralized peer to peer database on top of IPFS.

Security Tools

Ok, so you’ve finally built your dapp or smart contract. But how do you know it was set up correctly and is safe from hackers? The security tools below will help ensure that your code is safe and follows all Ethereum development best practices.


mythx

MythX

A security analysis API for Ethereum smart contracts. MythX powers tools that bring security into the smart contract software development life cycle.


Oyente just logo

Oyente

An analysis tool for smart contracts. Oyente utilizes a symbolic execution tool that works directly with EVM byte code without access to the high level representation (e.g Solidity).


manticore

 Manticore

A command line interface that uses a symbolic execution tool on smart contracts and binaries.


**A special thanks to Consensys.net for all the resources.


Want More?

Plug into the decentralized future. Join our newsletter.


Join Now


DEEPMIND ALPHAFOLD: The Next Giant Leap By Humans

Reading Time: 3 minutes

It has nearly taken hundreds of centuries to get where we are today. From the invention of the wheel to the fastest train with speed of 603 Kmph, from the discovery of fire to landing on the moon, all the technological advances that you use in everyday life, unnoticed, is the result of enthusiastic effort and genius of the great legacy. Artificial intelligence is certainly is the next giant step in that series, the rate of technological advancement would be ever high! Following the one such initiative:

  • DeepMind is the world leader in artificial intelligence research and its application for positive impact on the world.
  • DeepMind was founded in London and backed by some of the most successful technology entrepreneurs in the world and have been acquired by Google in 2014.
  • DeepMind, an AI lab is the complete outsider to the field of molecular biology, beat top pharmaceutical companies like Novartis, Pfizer, etc. at predicting protein structures.
  • DeepMind has brought together experts from fields if structural biology, physics, machine learning to apply cutting edge techniques to predict the 3D structure of a protein based on its genetic sequence.
  • DeepMind Alpha Fold is the system which uses vast genomic data to predict protein structure.
  • CASP (Critical assessment of structure prediction) is a virtual protein folding Olympics, where the aim is to predict the 3D structure of the protein based on its genetic sequence data.
  • DeepMind has won the CASP13 protein folding competition.
  • Alpha Fold scores 127.99 was 20 points higher than the second-ranked team, achieving what CASP called “unprecedented progress in the ability of computational methods to predict protein structure”.

     What is protein folding problem?

Proteins are our bodies building blocks and perform a vast array of essential functions.

A protein molecule is made of a string of smaller components called amino acids, which fold into the molecule’s 3D shape. The protein folding problem involves determining how the string of amino acids encodes the 3D shape of a protein molecule. This can produce a better understanding of proteins and enable scientists to change their function for the good of our bodies. For example in treating diseases caused by misfolded proteins, such as Alzheimer’s, Parkinson’s, Huntington’s and cystic fibrosis.

The protein folding problem is regarded as one of the grandest biochemistry challenges of the last 50 years. Current approaches include using algorithms to compute the 3D structure of proteins with amino acids sequence data, or using X-ray crystallography and other techniques to image a protein structure.

DEEPMIND ALPHAFOLD: The Next Giant Leap By Humans

    The DeepMind’s approach:

  • DeepMind researchers used deep neural network to learn the correlation between the shape of a protein molecule and its amino acid sequence.
  • The physical properties of a protein molecule include the distance between pairs of amino acids and the angles between chemical bonds that connect those amino acids.

DEEPMIND ALPHAFOLD: The Next Giant Leap By Humans

  • The model came up with a score that estimates the accuracy of a proposed protein structure, then used gradient descent a common deep learning algorithm that finds the minimum of a function to optimize that score.
  • DeepMind has been working on protein folding for two years and has significantly advanced the development of protein engineering.

Thanks for reading.

BY- AJAY KUMAR RACHURI (3rd year EC )

CHEERS, TEAM CEV.

CEV - Handout