Getting Familiar with Some Cool Git Commands- git bisect & git blame

Reading Time: 5 minutes

So, this article will move around:

  1. git bisect
  2. git blame

So let’s discuss them one by one, with the situations in which they can be used.

Finding Regression Error using ‘git bisect’:

‘git bisect’ will work as a life-saver spell if you need to find a regression bug introduced in your software accidentally. Such type of errors are common in group projects or open-source, in which some contributor unintentionally changes certain important piece of code, which breaks some other functionality, and it remains unnoticed for a long period of time. So, when such bug comes under notice, the main task of the maintainer is to track when this bug/breakage is introduced or to say before which commit, all things were working correctly.

So, the general approach to this problem would be to find a commit at which things were working correctly, and perform a binary search between the good commit and the latest commit to find the commit at which things were broken. This will narrow down the consideration window with few rounds of compiling.

Of course, it is a perfect approach, but doing it manually and keeping an eye on the good and bad commit makes the process cumbersome. So here comes the ‘git bisect’ for rescue.

To find the bug, firstly checkout to master and handover the git the responsibility to find the regression bug by firing:

git bisect start

By the above command, before the git starts the process you need to give a reference to a bad-commit and a good commit.

Assuming things are bad at the current HEAD, for giving reference to a bad commit use:

git bisect bad HEAD

After that, to perform a binary search, a reference to a commit, where things were working as expected, is needed. So, just take the hash of good-commit and use:

git bisect good <git-hash>

After this stage, git will start the process to find the breakage point. It will automatically checkout to the intermediate commits. All you need to do is to mark the checked-out commit as good or bad by:

git bisect good
git bisect bad


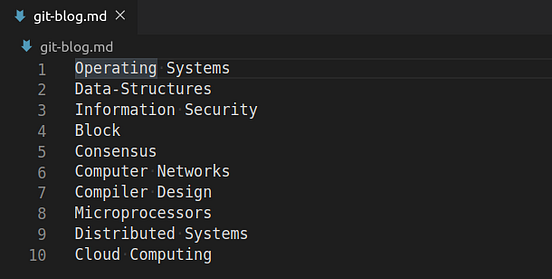
Let’s see this with example. Consider the file:

In this file, at line-4 the correct word was ‘Blockchain’, but accidentally it has been changed. So let’s find out the commit, before which everything was good.

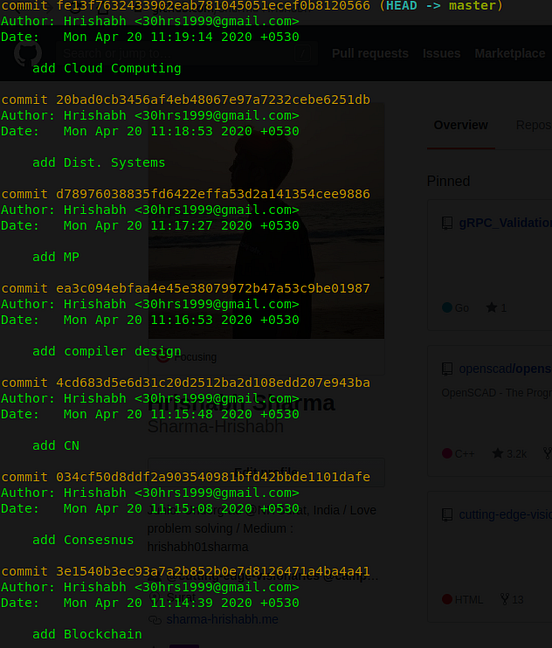
Here is the git-log for reference:

Let’s start the git bisect and as things were good at ‘add Blockchain’ commit. So let’s take it as a good commit and take the latest commit as bad commit.

You can see that git take over the task of divide and conquer, and also displays the rough steps remaining in finding the regression point. So, all you have to do now is to mark the current checked out commit as good or bad.

After seeing the file at ‘add compiler design’ commit, we can conclude it as a good commit, as the spelling is correct there. So, let’s mark it as good commit.

The next bisect point is a bad commit, so let’s mark it.

Again, it’s a bad commit.

Whoops, we just found the commit at which things the word was misspelt. It is the commit with the message ‘add MP’.

In the same way, you can find regression bugs very easily in big projects :).

It saved me many hours, so will also save yours.


Finding the culprit for breaking the code by ‘git blame’:

The official documentation says, git blame-

Annotates each line in the given file with information from the revision which last modified the line. Optionally, start annotating from the given revision.

So in short, it is used to find the person in a group project, who changed the line and responsible for breaking the project.

So, git blame command will give you the information about the latest commit that changed the line, for all the lines accompanied by the author of the commit.

Command:

So let’s try this out by :

git blame <path-to-file>

Clearly, you can see the latest commit hash which changed the Line-4. Although the author in these commits are same. But if it is a team project, you can also judge which person broke the code, so that you can blame him, to have a coffee :).

You can also use GitHub to find the git blame for a line:


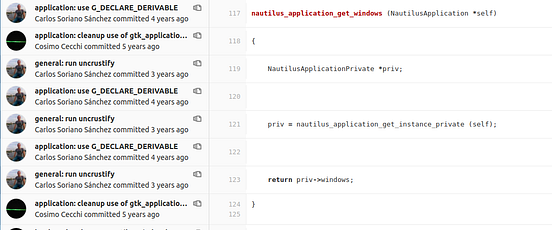
Similarly, GitLab also has the option to view blames:

That’s all for this article and Don’t forget to ‘Clap’, if you have found it useful.

References:

https://git-scm.com/docs/git-blame

https://git-scm.com/docs/git-bisect

You can find some more good-stuff at:

GIT and GITHUB: A Layman’s Guide[Part-1]

GIT and GITHUB: A Layman’s Guide [Part-2]

HTML Canvas Games from Scratch #3

Reading Time: 5 minutes
Hey, devs!🎮
So we are all set to begin creating the game👾.
Let’s do it!

Phase 3

Before we jump into coding, let us plan things.
Objects we will need :

  • Player (The space shuttle)🚀
  • Alien👾
  • Bullets

Let us define these objects :

//Shuttle object
var shuttle = function(x,y){
this.x = x;
this.y = y;
}

//Alien object
var alien = function(x,y){
this.x = x;
this.y = y;
}

//Bullet object
var bullet = function(x,y){
this.x = x;
this.y = y;
}

//Since we will handle multiple bullets and Aliens
var Bullets = new Array();
var Aliens = new Array();

Other variables that we will need to define are :

var totalBullets = 0; //bullets on screen
var health = 90; //health of player
var kills = 0; //total aliens killed
var maxAliens = 5; //Max aliens on the screen
var bulletSpeed = 7; //Speed of the bullet
var alienSpeed = 0.2; //Speed of the aliens

Note : These values are selected by hit and trial.
Now we will need alien and shuttle sprites. I have already made these using fillRect() functions.
Download code from this link : Code Link
Location in repository : \Phase 3\Sprites
Note : It is ok if you don’t try to understand drawShuttle() and drawAlien() as it isn’t very important, those are just figures made using rectangles. You will be using images for sprites in the future mostly.
Result :

HTML Canvas Games from Scratch #3
Space Shuttle will be positioned at the bottom center.
Alien will have a constrained random position at approximately the top part of the screen.

Now we will work on the same code that you’ve downloaded.
Let us add an event listener to enable the space shuttle to move using the arrow keys. (As we did in the previous post)

var keys = []; //Add this before the draw() definition

window.addEventListener("keydown", keysPressed, false );

function keysPressed(e) {
// store an entry for every key pressed
keys[e.keyCode] = true;
window.addEventListener("keyup", keysReleased, false);
}

function keysReleased(e) {
    // mark keys that were released
keys[e.keyCode] = false;
}

So we need to adjust the position of the space shuttle before re-drawing it on the canvas. Inside the draw() function, before drawing the space shuttle :

//Handling arrow key presses and shuttle movement boundaries

// left
if (keys[37]) {
if(player.x >= 70)
player.x -= shuttleSpeedh;
}

// right
if (keys[39]) {
if(player.x <= window.innerWidth - 50)
player.x += shuttleSpeedh;
}

// down
if (keys[38]) {
if(player.y >= window.innerHeight/2)
player.y -= shuttleSpeedv;
}

// up
if (keys[40]) {
if(player.y <= window.innerHeight - baseBottomh - midBottomh - cannonh)
player.y += shuttleSpeedv;
}

Run this code to check what are the constraints to the movement of the space shuttle.
Note : shuttleSpeedh and shuttleSpeedv respresent horizontal and vertical velocity. These have been defined in the file at the top.
Result :
HTML Canvas Games from Scratch #3
Here’s the source code : Code link
Location in repository : \Phase 3\MovingShuttle

Now let us fill the array of aliens:

//Initial array of aliens
for(a = 0; a < maxAliens; a++){
var temp = new alien(Math.random()*(window.innerWidth-100)+60, Math.random()*(window.innerHeight/2-300));
Aliens.push(temp); //We already defined this array
}

To draw all these aliens we need to make changes in out draw() function. Just add a loop where we are drawing a single alien:

for(a = 0 ; a < Aliens.length ; a++)
drawAlien(Aliens[a]);

Result :
HTML Canvas Games from Scratch #3
Here’s the source code : Code Link
Location in repository : \Phase 3\SpawnAliens

Moving on, we now need to make the space shuttle launch bullets.
This will happen on pressing spacebar. But only 1 bullet will be launched on pressing spacebar once. So the event we use will be keyRelease. Remember we have already defined it?
Let us add more functionality to it.
js  function keysReleased(e) { if(e.keyCode==32){ //keycode of spacebar var temp = new bullet(player.x , player.y - midBottomh - cannonh); totalBullets++; Bullets.push(temp); } }  
Now let us draw all the bullets on the canvas;

function drawBullet(thisBullet){
c.fillStyle = bulletColors[Math.floor(Math.random()*6)];
c.beginPath();
c.arc(thisBullet.x,thisBullet.y - cannonh + 10, 2.5 , 0 , Math.PI*2 ,false);
c.fillRect(thisBullet.x-2.5,thisBullet.y - cannonh + 10  ,5,5);
c.closePath();
c.fill();
}

Last but not the least lets draw these bullets on the canvas and make them move . This should be added inside draw():

//Check bullets that left the screen and remove them from array
for(a = 0 ; a < Bullets.length ; a++){
if(Bullets[a].y <=0 ){
Bullets.splice(a,1); //Removes 1 element from the array from index 'a'
}
}

//Update bullet coordinates to make it move and draw bullets
for(a = 0 ; a < Bullets.length ; a++){
Bullets[a].y -= bulletSpeed; //Already defined at the top
drawBullet(Bullets[a]);
}

Result :
HTML Canvas Games from Scratch #3
Here’s the source code : Code link
Location in repository : \Phase 3\Bullets

Moving on to the last thing that we will be doing in this phase. Make the aliens move.

Aliens[a].y += alienSpeed; //Add this inside the loop
//where we use drawAlien();

So we have set the aliens in motion!👾

Final source code for this phase : Code Link
Location in repository :  \Phase 3\Final

We are almost done with the game. This phase was about the aesthetics of the game. Next phase will be the final phase where we will add the game logic and a final touch with a good background and a visible healthbar.
Do leave comments/suggestions if any.
Cheers!🍺

 Play the game :

Star this game!


Written by : Jay Rathod💻
Links : Portfolio | Github | Codepen | Linkedin | Instagram

Modern Portfolio Theory – Markowitz Model

Reading Time: 6 minutes

Introduction


Modern Portfolio Theory - Markowitz Model


Since this concept is unknown to a lot of non-finance grads, I’ll try my best to cover the topic as quickly as possible, and yet make it explainable.
We all have some dreams about how we’re going to spend our lives. And most of these dreams may require us to be financially sufficient, if not rich. And when I say that, I am sure everyone thinks about either starting-up something or investing. Here we’re going to focus on the later. Everyone knows the importance and benefits of investment, and types of financing options available for any investment. Sadly, while many have mentally accepted they’d want to invest when they start earning, a very few know how to!
Modern Portfolio Theory, henceforth referred to as MPT, is the starting point to understand the world of investments, mathematically.
Harry Markowitz suggested the MPT in 1952 for which he won the Nobel Prize in Economic Sciences later.

Understanding the parameters of MPT

MPT is an entirely risk-return based assessment of your Portfolio. This means all it looks for is how to maximize your returns for a given amount of risk. It assumes that different people have a different risk-taking attitude. A young person would be willing to take a greater risk if it might generate him greater returns. While someone who is old, would not be willing to take higher risks and would remain satisfied with lower returns. Whatever the risk attitude, it tries to search for the ‘combination’ of assets in the Portfolio that would generate the highest possible returns (for some risk).
I hope we are clear with the very basic idea of what MPT is. Now let’s briefly understand how MPT defines risk and return for its assessment.
According to MPT, returns are simply the profit you make on an asset over a period of time. It would be negative in case of a loss. Obviously, this is very much intuitive.

Mathematically, R is the percentage change in the value of assets.

R = [(V – Vo)/(Vo)]X100

Risk, according to Markowitz, can be expressed using the standard deviation of returns over a period of time. Recall from your high school statistics, the standard deviation is the measure of how deviated the values are from their mean. So, the logic here is, if the returns more largely deviate from their mean values, the asset having those returns is more volatile. More volatility naturally means its riskier. Look how I emphasized on ‘according to Markowitz’. This is because, there are several methods of risk assessment (eg. VaR, CVaR, Conditional Risk, etc). This is because different people have different notions of what risk means to them. For some, it is how large their return could be on the negative side. For some, by what probability they can suffer an X% of loss on a standard normal distribution of their returns (essentially, the Z-Score). Anyway, to understand MPT, we need the basic definition of risk as described by Markowitz.

Mathematically, Risk (σ) = std(returns over that period)

Now, this is how we can calculate the risk and return of an asset. But obviously, we are not going to invest in a single asset. So more important value to us is the risk and return of your entire Portfolio. Consider a portfolio with N number of assets.

The expected return Ro on each one of these N Assets is the average of per period return R calculated using the percentage change formula discussed before.

R0(single asset) = mean(R of the asset)

Now that we have net expected Return for each of N assets, the net returns of the Portfolio as a combination of all the assets is simply the weighted average. Its obvious, isn’t it? Return is a linear quantity.
So if W1, W2, W3,..Wn are the weights of investment done in each of the Assets, the Portfolio Return (π) is,

π = mean(W.R) ∀ N assets.

Pretty easy right? Now, what would be the risk of entire Portfolio. Weighted average of the individual asset risks? NO!
Remember, risk isn’t a linear quantity plus, the net risk of entire Portfolio will also depend on how one asset moves relative to the rest in the Portfolio. Example, it is generally observed that when markets plummet, gold prices soar (because gold is universal in its value, and people trust it more than cash). Hence if the equities in your Portfolio go down, the gold will rise. We can see a co-dependence of assets with each other, which will also influence the risk of the entire Portfolio.
Hence mathematically,

σ(portfolio) = ΣΣ(Wi.Wj.σi.σj.ρij) ∀ i,j in N

where, ρ(i,j) = correlation between ith and jth asset.

The quantity σi.σj.ρij is also called Co-variance, σ(i,j). Now that we’ve understood the parameters of MPT, let’s get into a very easy and beautiful way to analyse portfolios – graphs.

The Risk-Return Space

The best way to understand and portfolios is to plot the risk and return of each portfolio for a variety of weights W1….Wn, and choose the perfect one for your needs. That ‘perfect’ Portfolio would be the one providing the highest return for a given amount of risk. For a 2-Asset portfolio, the risk-return space looks something like this –


Modern Portfolio Theory - Markowitz Model


Look how different correlation values between the assets changes the portfolio curve. This curve is plotted by changing the weights assigned to each Portfolio, W1, W2. where W<1 and W1+W2=1
As the weights are changed, the portfolio return and risk change and hence the curve. One beautiful observation which is the heart of Modern Portfolio Theory, is that as the correlation approaches closer to negative values, the return one can get for a particular amount of risk increases. This is because less the correlation more differently, the assets will move respect to each other and as it turns negative, they essentially would move opposite to each other just like the gold-equity example discussed before.
So far, so good. What happens to the curve when there are more than 2 assets. Now there wouldn’t be a single curve connecting 3 assets as in 2 asset case. This is because for every point on the curve between Asset A and B and Asset B and C, there would be an another portfolio X and Y. Hence the risk-return plot in any case of N>2 will actually be a space and not a simple curve.


The Efficient Frontier


Modern Portfolio Theory - Markowitz Model


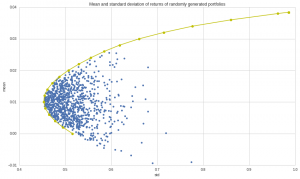
This is an algorithmically generated Portfolio Space for 4 Assets and 1000 different portfolios constructed by altering W1, W2, W3, W4 such that each is less than 1 and sum is 1.

Look at the above space plot carefully. Keeping in mind that one would always be looking to invest in portfolios with a higher return for certain risk. We get a series of portfolios which would be ideal for us if the above condition is considered that is more return for a particular risk. That will be achieved if we invest on any point on a unique curve such that the curve represents the highest possible return for some risk. This curve will be the yellow curve plotted with space. Hence as long as you’re on the upper part of yellow curve, you’re an efficient investor. This curve, as described by the MPT, is termed as the “Efficient Frontier”. The efficient frontier development mathematically is a quadratic convex optimization problem here solved using python’s SciPy library with its convex optimizer. We will, in later blogs, discuss how we can use python to generate this efficient curve along with the portfolio space.

Conclusion

We come to the most beautiful conclusion in the world of Finance. There are a unique set of portfolios which offer you more return for risk as compared to other possible portfolios. Now go back and imagine you being an independent investor having X amount of money wanting to invest in N Assets. Instead of randomly listening to news, people or read articles, you now have trusted mathematical way to construct a perfect portfolio to plan for your dreams.

Hmm. But if this were so easy, everyone would have learnt MPT and made money. But that’s not the case. Probably there are some caveats to it too. This and a lot more in the following blog. Until then keep following CEV Blogs!

RADIOACTIVE FIRE: The Chernobyl Disaster

Reading Time: 8 minutes

On April 26, 1986, a sudden surge of power during a reactor systems test destroyed Unit 4 of the nuclear power station at Chernobyl, Ukraine, in the former Soviet Union.  A nuclear meltdown in one of the reactors caused a fire that sent a plume of radioactive fallout that eventually spread all over Europe. You know how dangerous radioactive materials involved in a fire can be and what they had done to Chernobyl. Let’s find out all these in detail.

RADIOACTIVE MATERIALS

Radioactive materials are any material which contains unstable atoms that emit ionizing radiations as it decays. Radioactive atoms have too much energy. When they spontaneously release their excess energy, they are said to decay. After releasing all their excess energy, the atoms become stable and are no longer radioactive. This radiation can be emitted in the form of positively charged alpha particles, negatively charged beta particles, gamma rays, or x-rays. Radiation is energy given off in the form of rays and high-speed particles.

Fires involving radioactive materials can result in widespread contamination. Radioactive particles can be carried easily by smoke plumes, ventilation systems. Fire in radioactive material is hazardous, and we know that Nuclear Power Plants contain lots of radioactive material. Fire in a Nuclear Power Plant is dangerous as it will result in the release of numerous radiations which is very dangerous for the environment. Most of the radiation released from the failed nuclear reactor is from fission products iodine-131, cesium-134, and cesium-137. Iodine-131 has a relatively short half-life of eight days, but is rapidly ingested through the air and tends to localize in the thyroid gland. Caesium isotopes have longer half-lives (cesium-137 has a half-life of 30 years) and are a concern for years after their release into the environment. Such incidents happened in this world, and the major one was the Chernobyl Nuclear Power Plant Incident. Let’s discover what happened there, and the steps taken.

THE INCIDENT

On April 26, 1986, the Chernobyl power plant located near the city of Pripyat in northern Ukraine became the site of the worst ever nuclear accident. A massive steam explosion destroyed the reactor hall of unit 4, and radioactive material was released, affecting large parts of Ukraine, Belarus and Russia, but also reaching western Europe. On the evening of April 25, 1986, a group of engineers, lacking knowledge in nuclear physics, planned an electrical-engineering experiment on reactor number 4. They thought of experimenting how long turbines would spin and supply power to the main circulating pumps following a loss of main electrical power supply.

CAUSE OF DISASTER

RADIOACTIVE FIRE: The Chernobyl DisasterRADIOACTIVE FIRE: The Chernobyl Disaster

Operators decided to conduct a safety test, which they have timed to coincide with a routine shutdown for maintenance. The test was to determine whether, in the event of power failure, the plant still-spinning turbines can produce enough electricity to keep coolant pumps running during the brief gap before the emergency generators kick in.

To conduct the test reactor number 4’s core cooling system was disabled to keep it from interacting with the test. The reactor had to be stabilized at about 700-1000 MW prior to shut down, but it fell to 5000 MW due to some operational phenomenon. Later the operator committed an error and caused the reactor to go into the near-shutdown state by inserting the reactor control rods, which resulted in the drop of power output to around 30 MW. This low power wasn’t adequate to make the test and will make the reactor unstable. They decided to extract the control rods to restore the power, which was the violation of safety rules due to the positive void co-efficiency of the reactor.  The positive void coefficient is the increasing number of reactivity in a reactor that changes into steam. Extraction of control rods made power to stabilize at 200 MW at which they carried out the test, but the reactors were highly unstable at the lower power level. Even though the engineers continued with the experiment and shut down the turbine engine to see if its inertial spinning would power the reactor’s water pumps, it did not adequately power the water pumps. Without the cooling water, the power level in the reactor surged.

The water pumps started pumping water at a slower rate and them together with the entry to the core of slightly warmer feed water, may have caused boiling (void formation) at the bottom of the core. The void formation, along with xenon burn out, might have increased the power level at the core. The power level was then increased to 530 MW and continued to rise. The fuel elements were ruptured and led to steam generation, which grew the positive void coefficient resulting in high power output.

The high power output alarmed the engineers who pressed the emergency shutdown button and tried to insert all the 200 control rods, which is a conventional procedure done to control the core temperature. But these rods got jammed half the way, because of their graphite tip design. So, before the control rods with their five-meter absorbent material could penetrate the core, 200 graphite tips simultaneously entered the core, which facilitated the reaction to increase.

This ended up in two explosions. The first explosion, to be quickly followed by at least one more, blows the 1,000-ton roof right off the reactor and shoots a fireball high into the night sky. A blackout roils the plant as the air fills with dust and graphite chunks, and radiation begins spewing out.

All the materials such as Fuel, Moderator and Structural materials got eject, starting several fires and the destroyed core got exposed to the atmosphere. In the explosion and ensuing fire, more than 50 tons of radioactive material got released into the atmosphere, where air currents carried it. The blast was 400 times the amount of radioactive materials released at the time of the Hiroshima bombing.

HOW FIRE WAS CONTROLLED??

The firefighters present didn’t have any clue about what they were handling. They believed that they were tackling an ordinary blaze and were wearing no protective clothing. They turned off Reactor 3  immediately followed by reactor 1 and 2. By the next morning, all the fire was extinguished except for a blaze in the reactor 4.

Soviet authorities spooked by the political fallout tried to cover up the scale of the disaster. They even denied any knowledge of the nuclear disaster after Sweden reported radioactive particles in its airspace.

After continuous pumping of radiations into the air, authorities realized that they had to stop.

The radiations coming out were getting dangerous and were needed to stop. Hence, they used Boron because of its property to absorb neutrons so it would effectively end the fire by neutralizing the uranium atoms shot about at random. With the help of helicopters, they dumped more than 5,000 metric tons of sand, clay and Boron onto the burning, exposed reactor no. 4.

The helicopters used to dump the load struggled as they were not allowed to fly directly above the open reactor.

RADIOACTIVE FIRE: The Chernobyl Disaster

While the fire got suppressed, the authorities came up with a more significant problem of a nuclear meltdown due to overheating.

Half of Europe was in the danger of getting wiped out as the core was melted and was reacting with the groundwater underneath the plant, this would have caused a second, bigger explosion.

Three volunteer divers were sent into the depths of the power plant to open valves that would drain the water To prevent the second explosion. In this way, the big bang got restricted.

But 400 miners also had to be brought in to dig underneath the power plant and install a cooling system as the groundwater was still contaminated.

The heroes completed their work, knowing they were being exposed to radiation poisoning, in just six weeks despite a three-month project projection.

The efforts of all involved saved millions of lives.

WHY BORON AND SAND?

Exposing a burning nuclear core to the air is a problem on at least two levels.

First was an ongoing nuclear fission reaction. Uranium fires off neutrons which are slamming into other atoms and splitting them, releasing more energy yet and feeding the whole hot mess. The second problem was the presence of an assortment of types of relatively lightweight elements that form when uranium atoms split in the fire coming right out of a nuclear reactor which was very dangerous for the human body.

The sand was to smother the exposed reactor, squelching that deadly smoke plume.

Boron is one of the few elements to possess nuclear properties, which warrant its consideration as neutron absorber material. Due to its atomic structure, it’s sort of neutron-thirsty. So the plan was to dump enough boron on the exposed reactor, and it would absorb so many of those wildly firing neutrons that the reaction would stop.

In Chernobyl’s case, however, dumping the boron and other neutron absorbers onto the reactor turned out not to work as helicopters were not allowed to fly directly above the open nuclear reactor.

WHY NOT WATER?

As the molten metal was present inside the reactor, it oxidises in contact with water, stripping oxygen from the water molecule and leaving free hydrogen. Hydrogen could mix with air and explode. That’s why divers were sent into the depth of the power plant to open valves which drains out the underground water.

WHAT WOULD WE DO TODAY?

The modern-day nuclear reactors are much less likely than Chernobyl to encounter any sort of disaster. They will never run as hot and operate in sturdier vessels. The buildings themselves are designed to do much of the work to squelch a nuclear reactor fire and a radioactive plume. Modern-day reactors are equipped with chemical sprays that can flood the reactor buildings and will take the isotopes out of the air before they can escape. Unlike the Chernobyl, nuclear facilities are entirely enclosed in sealed structures of cement and rebar. These structures are so strong that even the jet crash won’t affect them, and it wouldn’t expose the core.

Emergency handbooks are present for each nuclear power plant laying out information of what responders should do in the events of all sorts of somewhat- plausible to highly unlikely emergencies. As soon as the reactor fails to shut down normally, lots of boron is to be shovelled into the core.

RADIOACTIVE FIRE: The Chernobyl Disaster

CONCLUSION

The accident at the Chernobyl nuclear power plant in 1986 was a tragic event for its victims, and those most affected suffered significant hardship. The leading cause of the disaster was the technical flaws in the process of Steam Turbine Test and low safety measures taken during the test. Due to radiation emission from the reactor, several problems related to human beings and the environment. Dumping boron was a good idea, but they were not able to find a better way to drop it. Fighting a fire on an exposed uranium core will always come down to more or less fancy versions of dumping boron and sand.

REFERENCES

  1.  International Journals of Advanced Research in Computer Science and Software Engineering ISSN: 2277-128X (Volume-8, Issue-2)
  2. https://www.livescience.com/65515-chernobyl-in-modern-times-nuclear-emergency.html
  3.  Mikhail Balonov, Malcolm Crick and Didier Louvat, Update of Impacts of the Chernobyl Accident: Assessments of the Chernobyl Forum (2003-2005) and UNSCEAR (2005-2008)
  4. INSAG-7, The Chernobyl Accident: Updating of INSAG-1, A report by the International Nuclear Safety Advisory Group, International Atomic Energy Agency, Safety Series No. 75-INSAG-7, 1992, (ISBN: 9201046928)
  5. https://www.ebrd.com/what-we-do/sectors/nuclear-safety/chernobyl-overview.html
  6. http://www.unscear.org/unscear/en/chernobyl.html
  7. United Nations Scientific Committee on the Effects of Atomic Radiation – Chernobyl
  8. https://www.nrc.gov/reading-rm/doc-collections/fact-sheets/chernobyl-bg.html
  9. https://www.livescience.com/39961-chernobyl.html
  10. https://inis.iaea.org/collection/NCLCollectionStore/_Public/12/627/12627520.pdf

HTML Canvas Games from Scratch #2

Reading Time: 7 minutes

Hey folks!🎮
So in the previous post I tried to lay a foundation to start understanding canvas. I hope that by now you are a bit comfortable with it. So in the previous post we saw:

  • File structure and boilerplate📁
  • Some important javascript functions for drawing✏️
  • Defining a particle and drawing it on the canvas (hope you remember atom😉)
  • requestAnimationFrame()🔄
  • One and two dimensional uniform motion of the particle🏃
  • Gaining control over the Math.random() function🎲

Phase 2

Till now we were have worked with one particle, but that’s not how games are right? At least most of them. Handling multiple particles is not as tough as you might think. Let’s see how its done!
First of all, will the object definition of the particle change?
Well, it depends on the properties of these particles.
(We will see this later on)

Let us continue with the same particle definition that we previously used:

var particle = function(x,y,radius){
   this.x = x;
   this.y = y;
   this.radius = radius;
}

Now instead of defining one particle, let us define an array of particles:

var particleArray = new Array();

Let us now define 50 particles with random positions on the screen. But what are the dimensions of the screen?
We already have :

  • window.innerWidth
  • window.innerHeight

So the coordinates of the screen will be in the range:

  • X : 0 – window.innerWidth
  • Y : 0 – window.innerHeight

So the code goes like this :

var totalParticles = 50;         //number of particles 
var maxRadius = 30;               //maximum value of radius   

var particle = function(x,y,radius){
    this.x = x;
    this.y = y;
    this.radius = radius;
}

var particleArray = new Array(); //array of particles        
var i;                          //loop variable 

for(i = 0 ; i < totalParticles ; i++) {
    //Defining properties of the particle
    var xcoord = Math.random()*window.innerWidth;
    var ycoord = Math.random()*window.innerHeight;
    var rad = Math.random()*maxRadius;
    
    //New particle with above properties
    var tempParticle = new particle(xcoord,ycoord,rad);   
    
    //Push tempParticle into the array
    particleArray.push(tempParticle);       
}

I’ve tried to keep the code readable and obvious. Just read it and you should understand what is happening.
What’s left? Let us draw these particles on the canvas!
Just add the following code :

c.fillStyle = 'aqua';
//Drawing the particles
for(i = 0 ; i < totalParticles ; i++ ){
    c.beginPath();
    c.arc(particleArray[i].x,particleArray[i].y,particleArray[i].radius,0, Math.PI*2,false);
    c.closePath();
    c.fill();
}

Result:

HTML Canvas Games from Scratch #2

Here’s the source code : Code link
Location in repository : \Phase 2\ParticleArray

Note : On refreshing the page you will find a new configuration everytime.
Also we haven’t used the requestAnimationFrame() function as we just wanted static particles as of now.

What next? Let us give all the particles some random velocities🚀.
We need to add two properties for the particle object “x velocity” and “y velocity“:

var particle = function(x,y,vx,vy,radius){
this.x = x;
this.y = y;
this.vx = vx;              //x vel
this.vy = vy;              //y vel
this.radius = radius;
}

Now since we have added new properties for this object, we must also define its values for all the defined instances.

Wait, did I just go too hard on you?😝

Ok let me reframe that:
Since we added two new properties to the particle object, we also need to give the value of these properties for all the particles that are stored in the array.
So inside the for loop in which we are defining and adding particles to the array :

{
    ...
    ...
    var xvel = Math.random()*6 - 3;
    var yvel = Math.random()*6 - 3;
    ...
    var tempParticle = new particle(xcoord,ycoord,xvel,yvel,rad);
    ...
    ...
}

Try figuring out the range of (xvel, yvel).

Now we are ready with particles and their velocities. Lets start drawing them on the canvas. This time we will use requestAnimationFrame():

c.fillStyle = 'aqua';        //define fillStyle
function draw(){
    //Clears the entire canvas
    c.clearRect(0,0,window.innerWidth,window.innerHeight);     

    //Update the value of the coordinates (according to velocity)
    for(i = 0 ; i < totalParticles ; i++ ){
        particleArray[i].x += particleArray[i].vx;
        particleArray[i].y += particleArray[i].vy;
    }

    //Drawing the particles
    for(i = 0 ; i < totalParticles ; i++ ){
        c.beginPath();
        c.arc(particleArray[i].x,particleArray[i].y,particleArray[i].radius,0, Math.PI*2,false);
        c.closePath();
        c.fill();
    }

    requestAnimationFrame(draw);
}
draw();

Result :

HTML Canvas Games from Scratch #2

Here’s the source code : Code link

Location in repository : \Phase 2\ParticleArrayMoving

It must be noted that the particles will soon disappear leaving a black screen. The reason being that the canvas extends infinitely, we just get to see a part which our window can capture.
To confine the particles to our window, we must make the window act as a box 🔳. Particles must collide and bounce back inside like this:

HTML Canvas Games from Scratch #2

These conditions are to be taken care of every time before drawing the particles. Let us code them:

//Checking for collison with walls
for(i = 0 ; i < totalParticles ; i++ ){
        
        if(particleArray[i].x > window.innerWidth || particleArray[i].x < 0)
            particleArray[i].vx*=-1; 
        
        if(particleArray[i].y > window.innerHeight || particleArray[i].y < 0)
            particleArray[i].vy*=-1; 
    }

Result :

HTML Canvas Games from Scratch #2

Here’s the source code : Code link
Location in repository : \Phase 2\ParticleArrayMovingCollisions

Notice the particles bouncing off the edges.

Practice Sesh💻 : You can try giving a different color to all the particles. You can also try to making all the particles twinkle/shimmer✨, by changing its opacity (the ‘a‘ in rgba).

Solutions to these : Link to code

Location in repository : \Phase 2\Practice Sesh

Interacting with the canvas:

Yes, chill❄️. It is possible. Obviously. Who would call it a game otherwise?
Let us talk about the addEventListener() method. As the name suggests, it simple listens to events. Events in this case are keyboard inputs, mouse clicks , changes in mouse movements etc.

Syntax:

window.addEventListener(Event,Function,useCapture);

Event : An event is nothing but a trigger. It is used to execute a coded response. Eg : click , onmousedown , onkeypress , onkeyup etc. (Know more..)
Function: This is the function that is to be called when that specific event occurs. It is defined somewhere in the code.
useCapture : This is either true or false. It is optional. It is used to define whether the event should be executed in the Bubbling or Capturing phase (it is not important right now, though you can read more here). By default it is false.

Lets start with the most basic event and response :
For this you will need the javascript code where we had just 1 static particle.(try to write this code yourself once)
Source code : Code link
Location in repository : \Phase 1\Atom Particle
Just remove the line of code used to increment the speed. Thus getting us a static particle.
Now let us add a simple mouse click event : (append this snippet at the end of the code.js file)

window.addEventListener("click", move , false); //define event listener

function move(e)            //response function                                              
{
    atom.x = e.x;            //update x coordinate of atom        
    atom.y = e.y;            //update y coordinate of atom
}

What is ‘e’ ?
e here represents the event, and the event here is click. It must be passed as a parameter to the function.
Every event has specific properties. For this click event, we have properties x and y which represent the coordinates of the cursor on clicking.

Coming back to the code, the function replaces coordinates of atom with the coordinates of the cursor. Thus moving it to the click position.
Check it out yourself.
Source code : Code link
Location in repository : \Phase 2\ParticleCanvasInteraction

Similarly, let us make atom move left , right, up and down with the arrow keys.
So this is what we need :

  • On pushing down an arrow key the particle should move.
  • On releasing the key the particle should stop its movement.

We will use the keydown and keyup events.
This even has a specific property called keyCode. Every key on the keyboard has a different keyCode. The keyCode values of arrow keys are :

  • Left : 37
  • Up : 38
  • Right : 39
  • Down : 40

Let us define a boolean array called “keys” which will hold true for all those keyCodes which are pressed.
Also we will need two event listeners, one that will check for keys pressed and the other that will check for keys released.

var keys = [];         
window.addEventListener("keydown",keyPressed,false); //keydown listener
window.addEventListener("keyup",keyReleased,false);      //keyup listener

function keyPressed(e){             //sets value true when key pressed 
    keys[e.keyCode] = true;
}
function keyReleased(e){            //sets value false when key released
    keys[e.keyCode] = false;
}

Its not done yet. We need to make required adjustments in the draw() function, the effect of key presses on the coordinates :

function draw(){
..
..
    if(keys[37])                //if left is true
        atom.x-=xspeed;         //move left by xspeed
    else if(keys[39])         //else if right is true
        atom.x+=xspeed;         //move right by xspeed

    if(keys[38])                //if up is true
        atom.y-=yspeed;         //move up by yspeed
    else if(keys[40])         //else if down is true
        atom.y+=yspeed;         //move down by yspeed
..
..
}

Note : These are grouped this way because Up and Down cannot function together, and Left and Right cannot function together.


Also don’t forget to define xspeed and yspeed outside the draw function.

Result :
HTML Canvas Games from Scratch #2
Source code : Code link
Location in repository : \Phase2\ParticleCanvasInteractionKeyboard

Now its your turn to play around with a few more such events.

Other things you can try :

  • Bound the motion of this particle to the box
  • Comment out the clearRect() function and see the output
  • Use the fillRect() function with black colour but opacity less than 1, instead of clearRect(). (Will give a nice trail effect)

This is all for this post. Till here I have covered everything it takes to create the game that I made. Now all we have to do is combine all this logic in one file ❗
In my opinion you may also start creating the game yourself, or try making some other game maybe ping-pong, flappy bird, snakes etc.

Do leave comments/suggestions (if any).
Cheers!🍭

Written by : Jay Rathod💻
Links : Portfolio | Github | Codepen | Linkedin | Instagram

THE VALUE OF MONEY

Reading Time: 4 minutes


Here we will be discussing how much our money is worth and the factors which decide its value and quantity available in the market.

Table of Contents-

  • Liquidity
  • Factors involved
  • Forex Market
  • History
  • Inflation
  • References

The common forms of money are cash, digital wallets, and cryptocurrency. Money is the most liquid asset available today; Liquidity is the ease with which we can trade our assets for goods and commodities. Other assets are not as liquid as money. For example, if you want to buy a refrigerator with the help of gold first, you will need to trade it for its equivalent amount of cash. Then with that cash, you will be able to buy that refrigerator, and most commodities available for sale today can easily be purchased with the help of money.

Now coming back to the topic:-

The value of money is determined by the demand for it, just like the value of goods and services. There are three ways to measure the value of the dollar. The first is how much the dollar will buy in foreign currencies. That’s what the exchange rate measures. Forex traders on the foreign exchange market determine exchange rates. They take into account supply and demand, and then factor in their expectations for the future.

 THE VALUE OF MONEY

For this reason, the value of money fluctuates throughout the trading day. The second method is the value of Treasury notes. They can be converted easily into dollars through the secondary market for Treasurys.

The third way is through foreign exchange reserves. That is the number of dollars held by foreign governments. The more they hold, the lower the supply. That makes U.S. money more valuable. If foreign governments were to sell all their dollar and Treasury holdings, the dollar would collapse. U.S. money would be worth a lot less.


What Is the Forex Market?

The foreign exchange market is where currencies are traded. Currencies are essential to most people around the world, whether they realize it or not because currencies need to be exchanged to conduct foreign trade and business. If you are living in the U.S. and want to buy cheese from France, either you or the company that you purchase the cheese from has to pay the French for the cheese in euros (EUR). This means that the U.S. importer would have to exchange the equivalent value of U.S. dollars (USD) into euros. The same goes for traveling. A French tourist in Egypt can’t pay in euros to see the pyramids because it’s not the locally accepted currency. As such, the tourist has to exchange the euros for the local currency, in this case, the Egyptian pound, at the current exchange rate.

THE VALUE OF MONEY

History of Purchasing Power

Until 1971 the dollar’s worth was measured against gold. Still, in 1971 that law was abolished. With that, it was no longer estimated with gold reserves, and soon after that, multiple countries followed the same. Nowadays, most of the valuable currencies are not depend on those countries’ gold reserves. The factors which decide its worth also include inflation, monetary policy, and other economic and political factors.

In India, we use the same measures to decide how much currency should be released in the market so that sufficient economic growth is achieved and a 2% rate of inflation is assumed to be necessary and safe for sustainable economic development. The Reserve bank of India has the authority to issue currency. The current system of the Indian government to issue notes is the “Minimum Reserve System.” Under this policy, the minimum reserves to be maintained in the form of gold and foreign exchange should consist of rupees 200 crores. Out of this reserve, the value of gold to be maintained is rupees 115 crores. This system was introduced in 1956, replacing the proportional reserve system, and continues to date. 

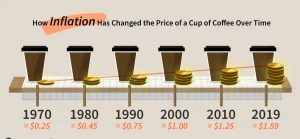
Inflation is a quantitative measure of the rate at which the average price level of a basket of selected goods and services in an economy increases over a while. It is the rise in the general level of prices where a unit of currency effectively buys less than it did in prior periods. Often expressed as a percentage, inflation thus indicates a decrease in the purchasing power of a nation’s currency.

THE VALUE OF MONEY

As prices rise, a single unit of currency loses value as it buys fewer goods and services. This loss of purchasing power impacts the general cost of living for the common public, which ultimately leads to a deceleration in economic growth. The consensus view among economists is that sustained inflation occurs when a nation’s money supply growth outpaces economic growth.

In other words, if we print cash more than which is required and then release it into the market, it will lose its value, and if yesterday we were able to buy some commodity for five units of currency after inflation it may be possible that even 500 units of currency will be able to buy that same commodity


The Bottom Line

Because of inflation, your cash today is worth more than it will be in the future. But the day-to-day value of money fluctuates as well because of the volume of demand for it.


References:

  • Investopedia

     https://www.investopedia.com/terms/i/inflation.asp

Thanks for reading, and will feel appreciated if followed by questions?

By Hemant Karanjkar

Keep reading, Keep learning

TEAM CEV!!!!


HTML Canvas Games from Scratch #1

Reading Time: 7 minutes

Hey there! This is my first blog about HTML Canvas Game Dev video_game.
There are a lot of other tools and libraries available for game dev which are easier to use, but canvas remains my favorite as it takes us to the root of how to code game physics. It is also a great way for beginners to get a good grip on Javascript (speaking from experience).
Thanks to my friend Ronik Gandhi <@rawnix> for introducing me with canvas.

At the end of this series you will be able to build a basic 2D game on your own.

In this series I will walk you through the steps to build a classic Space Invaderspace_invader game which I named SPACE-X.

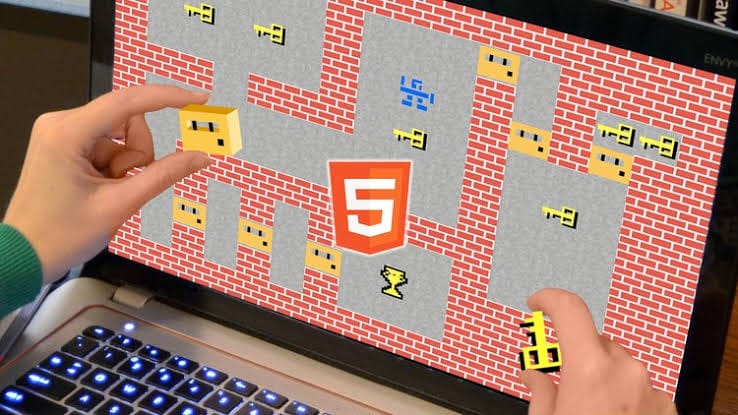
It will look like this.

Do star star my repo (https://github.com/jrathod9/Space-X) if you liked the game.

Let's get started rocket

[Note: We will be creating games for pc only. They won't be responsive.]

Basic Files and Boilerplate

📦Space-X  
┣ 📂assets  
┃ ┣ 📂Images  
┃ ┗ 📂audio  
┣ 📜index.html  
┗ 📜code.js  

Get these folders and files ready. As of now we won't be using any assets, we will instead use javascript functions to create shapes.

This game without any images can be played [here] https://codepen.io/jrathod9/full/jXwMWQ

The index.html file will look something like :

<!DOCTYPE html>  
<html>  
<head>  
<title>Space-X</title>  
</head>  
<body>  
<canvas id="canvas" style="background-color: black"></canvas>  
</body>  
<script type="text/javascript" src="code.js"></script>  
</html>  

This index.html file consists of a canvas tag which is present inside the body tag.
There will be no more changes to this. Rest of the coding will be done in the code.js file.
The code.js file is linked after the closing body tag.

The code.js file will look something like:

var canvas = document.querySelector('#canvas');  
var c = canvas.getContext('2d');  
canvas.width = window.innerWidth;  
canvas.height = window.innerHeight;  
  • The querySelector() method returns the first element that matches a specified CSS selector(s) in the document.
  • The getContext() method returns an object that provides methods and properties to draw on the canvas. In this case since '2d' is mentioned, we can draw text, lines, rectangles, circles etc.
  • Next we set the height and width of the canvas equal to the device window's height and width device (this can be changed according to your preference).

Now we are all set to begin coding the game!

Clone/Download this repository before beginning for all the source code.

Phase 1

In this phase we will be working with particles and particle physics.
It is important to keep this in mind that the coordinate system of the canvas is laid down such that the origin is at top left corner of the screen :

https://processing.org/tutorials/drawing/imgs/drawing-05.svg

Before getting your hands dirty, these are some important methods you should be familiar with to draw on a canvas:

c.clearRect(x1,y1,x2,y2); //clears the canvas inside this rectangular area  
c.beginPath(); //Used to begin drawing a shape  
c.closePath(); //Used to finish drawing a shape  
c.fillStyle = 'red'; //Defines color to be filled in the shapes  
c.fillStyle = '#ffffff'; //rgb,rgba and hex formats are also allowed  
c.fillStyle = 'rgb(12,243,32)';  
c.fillStyle = 'rgba(233,12,32,0.4)';//'a' is used to define opacity  
c.fill(); //Fills color  
c.strokeStyle = 'red'; ` //Defines stroke color (rgb,rgba,hex)  
c.stroke(); //Strokes the boundary or the figure  
c.font = "50px Calibri"; //Defines font properties of text  
c.fillText("text" , x, y); //Writes text,top left of text is at (x,y)  
c.arc(centerx,centery,radius, //Creates an arc with given properties  
start angle in radian ,  
ending angle in rad ,  
counterclockwise true or false);  
c.moveTo(x,y); //Moves context cursor to (x,y)  
c.lineTo(x,y); //Draws line from current context cursor coordinate to (x,y)  

NOTE : It is better to use beginPath() and closePath() separately for each connected figure.

A few sample code snippets: Code Link

Location in repository: \Phase 1\Sample Code

https://github.com/jrathod9/Making-of-Space-X-/blob/master/Phase%201/Sample%20Code/codesnippetexamples.png?raw=true)

Try playing around with the code a little to get a better understanding of the working.
Also it takes time to get used to the syntax of these functions, so hands-on practice is the only solution.

Now let us try to code a particle in canvas.
Consider a particle object in a two dimensional plane. It will have properties:

  • X Coordinate
  • Y Coordinate
  • Radius

It is considered that the particle is a circle.
This is how we can represent the same in javascript :

var particle = function(x,y,radius){  
this.x = x;  
this.y = y;  
this.radius = radius;  
//'this' refers to the owner object, i.e. an instance of particle  
}  

The above code defines an object type which is like a datatype , specifically it is a user-defined datatype. That means, now we can create variables of this type.
Lets create one named "atom".

var atom = new particle(100,100,30);  

This line creates a particle which can be referred with the variable "atom". It has the coordinates (100,100) and its radius is 50, but we still cannot see it on the canvas.

Note : All quantities are to be considered in 'pixels'.

Let us bring it to life by drawing it.

c.beginPath();  
c.fillStyle = 'aqua';  
c.arc(atom.x,atom.y,atom.radius,0, Math.PI*2,false);  
c.closePath();  
c.fill();  

It is now drawn on the canvas. But now what if you want to set it in motion let us say to the right ?
You need a continuous loop in which:

  • Canvas is cleared
  • X coordinate of atom is incremented
  • Atom is re-rendered on the canvas

The continuous loop is generated using the requestAnimationFrame() method.
The requestAnimationFrame() method calls the function, which is passed as a parameter, 60 times in one second. So now, we need a function for repetitive calling. Let us call this function 'draw' :

var xspeed = 1; //Define x direction speed  
function draw(){  
//Clears the entire canvas  
c.clearRect(0,0,window.innerWidth,window.innerHeight);  
  
//Update x coordinate  
atom.x += speed;  
  
//Drawing the particle  
c.beginPath();  
c.fillStyle = 'aqua';  
c.arc(atom.x,atom.y,atom.radius,0, Math.PI*2,false);  
c.closePath();  
c.fill();  
  
requestAnimationFrame(draw); //Called inside the function  
}  
draw(); //Initial function call  

Result :
https://github.com/jrathod9/Making-of-Space-X-/blob/master/Phase%201/Atom%20Particle/MovingAtom.gif?raw=true In every consecutive function call, x coordinate of atom is incremented by the value of xspeed variable. To increase the speed, increase the value of xspeed.
Here is the source code : Code link

Location in repository : \Phase 1\Atom Particle

Similarly if you introduce a variable yspeed, which updates the y coordinate of atom, it will lead to a uniform straight line motion in the 2d plane.

...  
...  
var yspeed = 2;  
function draw(){  
atom.y += yspeed;  
...  
...  
}  
draw();  

Result:

https://github.com/jrathod9/Making-of-Space-X-/blob/master/Phase%201/Atom%20Particle/MovingAtom2d.gif?raw=true

Javascript Math.random() function :

This deserves a separate section as it is very important to understand the working of the random function and how to control it. This function will be used very often in games for example:

  • To spawn new enemies at random locations
  • To spawn random powerups at random locations
  • To give random moving directions to objects etc.

Syntax:

var x = Math.random();  

x gets assigned a random float value between 0 and 1 .

Note: value is inclusive of 0 but not 1.

Few outputs of the random function:

  • 0.1882848343757757
  • 0.3605824495503056
  • 0.04217502958085739

How to get a random number between 0 and 1000?

var x = Math.random()*1000;  

This still gives a float value. For integer values:

var x = Math.ceil(Math.random()*1000);  
//Output: integer between 0 to 1000 both inclusive  

Math.ceil() function rounds a number up to the next largest whole number or integer.
There is another function called Math.floor() which returns the largest integer less than or equal to a given number.

Note : Lower bound is still 0.

How to get a random number between 500 and 1000?

var x = Math.ceil(Math.random()*500) + 500;  

Here initially Math.ceil(Math.random()*500) function returns values between {0,500} , thus on adding 500 to this range we get the new range {500,1000}.

How to get a negative range lets say -250 to 350?

var x = Math.ceil(Math.random()*500) - 250;  

If you aren't able to figure out how, try finding individual outputs of all the functions in the code one at a time.

This is all for this blog, in the next blog we shall see:

  • How to handle multiple particles
  • Random function in action
  • Collisions
  • Controlling the objects through user input

Written by : Jay Rathodcomputer
Links : Portfolio | GitHub | Codepen | LinkedIn | Instagram

Day19 – “Why?” & “What in?” Security & Blockchain?

Reading Time: 4 minutes

author: aman

Blog VII - Part I - Day 19

So, towards an end of this series.

I was quite busy in some other blog so couldn't write this one quickly.

In this blog I'll take up a case of a Security tool used in Ethereum Smart Contract bug discovery, ECHIDNA. I'll try to unwrap a few things about how a security can be used to analyse a "script", that governs the business of an organistion over Blockchain network. I'll try to cover almost everything taught last time in these 2 upcoming micro-blogs.

Let's take a look what's coming up...

In this micro-blog

  • One thing you can't believe in...
  • Fuzzer
  • Echidna
  • the Trail
One thing you can't believe in...

You might be having this strong image of BLOCKCHAIN, that a fraudulent transaction in a Blockchain cannot be reversed. Well...what is I say, it is actually inaccurate.

One of the famous article in MIT Technology Review, by Mike Orcutt, titled as "Once hailed as unhackable, blockchains are now getting hacked", stated the following:

"Blockchains are particularly attractive to thieves because fraudulent transactions can’t be reversed as they can be in the traditional financial system."

The statement is actually inaccurate!

Ethereum classic is an example to it. Remember, I've told you people before about the famous DAO attack. The had a massive $50 million money heist. Well the attacker is still a mystery.

The funds stuck until July 14, 2016. See the article. The possibility of attack was due to a vulnerable smart contract, that governs the functioning of DAO.

This was the problem until the Ethereum Chain was forked, after a long debate among the community. The transaction was rewritten in the new chain and now there exists 2 ethereum chain. One, that we use now, and where the DAO attack never happened. The other one, Ethereum Classic, where the DAO attack happened.

This is a note published by Vitalik Buterin, the founder of Ethereum Blockchain.

Strange!! yeah...?

Lets try to know about something which is used as a help to "not" get into such troubles...

Fuzzer

Prevention is better than cure! Since, every crucial thing from a developer side depends on how well the contracts are written. If the contract does not release any possibility of attack, any loopholes of information leakage, the contract is probably secure.

Just like normal computer programs, there exists this old and always alive Computer Science (we may call it fundamental though). Analysing the programs statically and in dynamic environments to detect the bugs that can be triggered or are automatically getting triggered.

There are several techniques to anlayse a program. Symbolic analysis, Dynamic Analysis, Model Checking, Fuzzing...

There had been a lot of Security Tools in development recently. Here is a sophisticated list of all, in the official listings of CONSENSYS.link

I will talk a bit about the only fuzzer system available for Smart Contract Analysis, by an Argentanian company TrailofBits. The tool is known as ECHIDNA.

Bonus excerpt(link)

ECHIDNA

day19_01 **pretty logo! isn't it?

ECHIDNA, is a property-based fuzzer system available for generating malicious inputs and break the smart contracts. It means, we write a certain property(like the one a system should "always" follow, or should "never" follow), and the system runs it on a local virtual machine, which is inbuilt with the tool. The system starts fuzzing. i.e. inputting the contract with random inputs, to check where the system fails the written property. These inputs are determined by input generation techniques, which are certainly in "possible limits" tha EVM can handle, and are not that arbitrary.

The tool is written in HASKELL, which is a FUNCTIONAL PROGRAMMING LANGUAGES, which you probably have never heard about. This means the code is short and does a lot. To give a intuitive brief, the Functional programming language are actually concerned about "What the thing is?" rather than "How the thing works?". Most of the SAT/SMT solvers, that I have talked about before are built over functional programming languages.

How ECHIDNA works? from user's point of view You write a smart contract with certain invariants(the property you think should never change and the smart contract should always follow). Then you run that within the system.

the Trail

After discussing all this... you must have got a great idea about what is actually going out around the world.

The next blog will be a very special Connect the dots... thing. Will have no technical knowledge.

I will just cover the things I & the 2 guests Kaushik & Gaurav has compiled for you people.

Will finally unveil the "The Road Not TAKEN..."

Thanks!!!

Day18 – “Why?” & “What in?” Security & Blockchain?

Reading Time: 5 minutes

Hey guys, in this Blog I will be discussing the Integration of Blockchain with IoT (Internet of Things).

So, let’s proceed with what IoT actually is.

What is Iot?

Internet of things is an environment of connected physical devices embedded in various systems and accessible on the Internet, thus rendering these devices to become autonomous and can be controlled through their digital representation. The whole idea behind IoT is based on the transfer of data between two physical devices connected over a network and thus based on these data they act, like simulating the temperature of a house as in the case of smart homes, saving your attendance in a database as in for RFID.

Some of the industries and technologies developed on IoT includes smart homes, automotive environment, Healthcare, smart cities, smart grids, smartwatches, banking sector, etc.

perks of iot:

If technology is being used in multiple industries, it is a bit obvious that it should have some edge over the rest. The benefits of IoT are:

  • Communication: As discussed, it enables Machine-to-Machine(M2M) communication over the network on which both of them are connected.
  • Automation with control: Devices are controlled over a centralized wireless infrastructure, thus enhancing automation. This brings out an efficient communication between the devices, leading to output at a greater speed.
  • Monitoring over Information: The amount of data we receive through these IoT devices is enormous and hence it can be used to monitor the efficiency of these devices as well as take the algorithmic decisions more effectively due to this huge dataset.
  • Saves Money: Optimum usage of energy and resources with proper surveillance helps in avoiding possible shutdowns (as in industries), damages or waste of resources.

Thus, the price paid for implementing these IoT devices is very minimal when compared to the benefits it provides.

problems in iot:

“With a great amount of data comes out a greater responsibility to process it safely”.

The IoT network is a centralized one and also contains a large number of devices and involves the application of a huge set of data points, which requires security. This not only expands the attack surface, and hence IoT security and IoT privacy are huge concerns.

A case of such an IoT attack that took place in 2016, in this Mirai (a Botnet) penetrated in the domain name service provider Dyn and performed a DDoS (Denial of Service Attack) for a huge period, as a result, a large number of websites were down. It was achieved as the attackers gained access to this centralized network through the poorly connected IoT devices.

With such a huge vulnerability, it becomes non-practical to implement IoT in industries, Healthcare, or Banking sector where data security and privacy is a major concern. Also, the network is centralized hence the manufacturer, who is the most probable administrator to this can gain access to data. Hacker just has to find one vulnerability to gain access to the network and he will be able to gain control over the entire network.

Blockchain to rescue!!

To extend the properties of decentralization and data encryption to IoT, Blockchain is a major technology

being looked up to. Blockchain can ensure the decentralization of the network thus greatly reducing the

chances of any attacks on the IoT devices on the network. Also, encryption can be achieved at multiple

data entry points. Some of the features that can be added to IoT with the use of Blockchain are:

  • Identity: using a common blockchain network every node can identify all the devices. Data provided to the system is immutable and holds a record of every change in it. Also, the authentication of each device becomes more secure.
  • Scalability: using a blockchain network the fault tolerance and the system scalability also improves.
  • Security: blockchain can be used to secure the data contained in the network as transactions. Here, the data transfer is treated as a transaction that follows the rules set by the Smart Contracts.
  • Autonomy: using Blockchain the interaction of devices is decentralized and hence there are no servers. This makes the deployment of smart autonomous hardware possible for the service.
  • Secure code deployment: the deployment of codes into the devices also becomes more secure with the use of Blockchain. Thus, the developer can be confident that the code running on the device is the one he wrote and not the one by some malicious attacker.

problems in the integration

It’s not very simple to merge the two mentioned technologies which were not designed to work with one another and hence almost all the features that we added above as the benefits have certain restrictions.

Blockchain was made to be operated with much accessible Internet along with a device supporting high computational power which is not a property of IoT devices. Some other problems faced while the integration of the two is:

  • Storage capacity: IoT devices produce a huge amount of data in a real-time application while the blockchains we want to implement perform only a few transactions per sec. Thus, Blockchains are not meant to store this huge amount of data.
  • Security: the security problems at different levels furthermore increase with additional complexity as a result of a large variety of devices. Blockchain ensures the immutability of the data in the chains but cannot detect if the data received is already corrupt due to some hardware failure, environment change, etc. Thus, the IoT devices to be used on the blockchain need to be checked properly to avoid any such probable cause to occur.
  • Anonymity and data privacy: IoT devices that are used in the Healthcare sector or Banking sector deal with many private details and it is important to establish trust for data privacy and anonymity. But the problem of data privacy in IoT devices is complicated than the private and public Blockchain network as it starts with the collection of data and goes up to application level. 

    Hence securing the device requires the integration of security cryptographic software’s which generally harm the resource limitations of devices and hence economic viability.
  • Smart Contracts: the killer application of blockchain technology presents many challenges to IoT technology as they do not fit in IoT applications easily. Validation of these Smart Contracts is compromised if the IoT is not stable. Also accessing multiple data sources can result in overloading these contracts.
  • Consensus: the limited resource in IoT devices makes the PoW consensus unsuitable, there are other proposed consensus mechanisms (PoS, PoU, etc) but these are still not mature enough for their implementation. The initiatives have been taken of implementing full nodes into IoT devices, mining is a big challenge in IoT due to these limitations.


The Hybrid approach, using only a part of the interactions and data takes place in the blockchain and the rest are directly shared between the IoT devices, has been used in fog computation and is being tested for application in other domains, so we can safely say that the possibilities are high. Hope things work out well between the two great technologies.

Day17 – “Why?” & “What in?” Security & Blockchain?

Reading Time: 3 minutes

author: aman

Blog V - Part II - Day 17

Hey People, I have given a gist of how the EVM stores the smart contracts on its machine.

In this I will directly discuss some technical things about, how deep you can dive into using just the information told about in the previoud micro-blog. Will try to give a glimpse, rest you can think of autonomously.

Let's do it...

In this micro-blog

  • Ethereum Virtual Machine (EVM)
  • The two Properties of EVM
  • How the Smart Contracts are actually stored?
  • Some supplementaries
  • These trail of Digits have some meaning
  • How can the attackers mis-use it?
Some supplementaries

I would suggest to open up following things in other tabs, would help you people throughout:

These trail of Digits have some meaning

I will keep this explanation as vague as possible, as we have some people onboard who have excitement about the blockchain, despite their core interests and Fields.

You know right, EVM is a Stack based machine, as 2 + 2 is actually written as 2 2 +, postfix notation.

If you break this "strange series of digits", 608060405234801561001057600080fd5b5060016000819055506......

according to as shown in ethervm.io tab.

Day17 - "Why?" & "What in?" Security & Blockchain?

EVM is a stack-based machine and for actions to happend on this machine, these trails are converted into the OPCODES.

Each OPCODE has a size of 1 byte. EVM has a set of 140 OPCODES in total

Byte Count BYTCODE OPCODE
0000 60 PUSH1 0x80
0002 60 PUSH1 0x40
0004 52 MSTORE
0005 34 CALLVALUE
0006 80 DUP1
0007 15 ISZERO
0008 61 PUSH2 0x0010
.... ...... ....
.... ...... ....
.... ...... ....

Now, you understand how this thing works in EVM Stack? It would be infeasible to explain here how does a stack work. You better watch a video here call stacks & a big blog series here

If you are wondering how can you find the contract with that data? Well...just try copying pasting the following BYTECODE, and decompile in the ethervm.io/decompile, you'll find the same contract as was written in the previoud micro-blog simpleContract.sol.

608060405234801561001057600080fd5b50600160008190555060c6806100276000396000f3fe6080604052348015600f57600080fd5b506004361060325760003560e01c806360fe47b11460375780636d4ce63c146062575b600080fd5b606060048036036020811015604b57600080fd5b8101908080359060200190929190505050607e565b005b60686088565b6040518082815260200191505060405180910390f35b8060008190555050565b6000805490509056fea265627a7a723158200e135b4c7bcf7bde9dca1f257d97637d8137b315e29248b5654ac7830dab9e8264736f6c63430005100032
How can the attackers mis-use it?

The level of publicity, Blockchain provides, any user can directly use the address of the contract deployed, to instatiate a variable of that, contract and call its various function.

This is not small, this can let the potential attackers exploit the contract and cause big-attacks like, DAO-Reentrancy attack, or DDoS Gas attack, explained in the previous blogs.

As I have told, these work as the fill in the blanks, the vacant spaces within the Bytecode are initiated by 0 , which is then replaced by the hexadec code of the input.

This contract is again deployed to replace the existing one, changing the current state of the contract.

The Internal checks verifies whether you are the authorised one to make a certain check or not.

IG, This concept is heavily used in off-chains, as well.

====================

Find deeper readings here

CEV - Handout